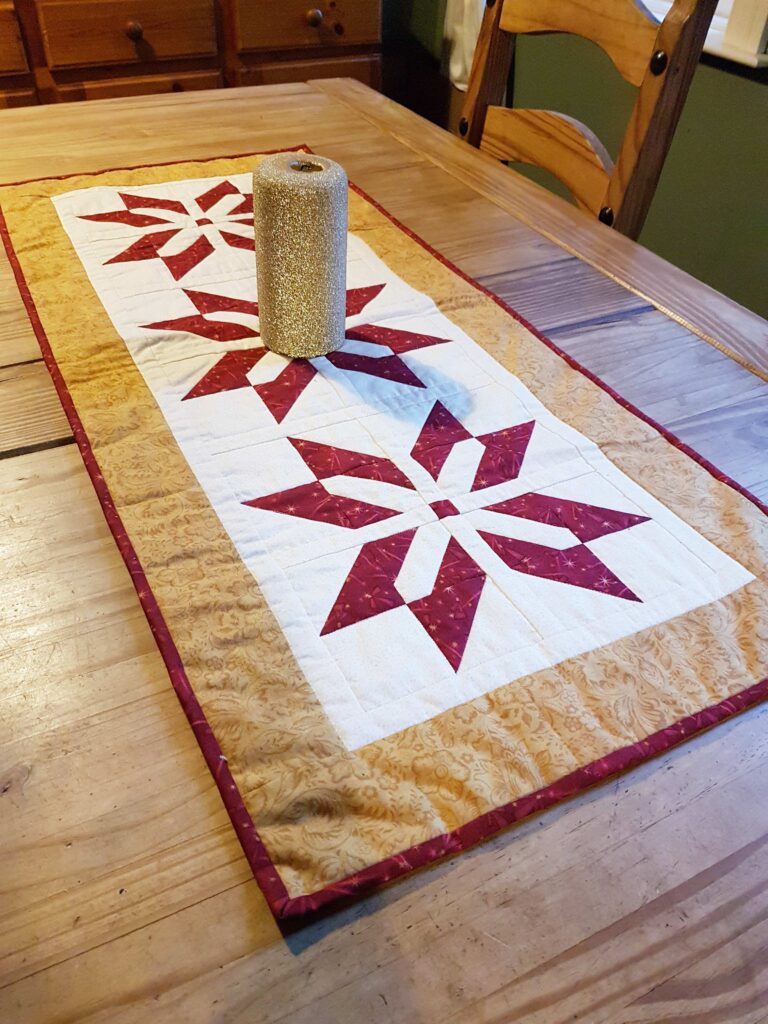
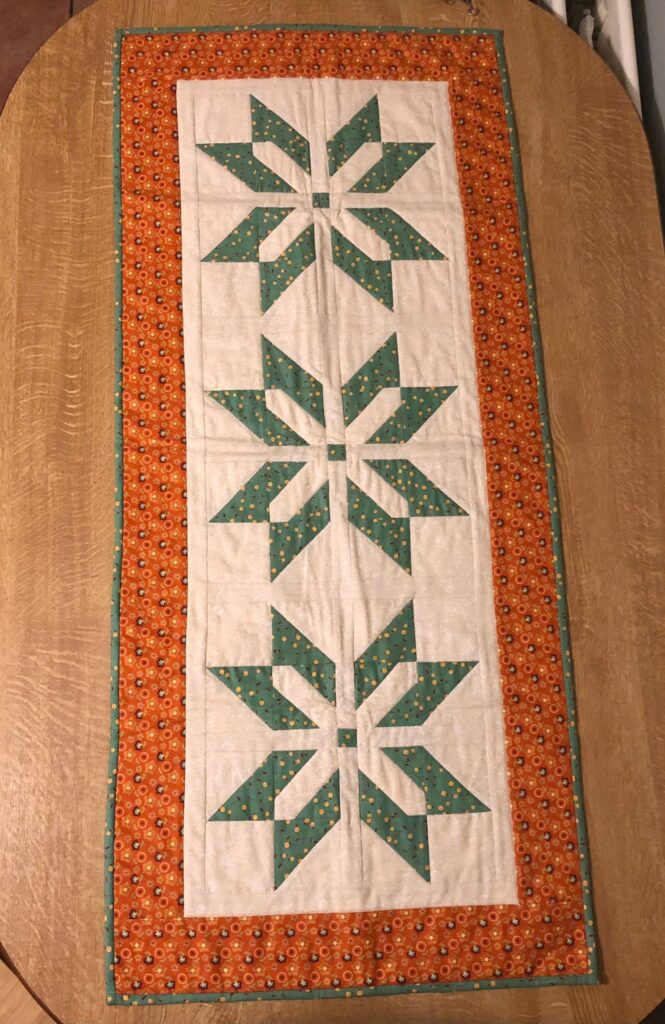
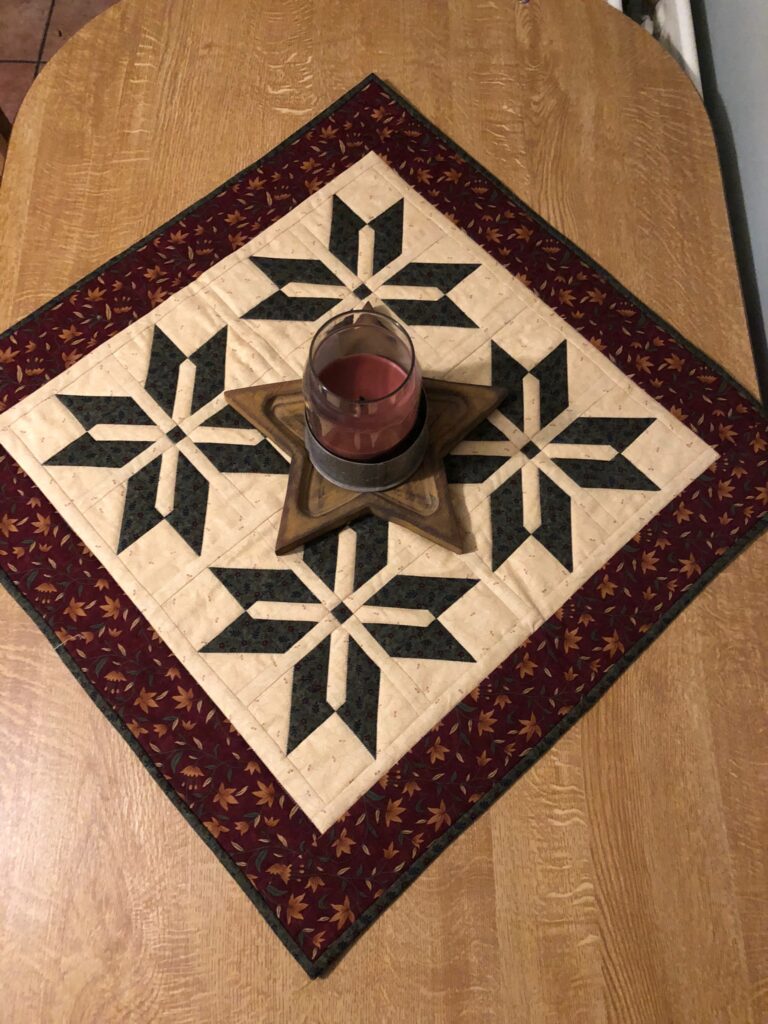
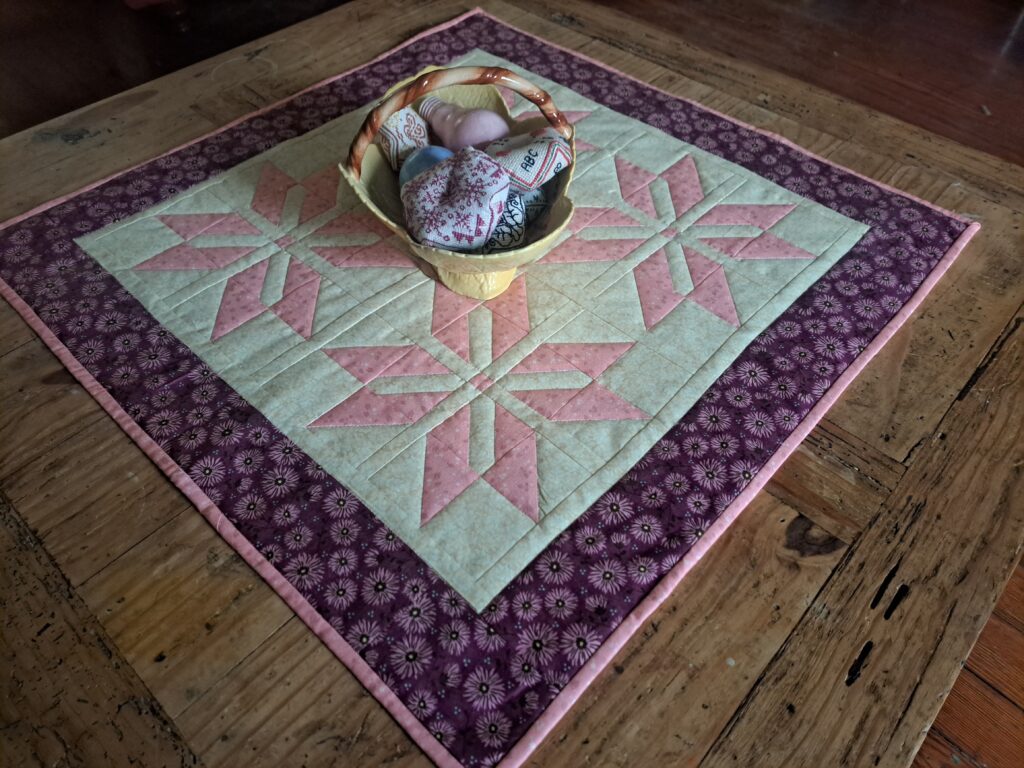
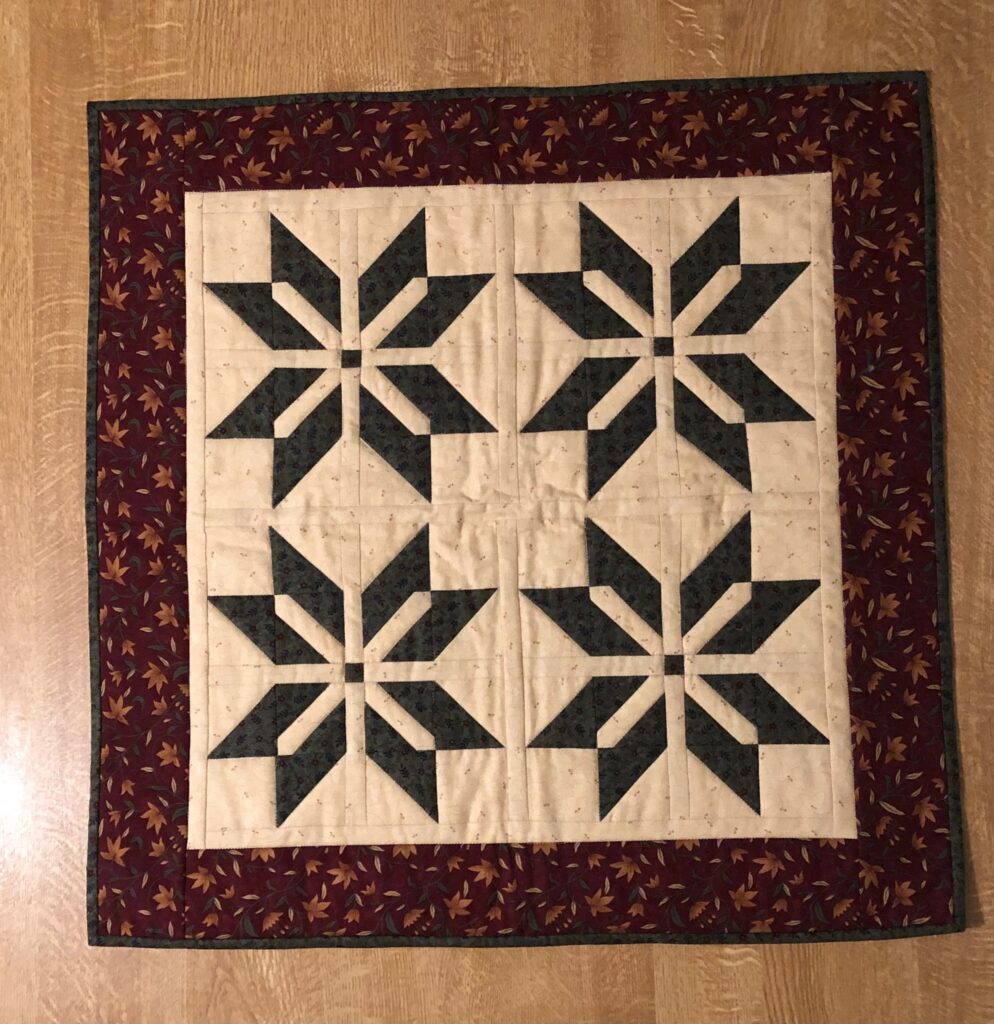
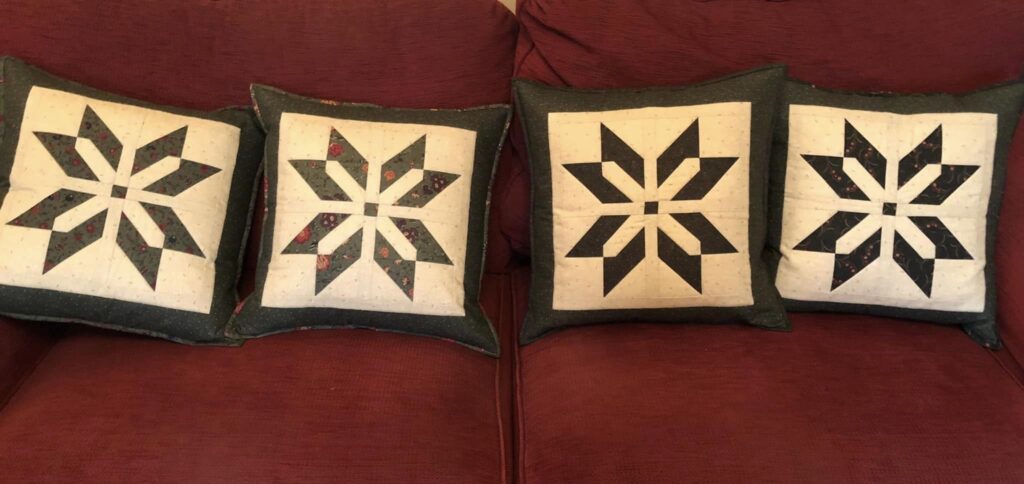
Going back several years, a table runner was designed, pattern written up for a workshop on furthering your sewing techniques…. A table runner that featured several small blocks …. Blocks that were named …. Half square triangles …. Hatchet blocks …. And put together to form a lovely eight pointed star….
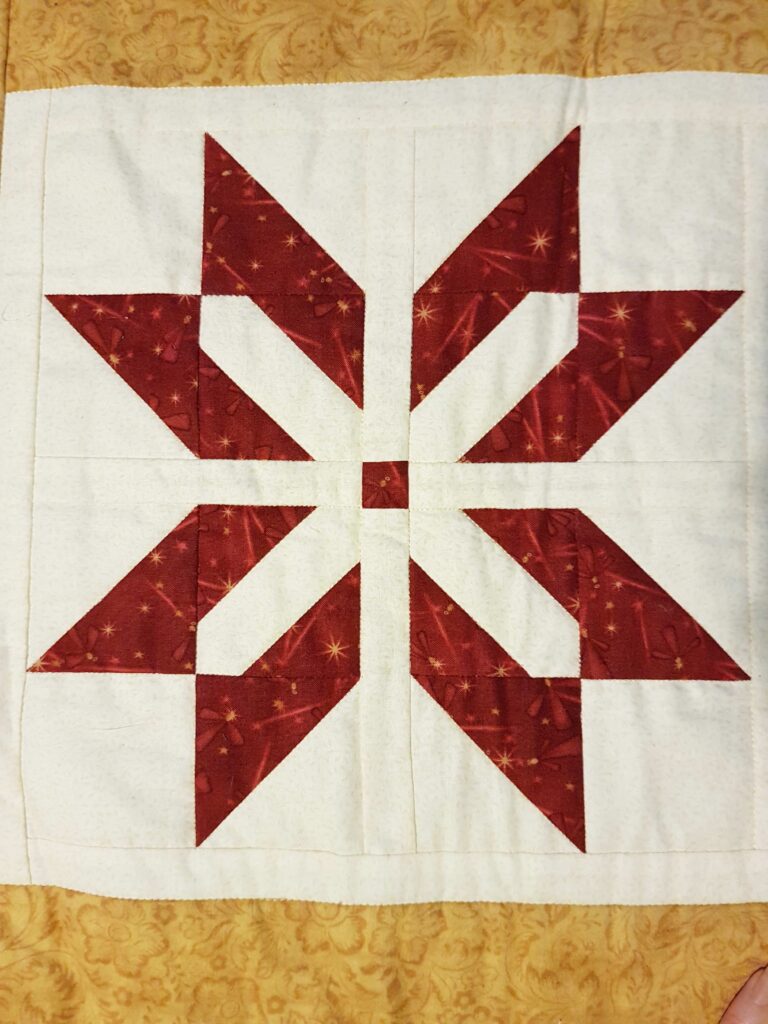
Star Flower Block
It was a lovely block and made an even prettier table runner when several blocks were joined together.
Table runner
Fast forward to a few months before Christmas 2022 …. And one of the ladies at our weekly sewing class mentioned the table runner that she had made at the workshop all those years ago…. How it was one of her favourite table runner patterns to do … and how much she had learnt from that workshop and the new techniques learnt. It was her ‘Go to’ table runner to make when she wanted to make a present for someone.
I had actually forgotten about the table runner … and had to be reminded of it …. Once I saw the pattern, I realised that it was still lying in the depths of my computer hard drive …. I had never actually gotten round to publishing the pattern!
I decided to print out the pattern and update it, so it was more in keeping with my current pattern formats. That was a task in itself …. It is amazing how much one’s pattern writing have come since it then! At another weekly sewing class, another student mentioned how the design was lovely but was definitely advanced for her skills! I challenged her and said that I would give her the pattern once I had updated it and she could sew it up …. (actually meant that she could test it for me) … Well, she accepted the challenge and found the instructions easy to follow and the cutting instructions/diagrams made it so less daunting! In fact she loved the design/table runner so much, she made two of them for Christmas presents! Think it is safe to say that the pattern was rewritten clearly and with simple to follow instructions.
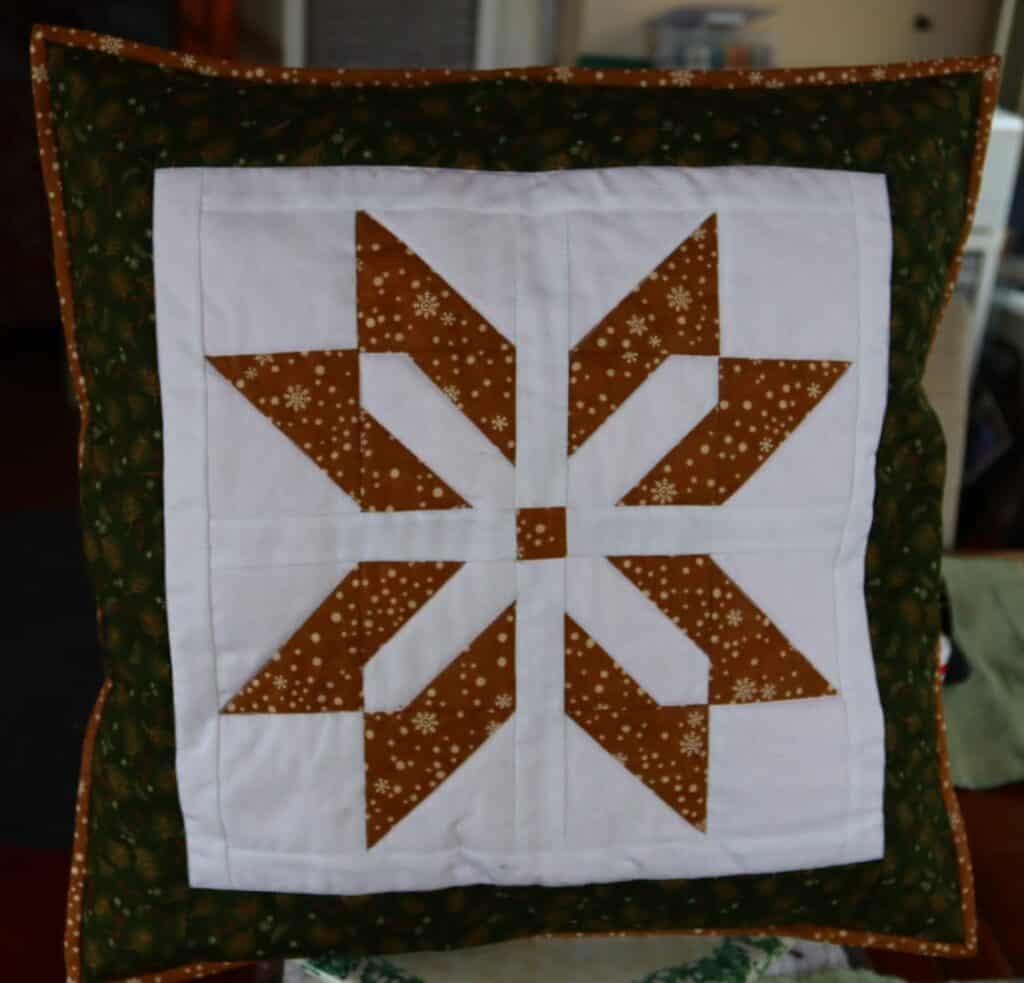
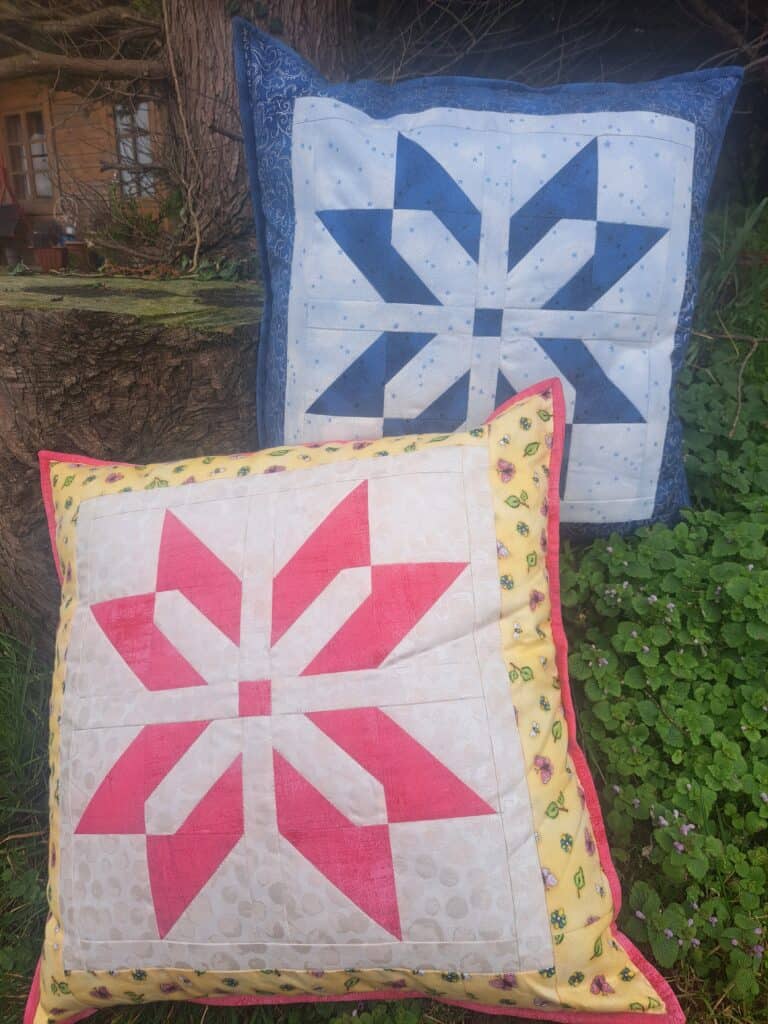
So after completing the two table runners, my ‘tester’ came back to say how much she thoroughly enjoyed the design, and it would be lovely as a square table topper (would suit her Mother’s round dining table) …. ‘it would also make lovely cushion covers’ …. Oh and wouldn’t the block make a gorgeous quilt?!
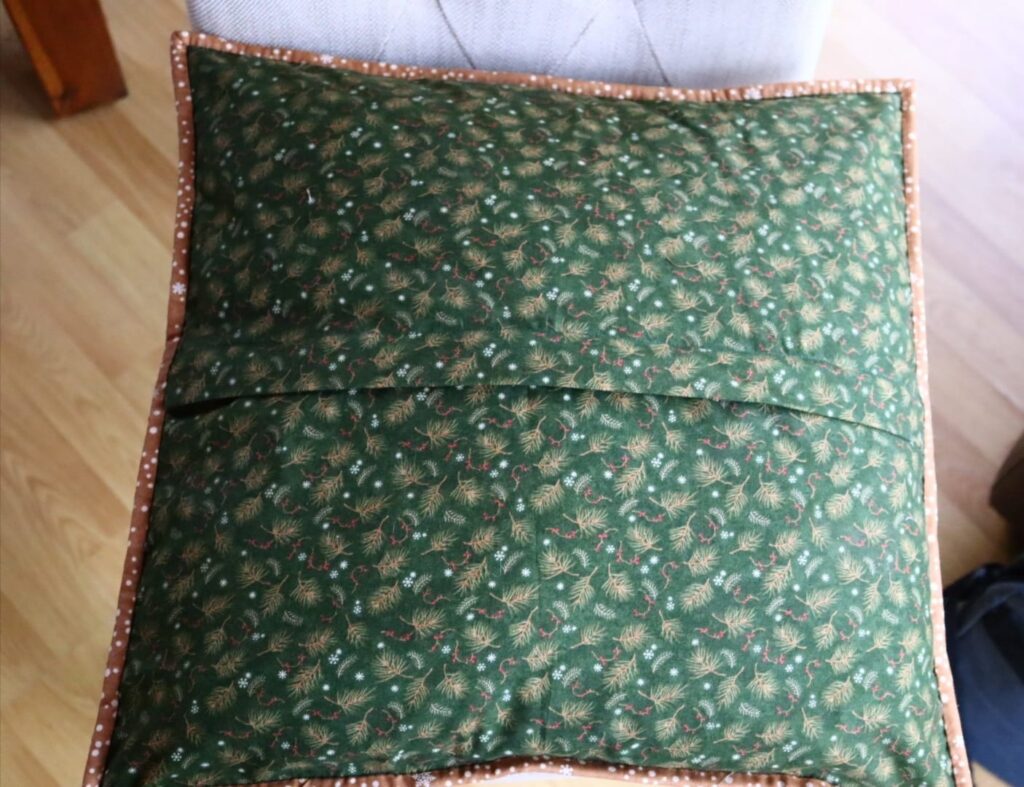
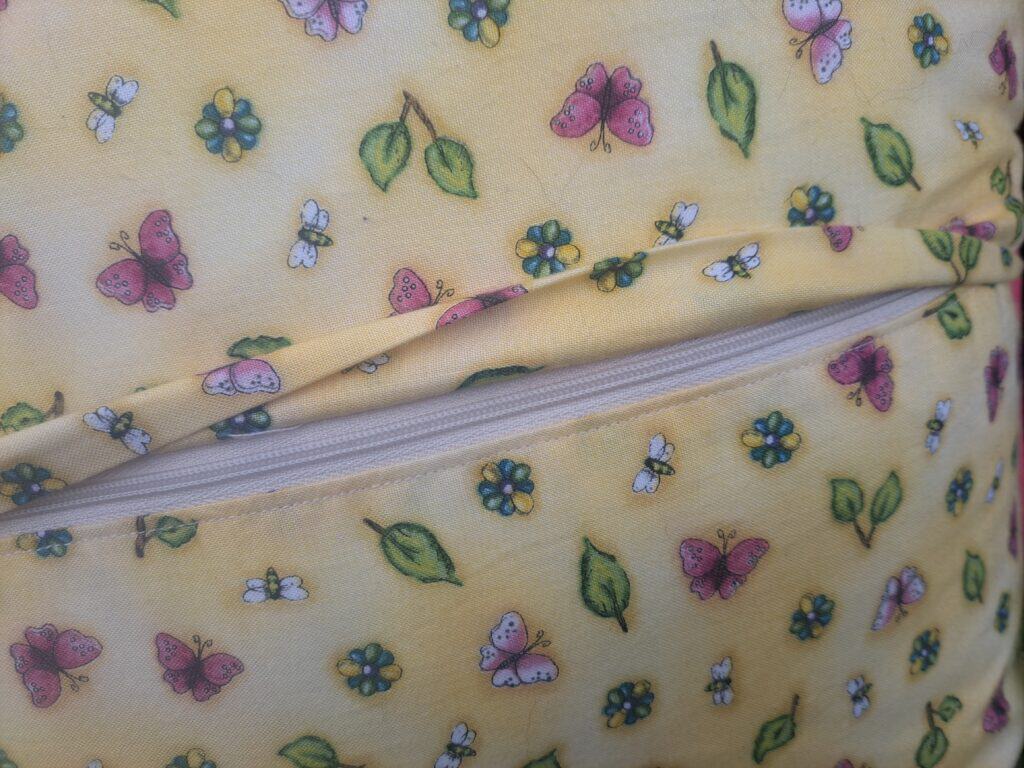
I guess it is safe to say that a challenge was made to me, and I couldn’t refuse! …. I wrote up a pattern for a cushion cover. However, I didn’t want to finish this cushion cover with my usual button closure on the back. I wanted to have a zip in it! But not a zip placed in the seam … also wanted binded edges …. So … if the zip was not to go into the seam … and with binding around the cushion …. The zip would need to be placed in the back of the cushion cover. I didn’t want the zip to be seen …. I really do dislike a zip showing on a cushion cover. So …. The idea of having a flap covering the zip was born … a zip discreetly hidden under a flap of fabric on the cushion back.
Christmas FabricsSpring and Christmas FabricsAutumn Fabrics‘Hidden’ zip
The best thing about putting zips in … and NOT using pins …. Is to use washable basting tape! This really is a game changer! No more scary ‘putting in zips!’ trauma!
Even my testers were like ‘NO, I cant put a zip in!’, ‘My zips never turn out right’!! Well, the feedback from the ladies was brilliant. I think it is safe to say that sewing in zips is so easy! Especially when you use the basting tape. If you have never used basting tape before to sew in your zips …. OR … if you have never sewn in a zip because it is too scary … then do not be afraid … to do be put off with this pattern …. The instructions and diagrams, guide you through step by step in sewing in the perfect discreetly hidden zip into the back of a cushion cover!
Zip Flap closure
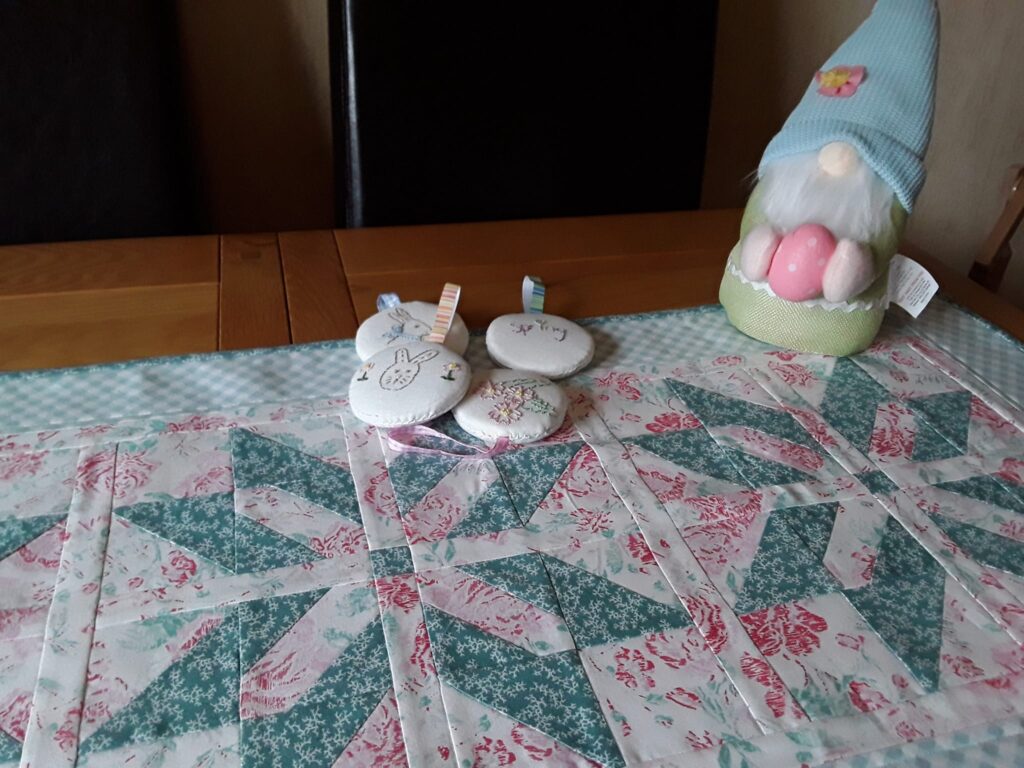
The next challenge was the table topper for mother’s dining table … This design was a bit more complex. I could have just used four blocks from the cushion cover and have a square table topper. But the blocks from the cushion cover and the table runner were quite large. If I used that sized block, it would have made my table topper come out quite large. I wanted it to be a reasonable size – around 22-24” square. So I had to go back and work on my figures and have a play with sizing and measurements – this is where maths comes in handy – not my most favourite/easiest subject at school. The blocks needed to be smaller, the hatchet block needed to have a smaller section of fabric showing in the centre. It was all trial and error and making up a few hatchets until I came up with just the right distance in the block.
Then Christmas comes along and other work commitments that needed priority over the design samples. I had them sewn … just had to hand sew all the bindings. So, I quietly worked away on the hand stitching when I had a spare moment. I rewrote the pattern drafts, got them proof read and finalised on the computer.
I did had to take photos of the finished items for the pattern covers and website. It really is quite hard to get the time for a photo shoot and just the right weather to take some outdoor photos. But in the end I managed to get all that sorted.
So since Christmas I have been finalising the patterns on the computer and I am happy to say that these patterns are now ready for the website.
The block really is quite stunning and is far easier than it looks. It would not be a beginner’s patchwork pattern but great if you are wanting to further your techniques. The pattern instructions and diagrams are clear and easy to follow.
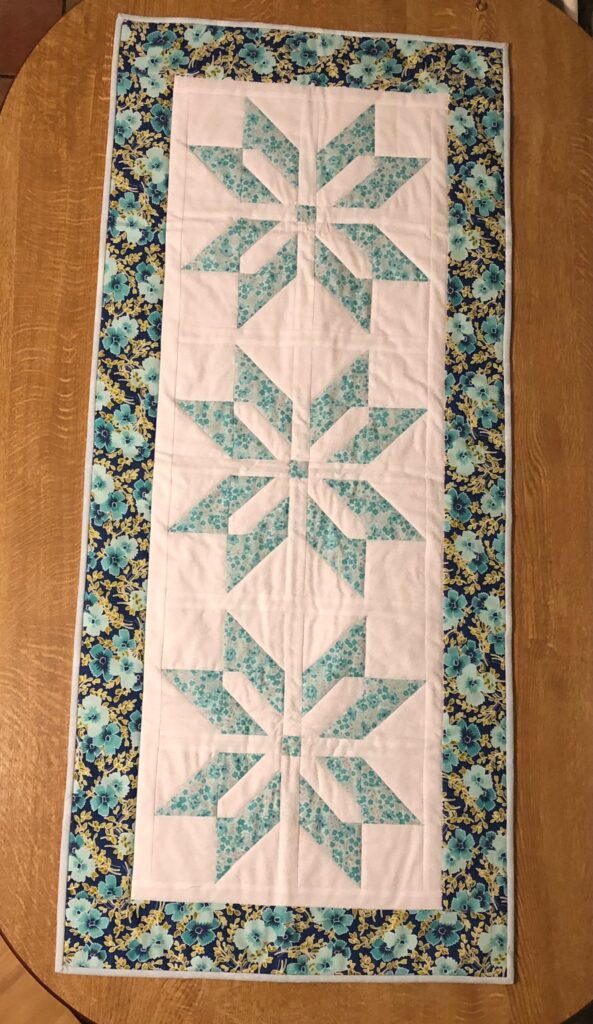
These designs would look great for Christmas or anytime of the year. Just change your fabric choices. All three designs have been made in a variety of fabrics to really show off just how versatile this block is. I think the hardest part of making this pattern is deciding if you want to make it up with Christmas fabric, in autumn tones or spring colours ….. So why not make up several of each and then you can enjoy the designs all year round!
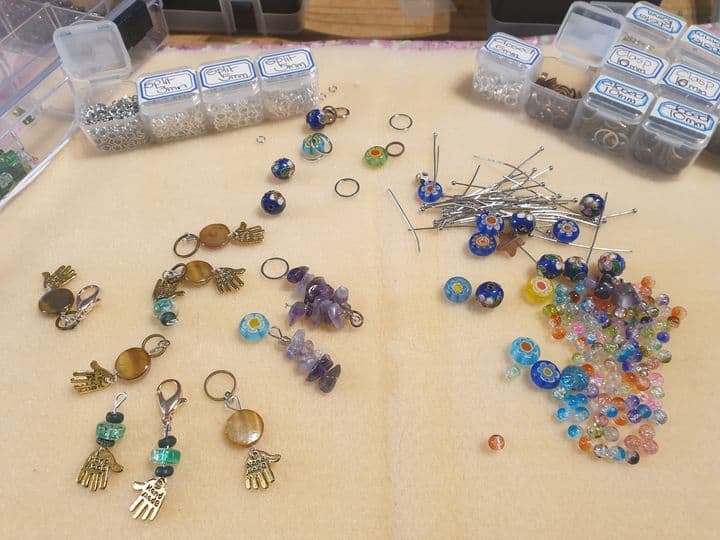
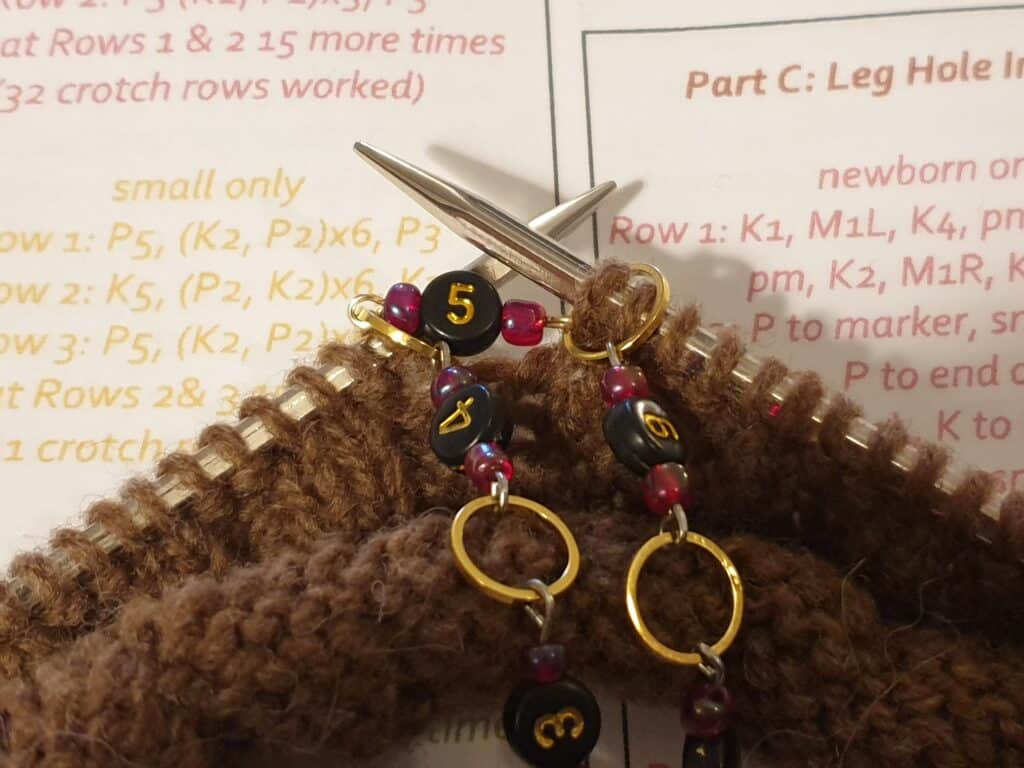
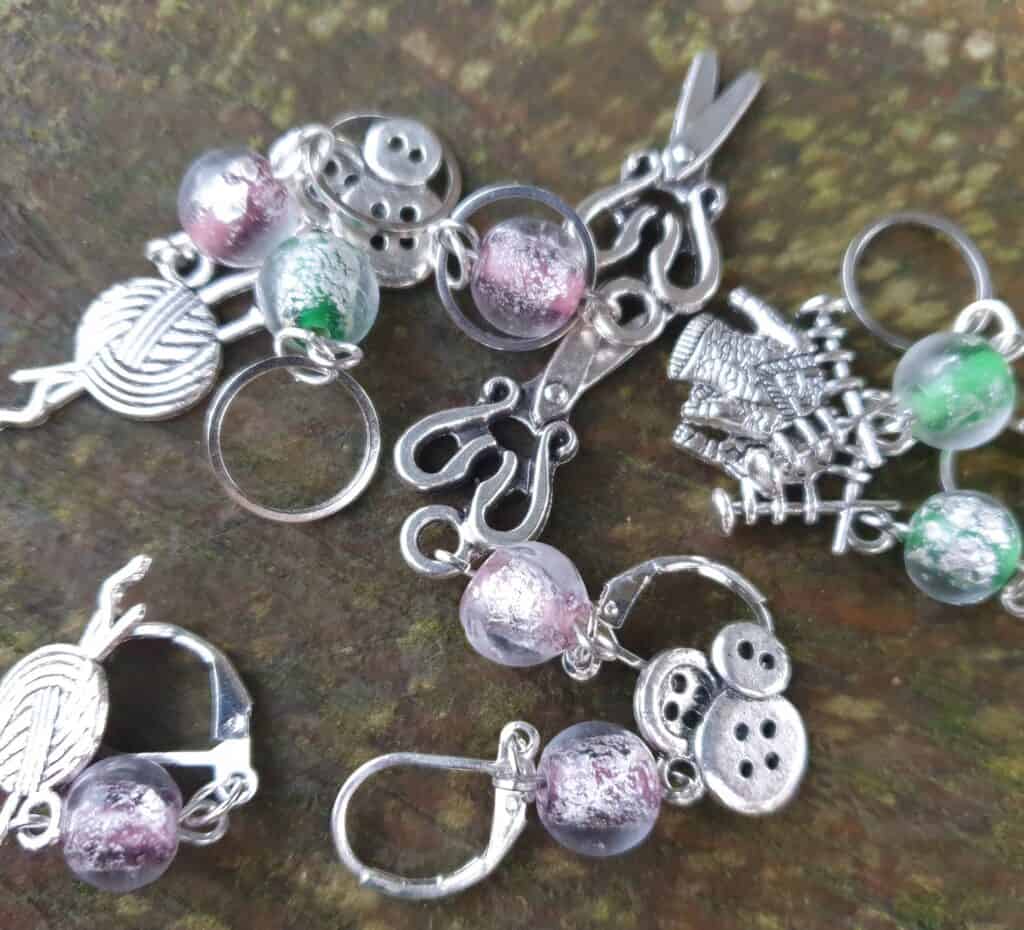
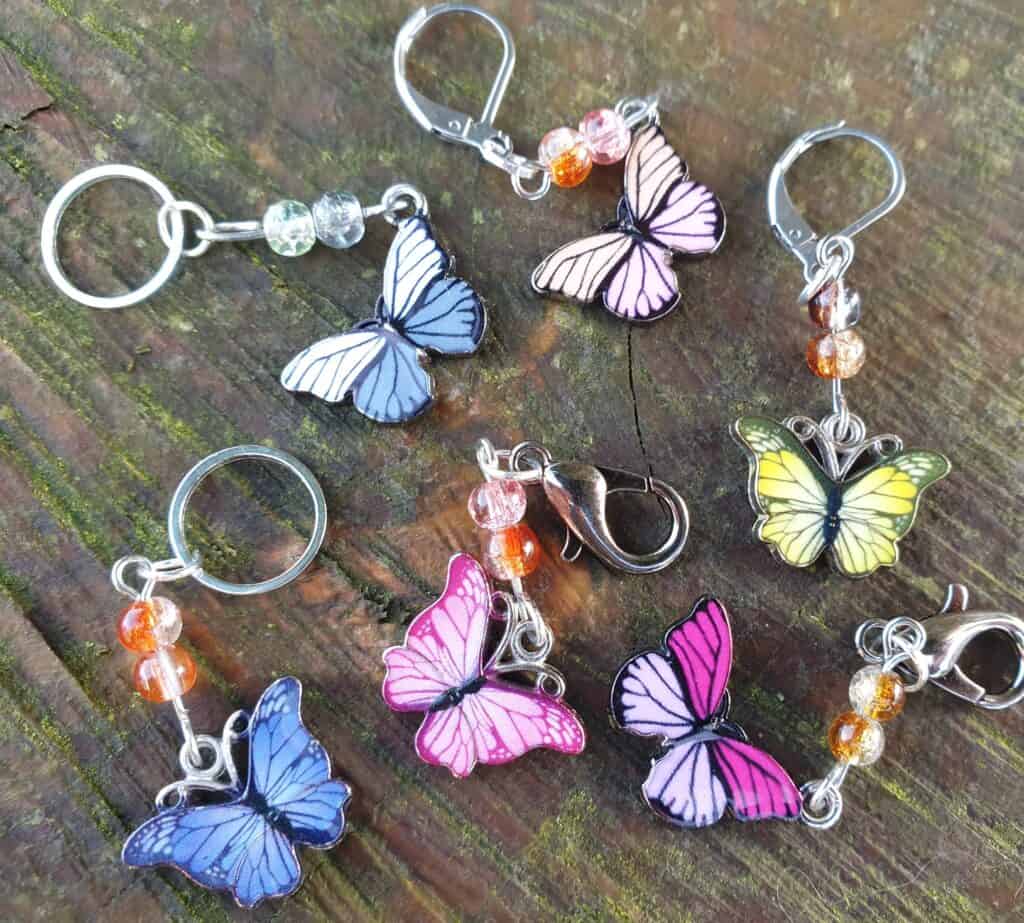
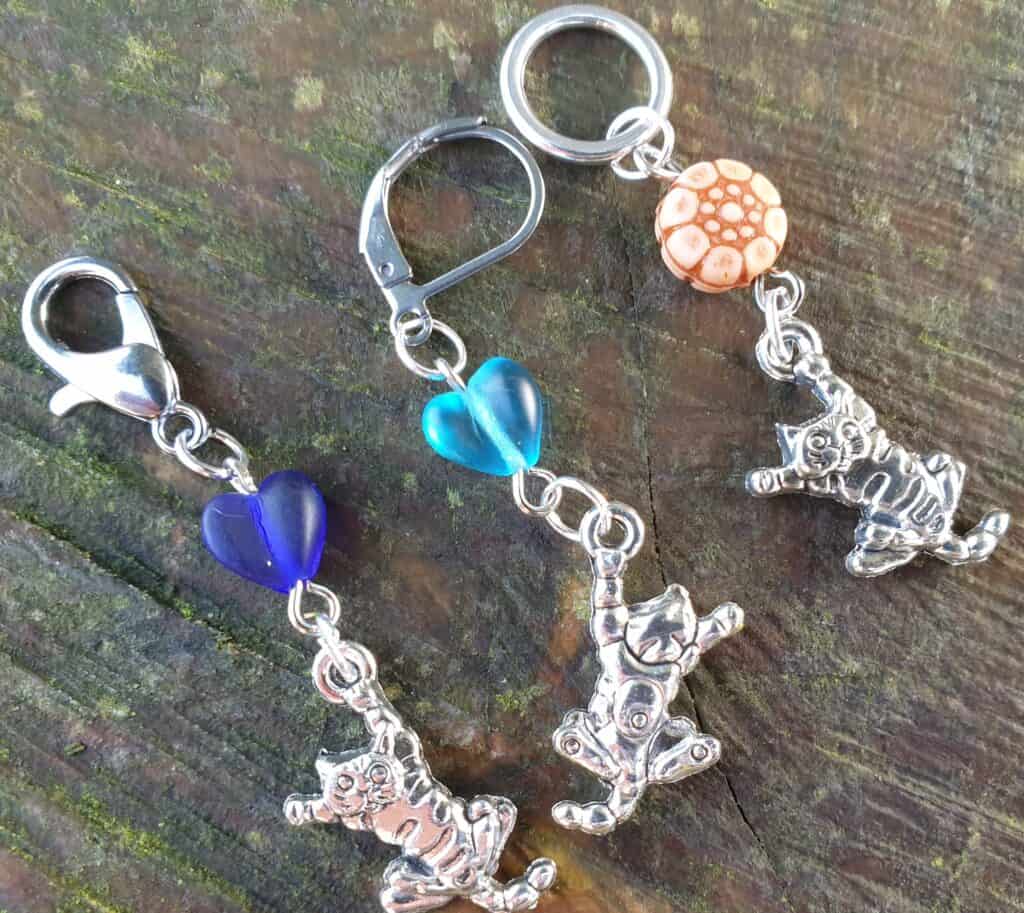
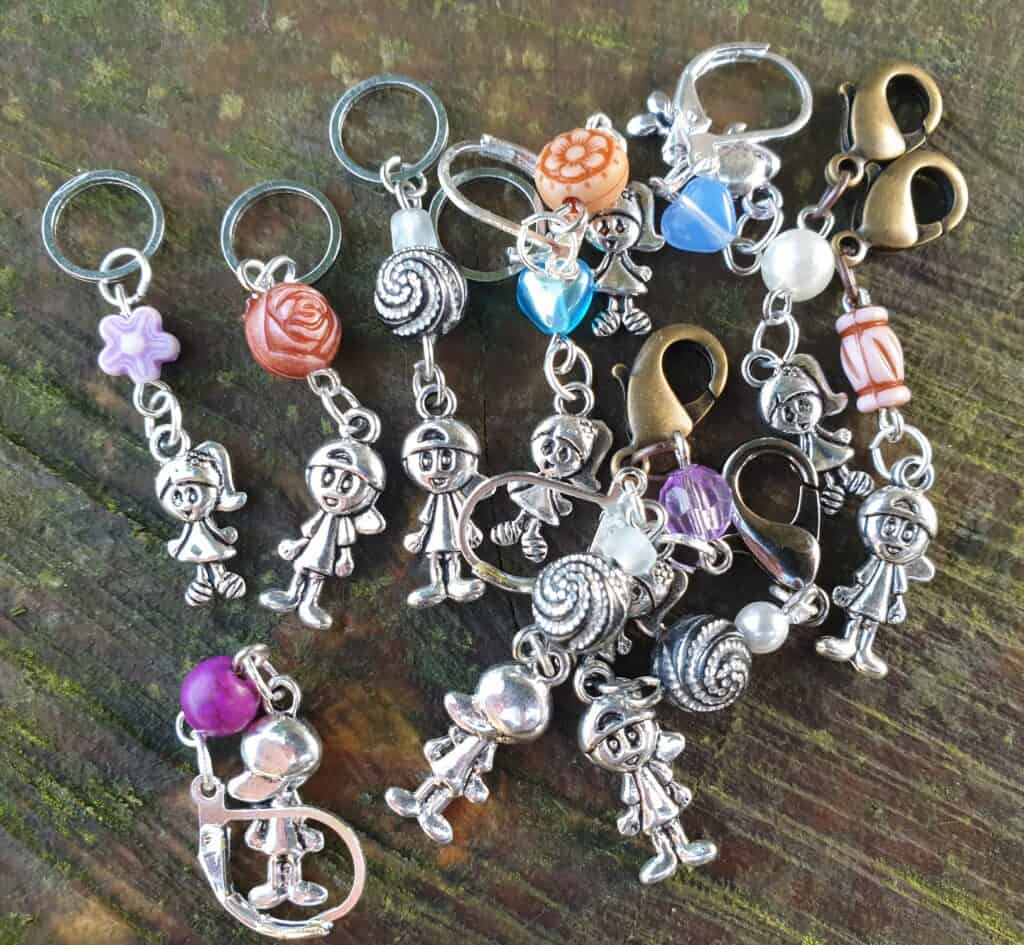
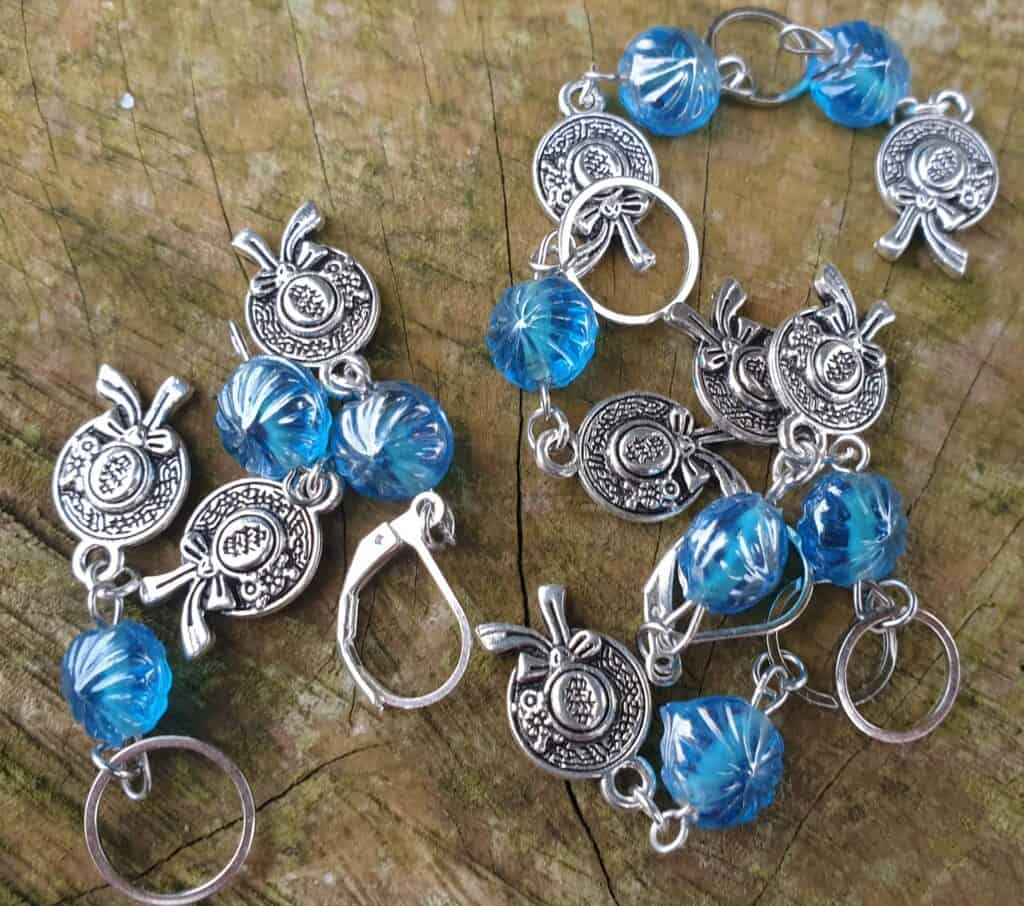
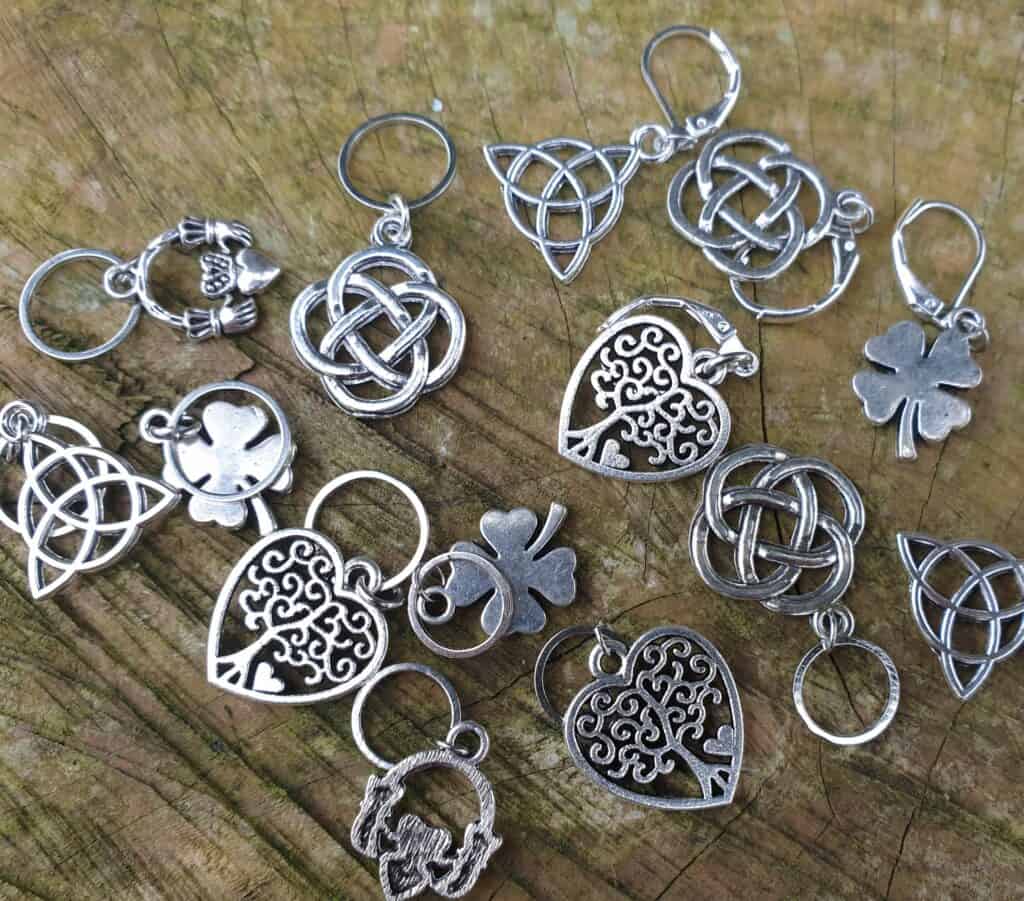
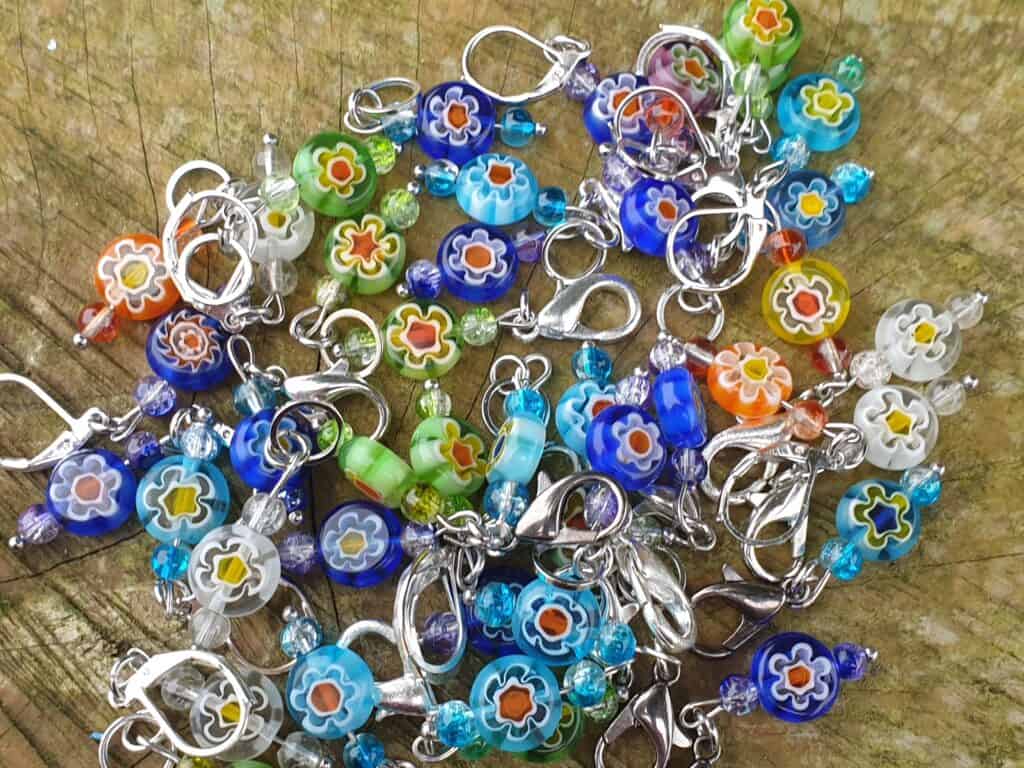
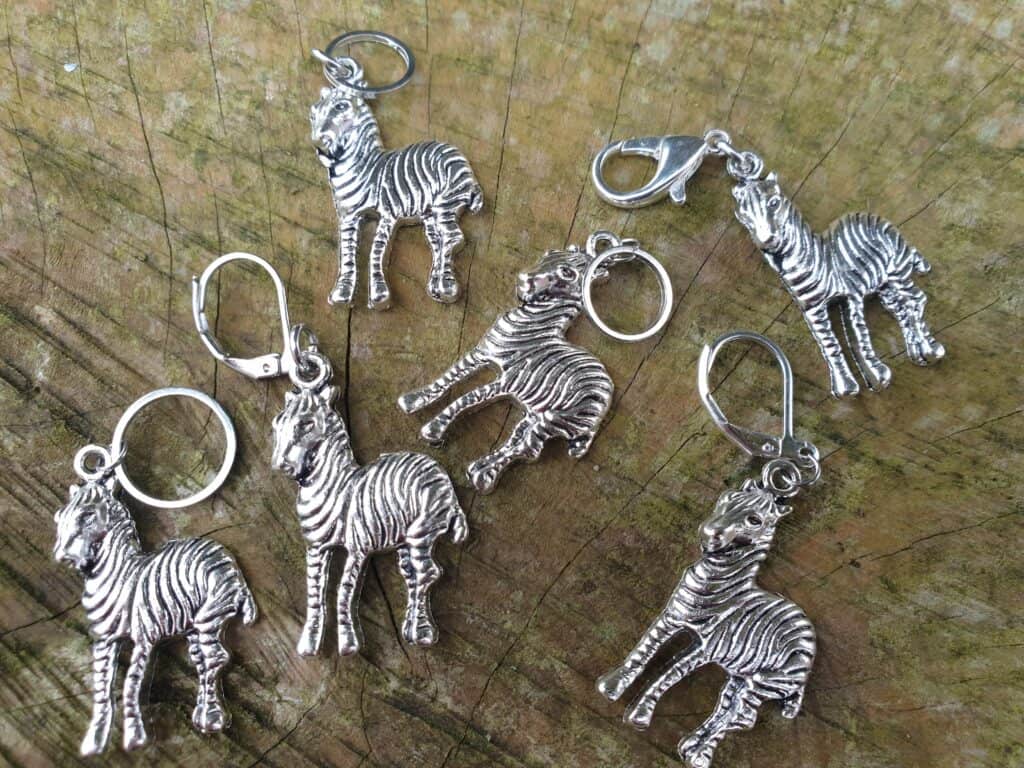
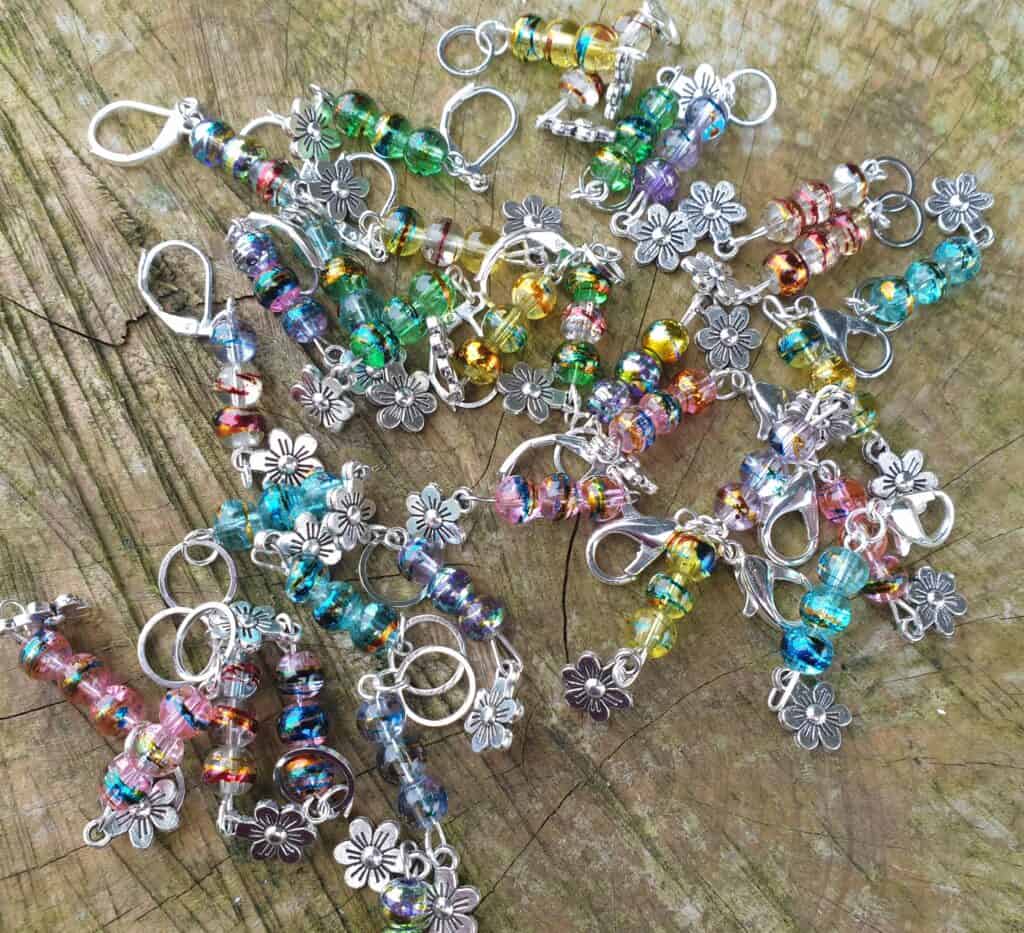
Following on from my previous blog in regard to Alyssa and I hunting out my jewellery craft bits and bobs …. And starting to make stitch and progress markers …. I thought it was a great way to introduce this exciting new product line ….
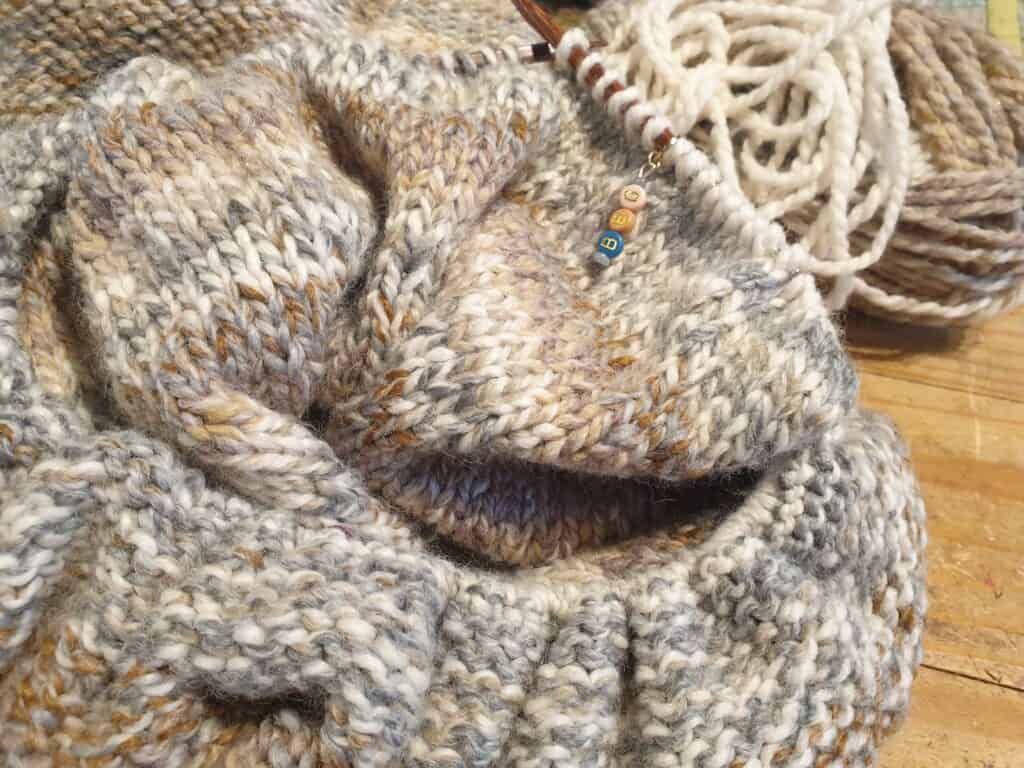
I have used stitch markers for many, many, years with my knitting. When I first started knitting, I never used them, or had even known about them. That all changed when I was introduced to knitting my garments from the Top Down (a great technique and I would strongly recommend you learning it if you haven’t already done so – in fact I even have a ‘Learn to’ kit in the shop) …. And stitch markers are essential with doing this technique as they marked where you needed to do the increases for the sleeves, front and back. I then used them when knitting shawls to remind me to increase at the shawl spine and even to divide the lace pattern repeats.
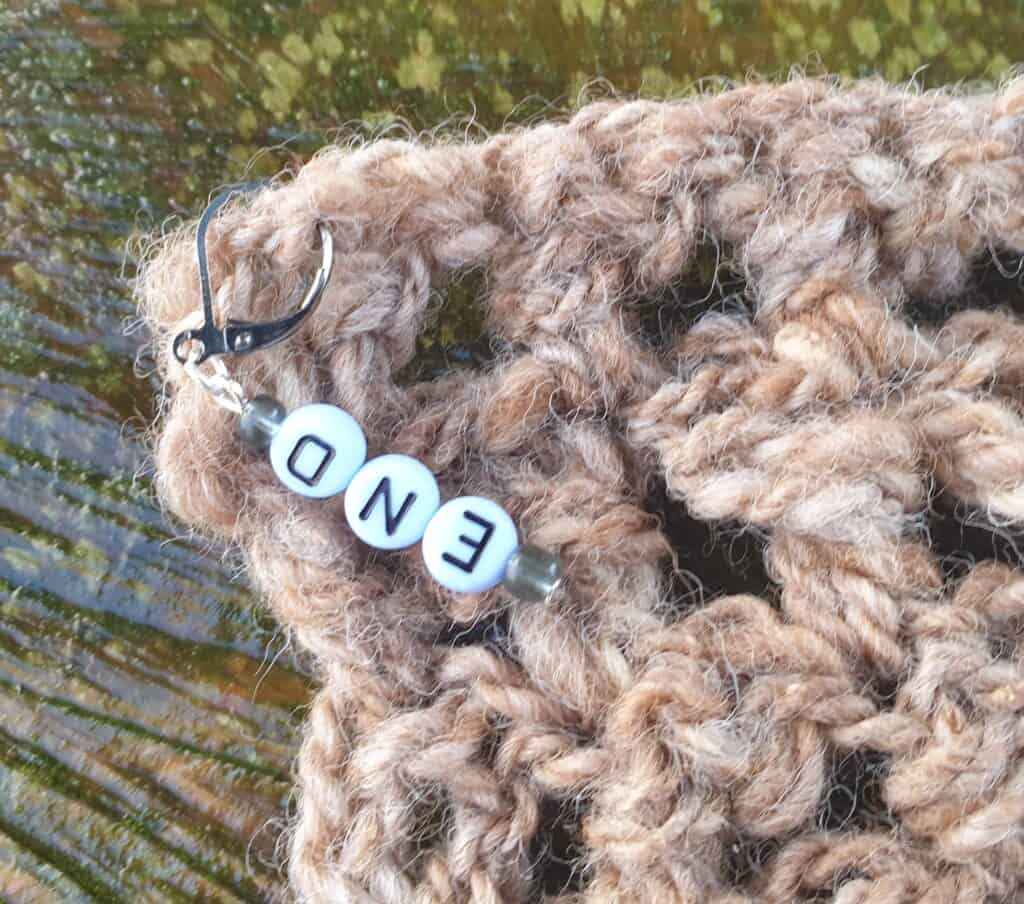
I must admit that I really never used them much for crochet. But in saying that, I found that the hook like markers came in quite handy to keep track of where the very last stitch was when crocheting in rows. I used this hack when teaching the learn to crochet course and this provided an invaluable tip/trigger for remembering EXACTLY where the VERY last stitch was meant to go. The perfect learners trick. I also found these hooks invaluable for keeping track of important places in the crochet piece.
End Marker for last stitch in crochet row
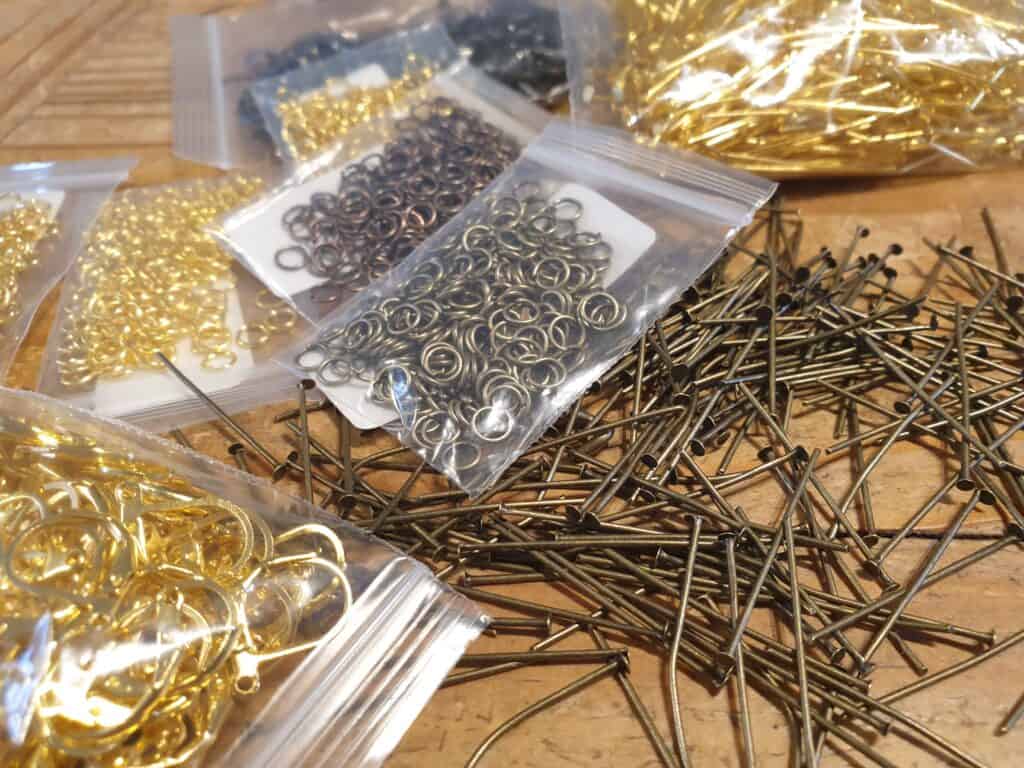
As mentioned in my previous blog, I love to use pretty, practical tools with my crafting. Yet I only used plain plastic markers even though I loved the decorative ones. I had a couple of decorative markers, but I hated using them. One lot used open jump rings so there was a split in the ring for opening and closing and no matter how careful I was, the ring always managed to snag my yarn which wasn’t great when using delicate and luxurious yarn …. So those rings were cast aside. I also had the wire loop style, which was a close loop with no opening, but the loop ‘moved’ …. In other words the bead at the base of the loop was not secured so would move up and tighten the loop.
In seeing all of the jewellery treasures, it really inspired me into wanting to make some markers. I did some research and online finger shopping to source the ideal findings needed to make the perfect markers, that I would be happy to use. That was a success (or disaster on how you look at it) – a success for my creative mind and a disaster for my bank account! But the orders were placed, and I started making up my first lot of decorative and practical markers.
ordering and making
So, while getting excited about making these unique wee tools and sharing the photos on Facebook, I soon learnt that not everyone (even knitters and crocheters) know what these wee markers are, or what they are used for. So of course I had to write a blog and go into detail on how to really make the most of these useful wee tools.
As mentioned earlier, I only had the plastic stitch markers for my knitting that came in two sizes and two colours. It really did not give me much scope for making full use of these tools. They were fine when I needed four rings to mark where the increases go in top down knitting. However, when knitting in the round, I had to place a marker to signify the start of the round. This can be difficult when you only have the one colour, or maybe a slightly larger ring…. And being me (short memory span) I would usually forget what colour/size ring I had used for the start of a round.
So, what is the difference between all the markers and just how many types are there?
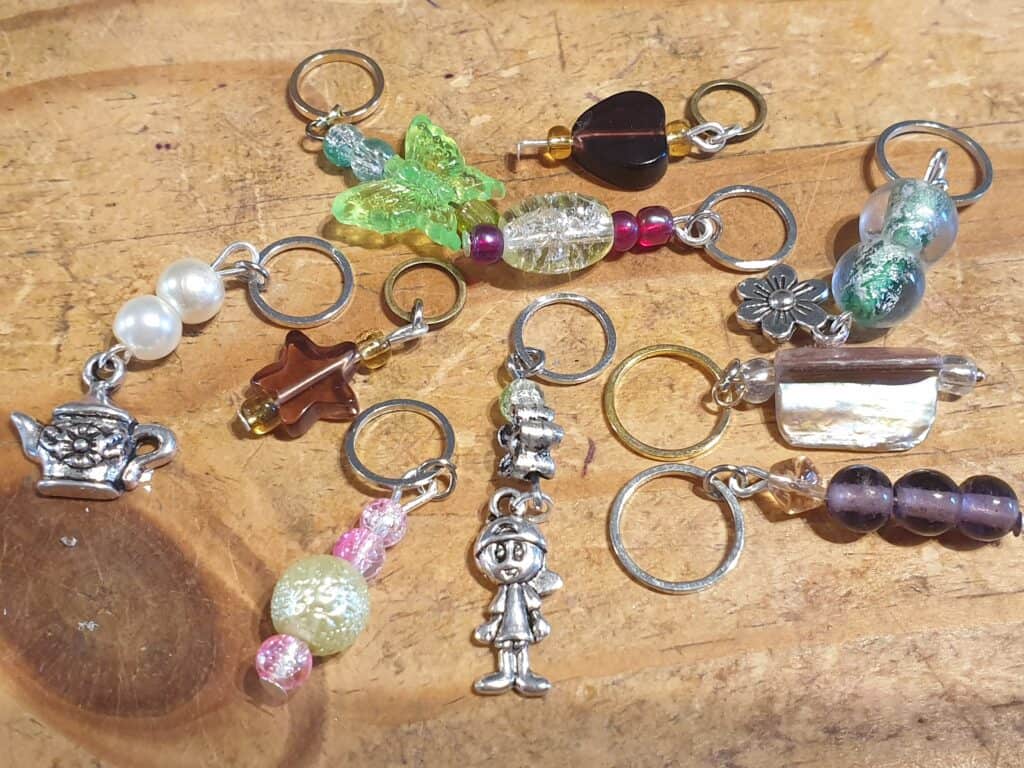
Stitch (or progress) markers come with a number of different clasps ….
CLOSED MARKERS
As the name implies, these cannot be opened and are commonly known as Ring (Stitch) markers. These can be either with a split jump ring, wire loop or a closed jump ring. I am not keen on the first two types, which I explained about above and these in effect put me off the decorative markers. I make my stitch markers with a closed jump ring which is basically a solid metal ring made in the same way as the plastic rings. The rings usually come in a variety of sizes to fit a range of needle sizes, which makes sense as it would be awkward to use a very large ring on tiny knitting needles. It would also be the same if you only had tiny rings that couldn’t be used on larger needles.
The closed rings can only be used for knitting but have so many uses. Once you start to use markers in your knitting, you will not know how you managed without them.
These markers sit on your needle between the stitches to mark pattern changes, where the round begins and ends, pattern repeats and so forth. When you come to the marker, you just slip it from one needle to the other, or remove it, if it is no longer required.
One thing to remember, ring markers can only be used for knitting. They can’t be used in crocheting as the rings are closed and there is no needle for the marker to sit on between stitches as crochet only has one stitch.
Closed Markers using solid closed rings in various sizes to fit different needle sizes
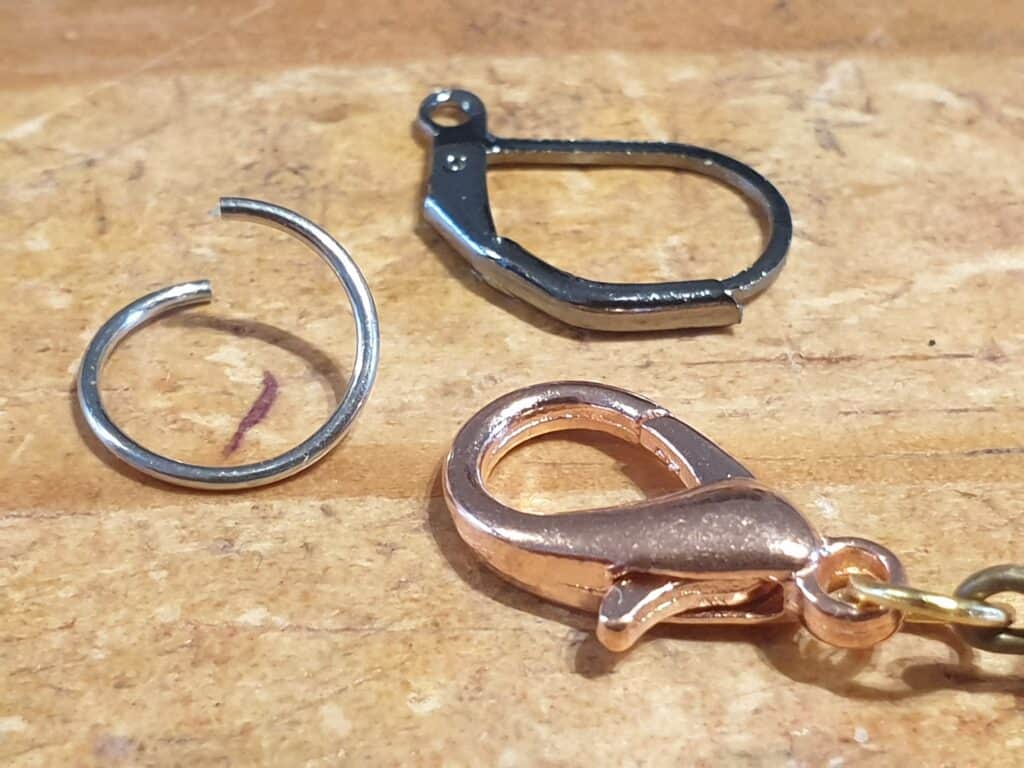
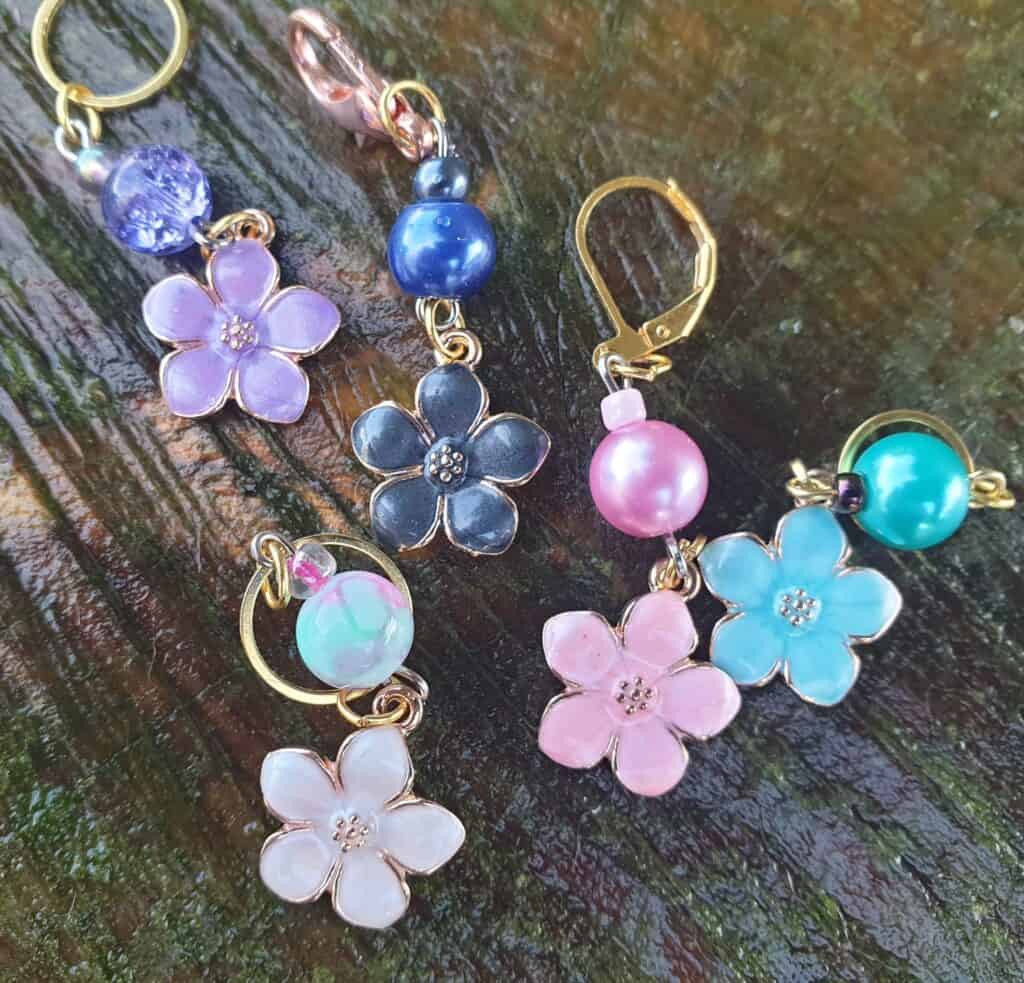
OPEN RING MARKERS
These come in a variety of clasps –
Split ring marker which uses the split jump rings which you need to open like a paper clip. I am not keen on these as they can be difficult to open and closed with your fingers and the ends can snag your yarn.
Locking ones, using a Lobster or Leverback clasp like the ones that are common on necklaces/bracelets or earrings.
Split ring, Leverback and Lobster Clasps
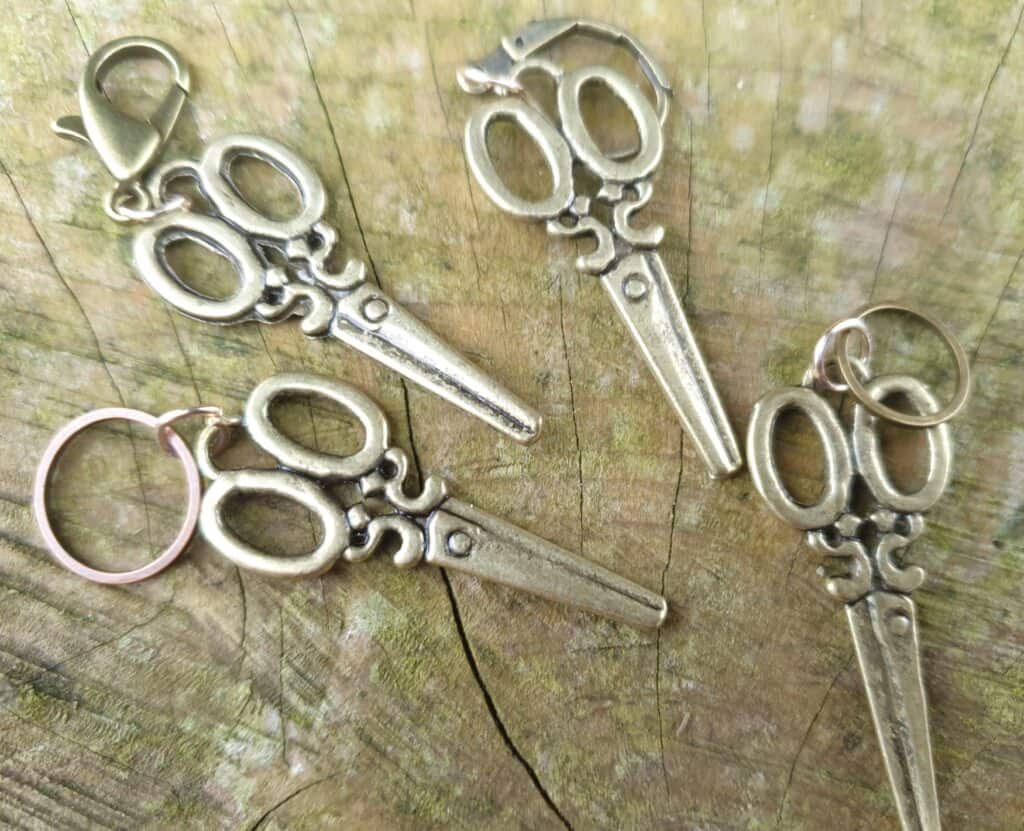
Less common is the open marker which uses a hook clasp which does not close. They can be useful when it is not essential to have a locking marker but still need to be easily removed.
These markers are commonly used for crochet as the marker is basically attached to any stitch and easily removed when no longer required. They are great to use to indicate where the last stitch is needed to be worked when crocheting in rows, especially since it can be so easy to miss that last stitch to be worked into the turning chain of the previous row.
The open markers can also be used in knitting in the same way as the closed ones and placed on your needles. However, I have found that using these markers may be abit more harder, especially if the clasp is a lobster or an open hook. The lobster clasps are not exactly round so would not slide from needle to needle as well as the closed rings. The Leverback clasp would be more ideal but still not as smooth as the ring. The only perk would be if you accidently knitted the marker into your project, you could open the marker and remove it which you could not do with a closed ring. In being able to open up, the other downfall could be that they could open up and fall off your needle which would cause you to misplace where the marker should be in your project.
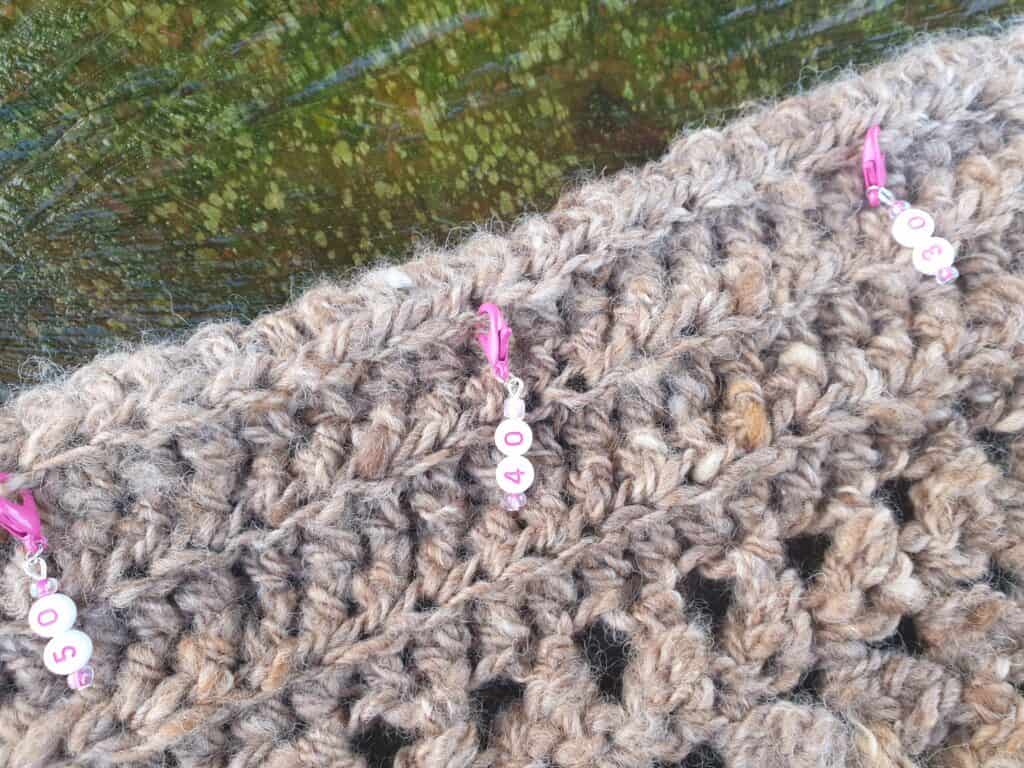
They are perfect for counting rows and tracking your progress. If you are working a pattern that repeats often, these markers can be placed on every few rows and you can count as you go. If you are needing to do a lot of rows, then a marker can be placed every 10 rows so you can keep track of rows in groups of tens. It is a lot easier than counting 100 individual rows. These are the type of markers that are placed in your work and not on your needle, so they need to be removable and the clasps easy to use.
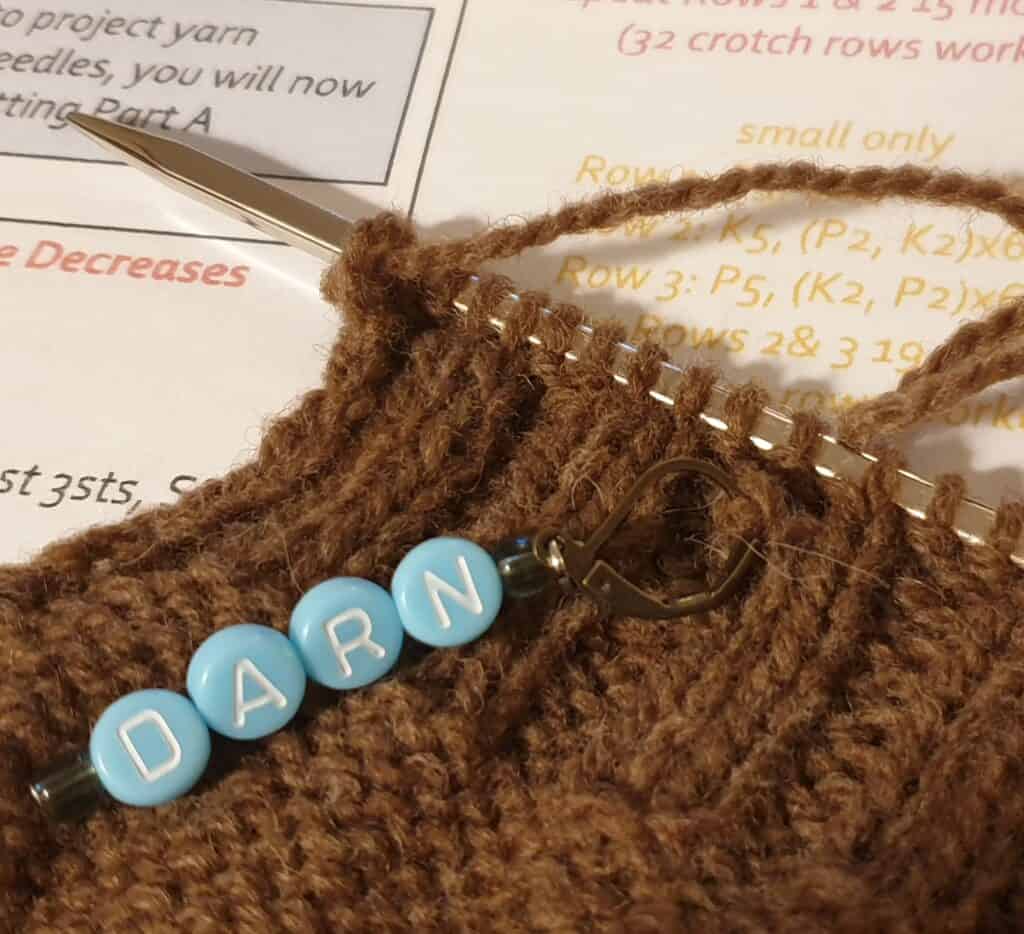
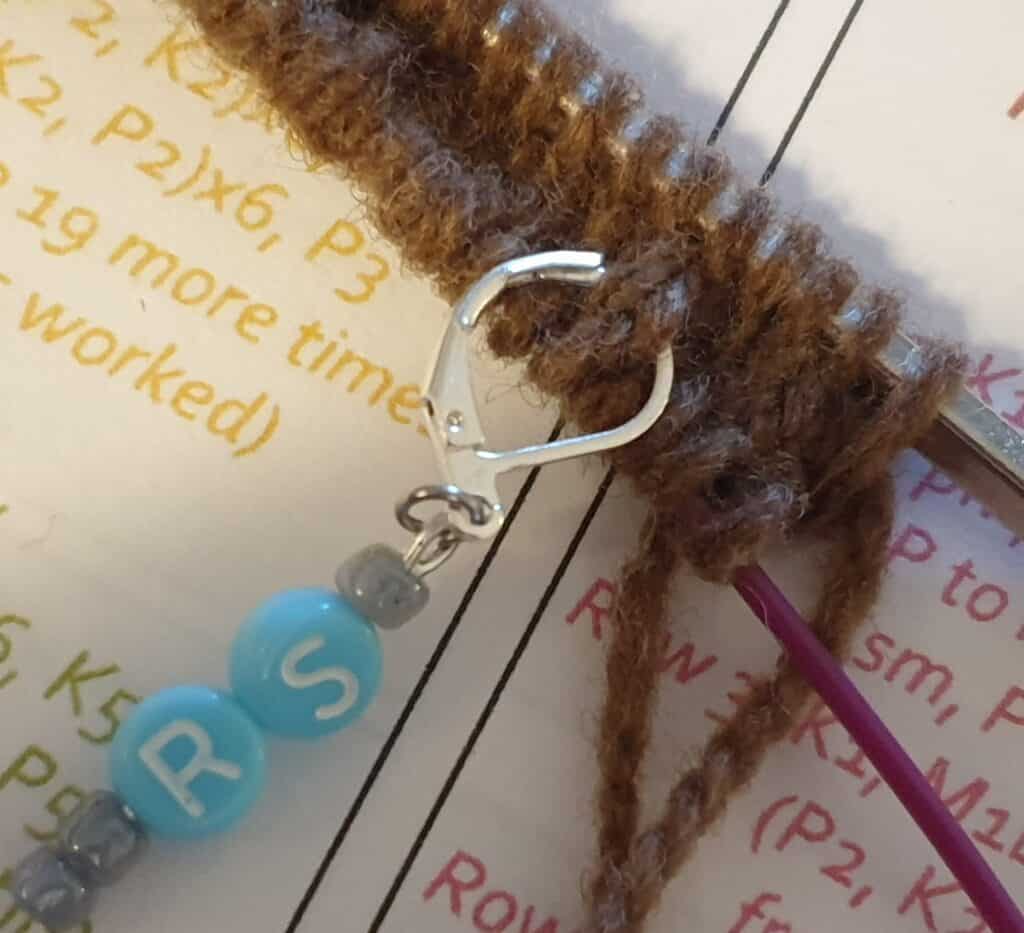
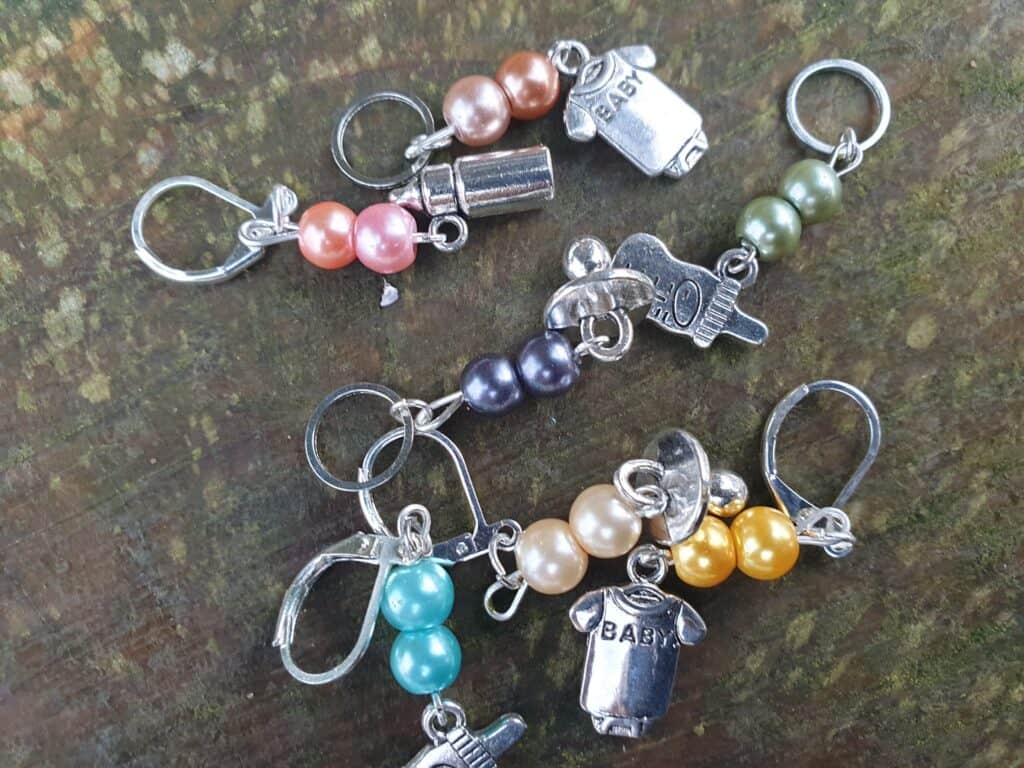
So, in making up the markers I started to think in what I would like to have and use and really liked the idea of having specific markers for certain tasks. I have made up open markers (using the different clasps) for stating the wrong or right side of the project, the start or end of a row/round, row counters in either 1-10 or in 10’s. I have even made up markers designed for holding those dropped stitches (Oops and darn) so you can’t forget why those markers have been placed into your project.
One last item to talk about is all about the counting. How many of us have a pattern that tells us to knit so many rows …? Are you like me …? Try (without too much success) to keep tally in my head of the rows worked before the next pattern instruction? Especially if there is no paper and pen at hand and you are too lazy to get up and find it …. Yes, I still do keep tally on paper with a stroke if I have quite a few pattern rows to complete and still lost myself if I stop part way through as I need to head to bed. I have to admit that I would also keep going long past bedtime so I can ‘finish’ at a good stopping point in the pattern. I have also manually kept count of the rows in my head and still lost count. These row counters are great to use when you start your knitting or crocheting and at the end of your session you will be able to see just how much (or how little) you have accomplished.
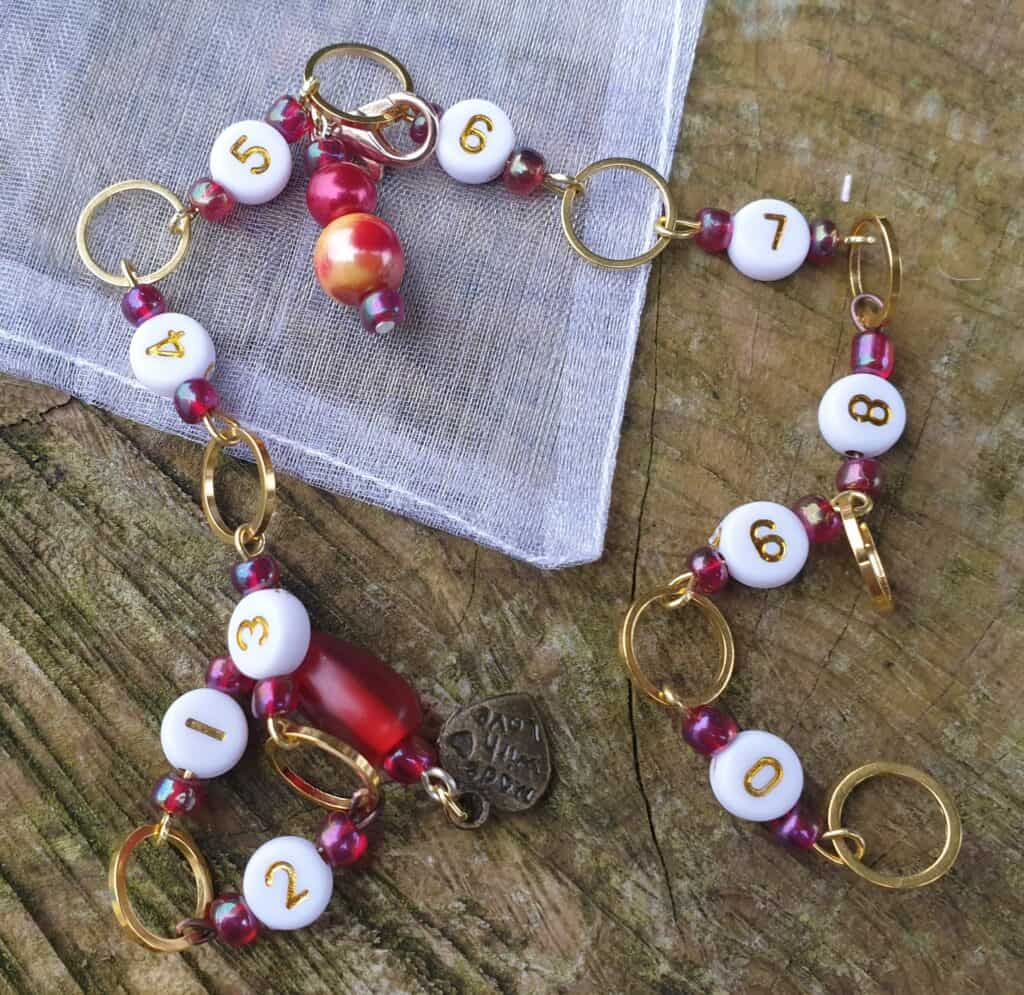
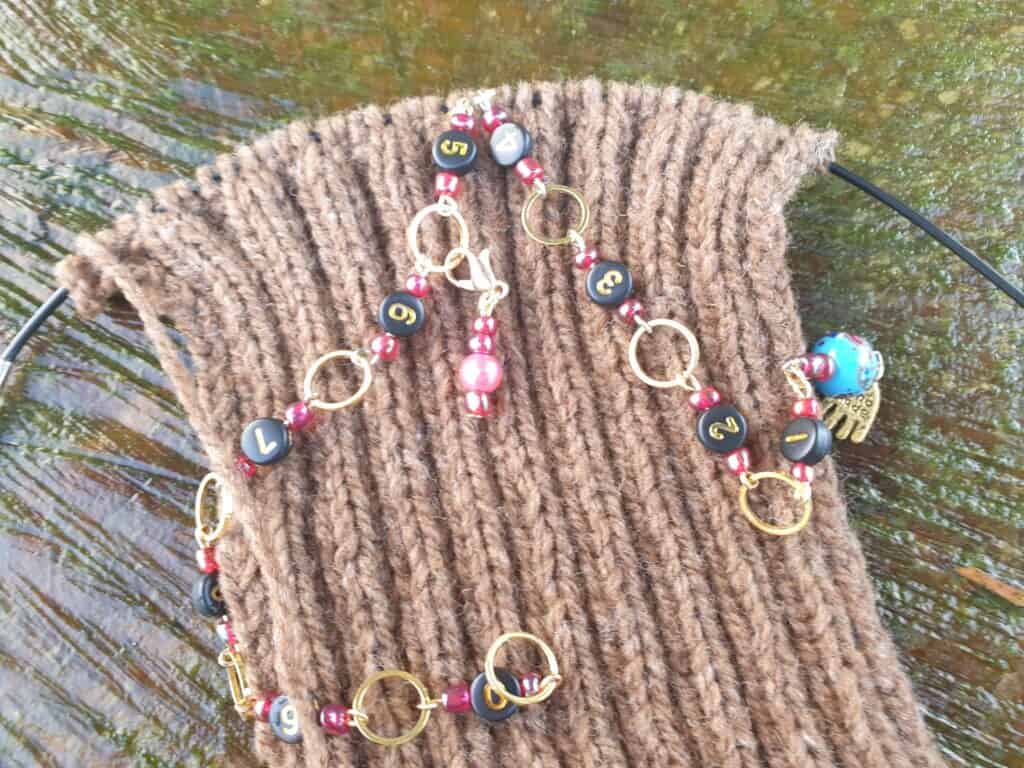
In doing my research I came across this ingenious chain and wondered how I had ever done without it (as well as not known about it). It is a row counting chain that keeps track of your knitting rows from 1-99!!! As well as being practical (& ingenious) it is also so very pretty. At last a beautiful tool for keeping count, so much nicer than paper and pen. I know I have used the barrel row counting tool that you placed on the knitting needle, but I found those oh so boring and I always forgot to click forward at the end of a row …. Now all I need is to find patterns that require a lot of row counting …. Oh my, I am starting to sound like the Count from Sesame Street!!!
Row Counting Chain
I can hear you ask, So, how do you use this tool exactly? …
The chain is numbered 1 – 0 using beads and closed rings between each numbered bead. There is also a removable marker with a lobster clasp…
Basically, once you have completed (part way through to keep it secure) your first row, place the ring (between 1-2) onto your knitting needles. Change up to the next ring on your chain when you come back to the chain while knitting the next row. Continue like this, working your way through all rings on the chain, until you reach the zero ring and you have completed 10 rows. Place the lobster clasp onto the ring between 1 and 2 to represent the number 10. After completing the 10th row, restart at the first ring again and work your way down the chain again. Every 10 rows you move the lobster clasp to the next number ring.
For example, if you have completed 37 rows the lobster clasp should be on the ring between 3 and 4 and the knitting needle is in the ring between 7 and 8. This chain is ingenious, and you will never forget how many rows you have completed if you need to set the project aside halfway through completing a set number of rows.
I used the chain last night to do some knitting. I needed to knit 54 rows of rib (as well as keeping tabs on which was the right side). I was looking forward to using the counting chain and wondered how it would go … would it be awkward while knitting? …. I had knitted this item before and I manually kept count in my head, which was a total nightmare and not very practical, especially if you needed to take a break part way through… so on came the chain …. Part way through my first round I placed the needle into the ring between 1 and 2 and continued knitting. On the return row, I came up to the marker and literally slipped my right needle into the ring between 2 and 3 and slipped off the ring from my left hand needle. As simple as that! No hassle, I just had to remember to keep my chain to the front of my work and NOT knit the chain into my stitches! I kept on going, not needing to manually remember or write down how many rows I had knitted – it was always there on the chain for me to see. Once I came to the end of the chain – 0 -, I placed my lobster clasp marker into the ring between 1 and 2, to represent 10’s and on the next row, I moved my right hand needle into the first ring of the chain and continued working through the chain to 0 again.
slipping new ring to the needle
completed rows knitted and shown on chain – 56 rows
This counting chain is so easy to use, and it wasn’t long before I had worked my 56 rows and the chain is still firmly in place on my needles telling me exactly how many rows I have worked. I just need to remove the chain when I come to it when knitting my next row. This pretty, practical tool has firmly earned its place as an ESSENTIAL tool in my knitting kit. I just know I will be wanting a counting chain in the different sizes to accommodate the various needle sizes that I use.
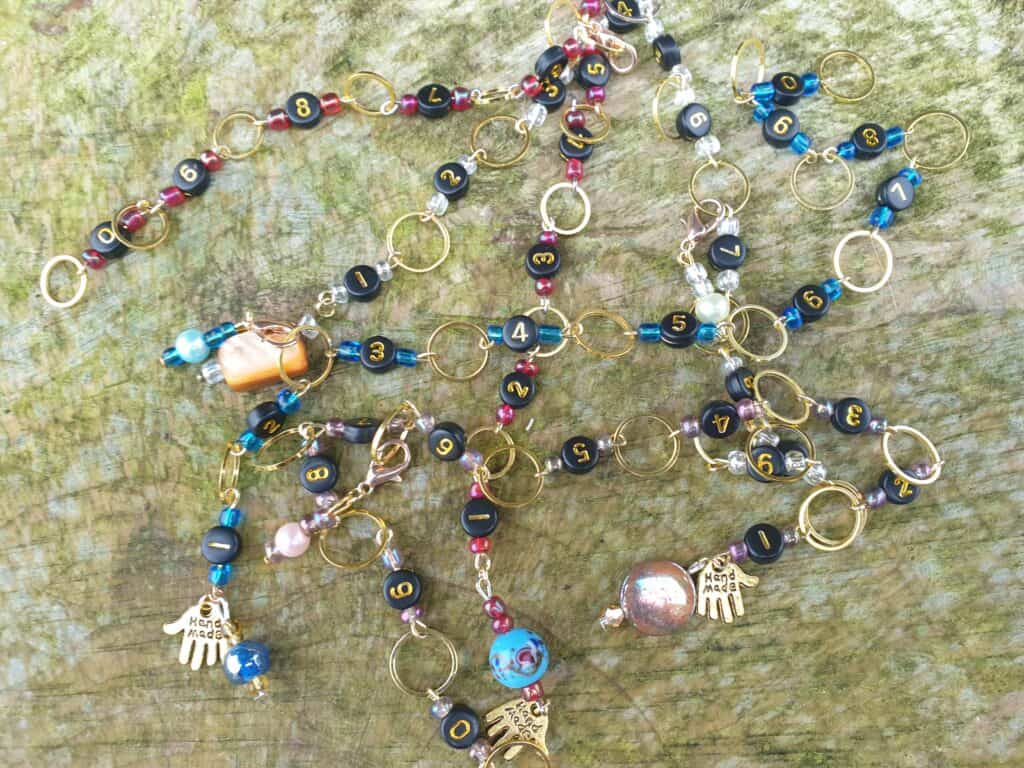
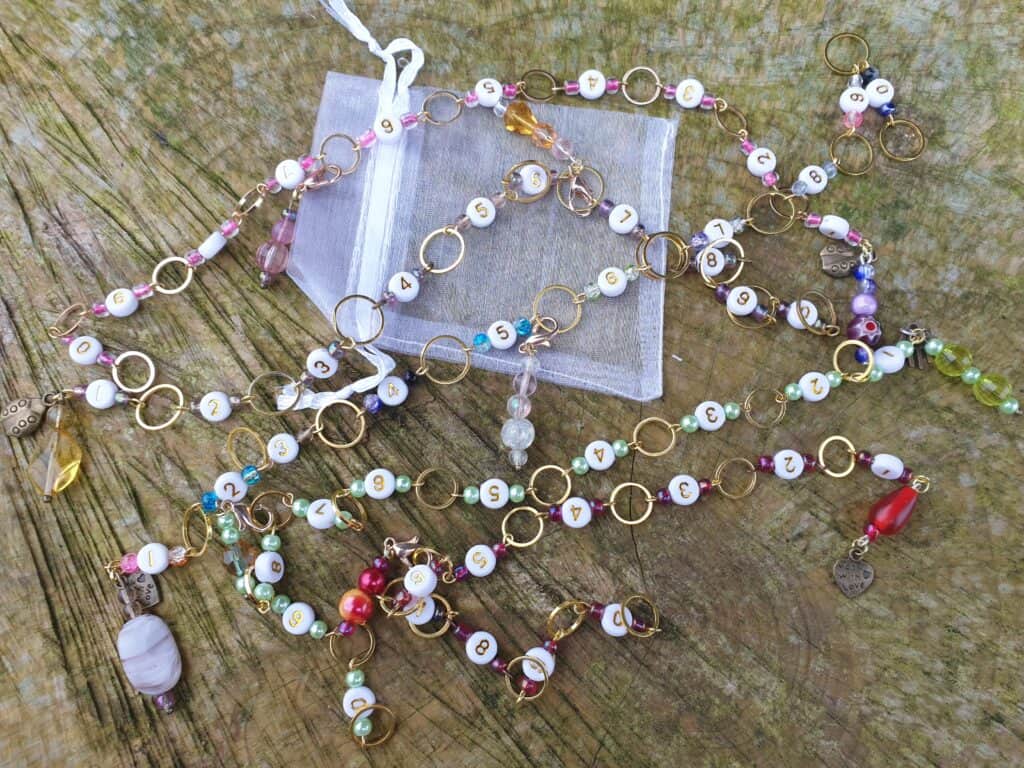
The chains are all made so each one is unique and definitely one of a kind as I use different beads and markers on each and every counting chain. The only common theme is the colours of the number beads and the small seed beads that I use with the number beads. However, the colourway of the seed beads is limited, in that I only use the same colour on about 4-5 chain sets and the colours are often limited. The end charms and the lobster clasp marker and unique and different for EACH chain. I wanted these chains to be unique and feel like treasure, so NOT ONE chain is the same. The counting chain comes in an organza pouch for safe keeping, along with a printed card on how to use them and the size of knitting needles they will fit up to. These would make ideal gifts for a knitter or yourself.
The row counting chain is only for knitting and cannot be used in crocheting. However, the other row counters with the opening clasps are great for crocheting and work just as well.
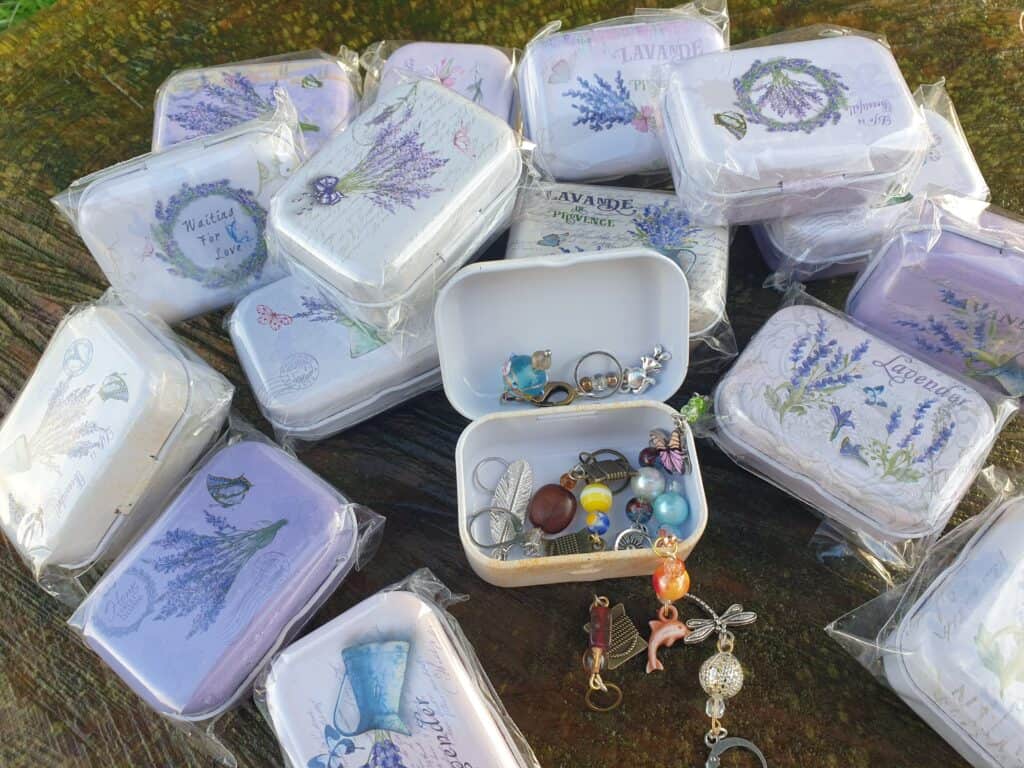
Don’t be afraid to use the stitch markers and use them often. Keep them in reach and keep them safe in a lovely tin. I can even help with that …. I have some lovely vintage tins that have arrived this morning that will be just so perfect for keeping your cute markers in. These tins are available on the website.
I will be regularly updating the sections with new marker designs, and I have quite a few ideas for some more counting tools. So do keep a regular look on the website for newly added markers. I am wanting to have a large selection of handmade markers that are not only practical, but also unique in being limited editions. So when you purchase any markers, you know that they are NOT mass produced and will only be a limited line. This applies mainly to the markers that use the beads and charms, as I purchase in small orders. I feel that in this way, the markers are that extra bit special. You know that you are purchasing a ‘one-off’ marker that cannot be mass produced.
One can never have enough markers and there is no need to just use the one for multi tasks and forget exactly what its task was for. Have a collection of markers that have their own individual tasks and are clear about what you need to remember. Adorn your knitting and crochet with handmade unique markers.
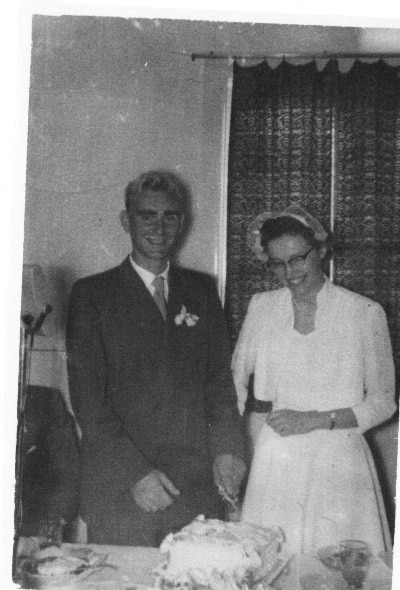
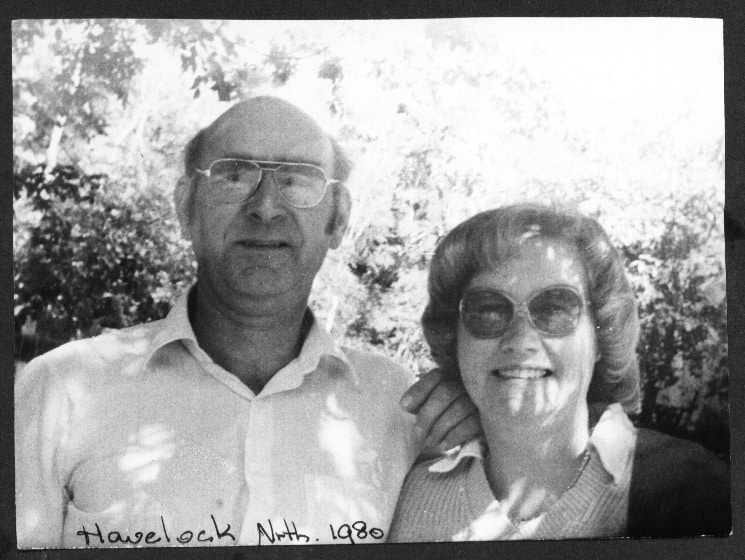
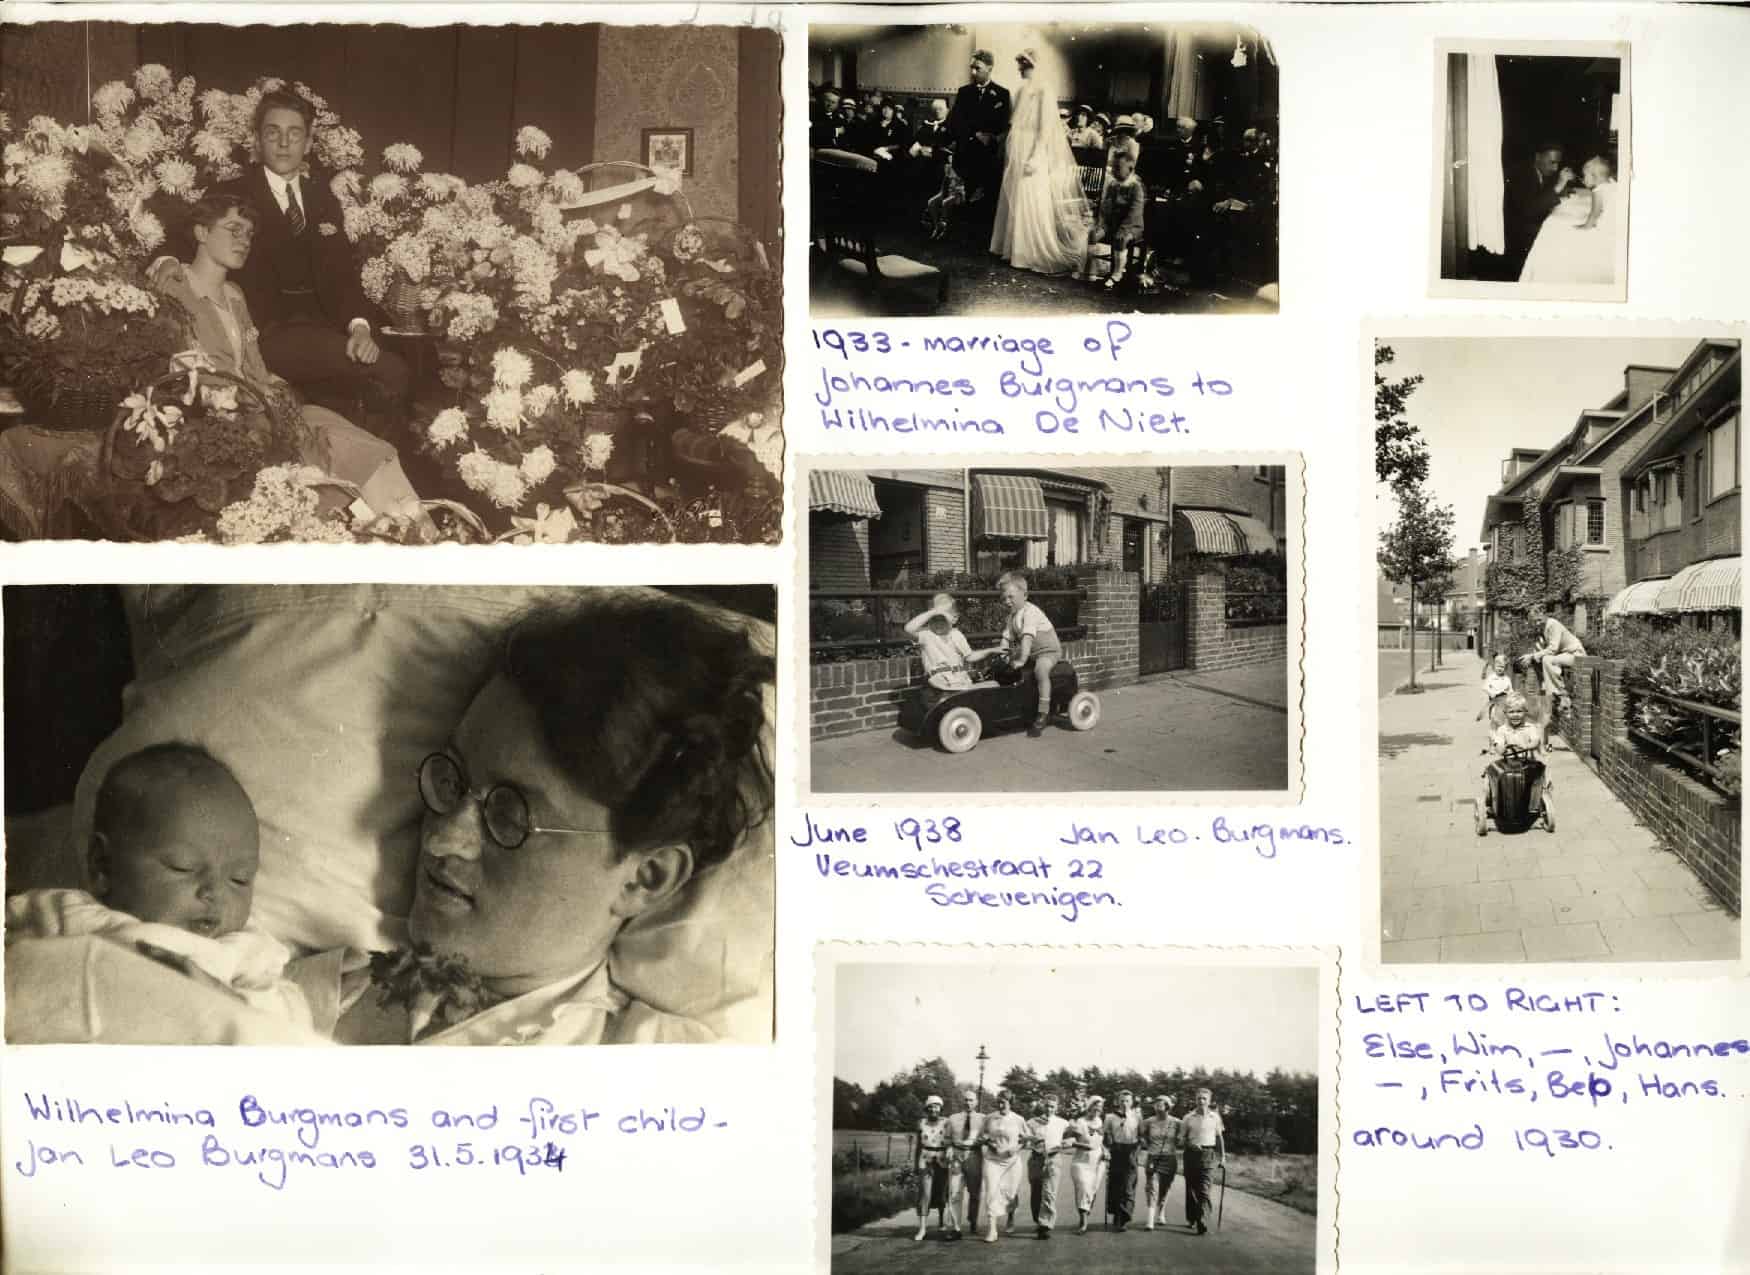
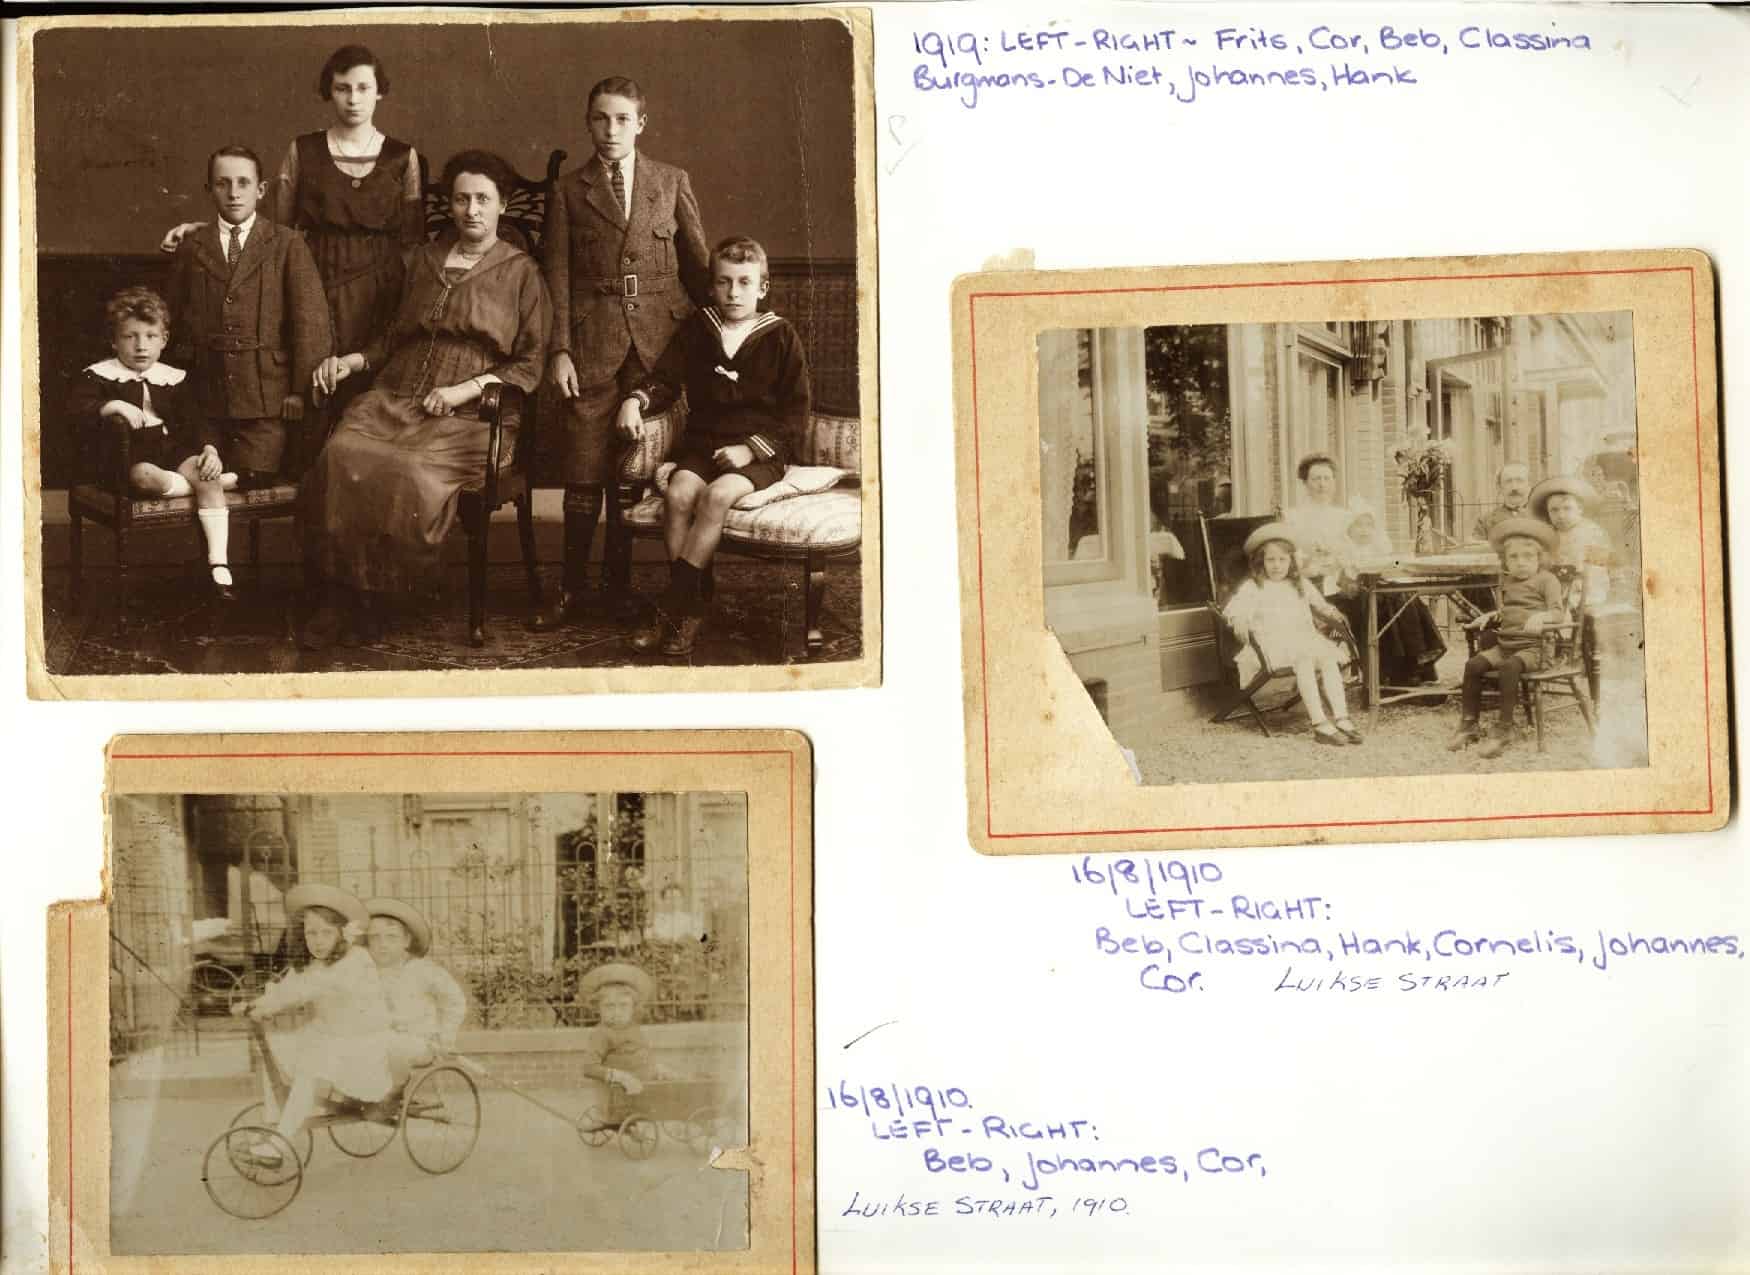
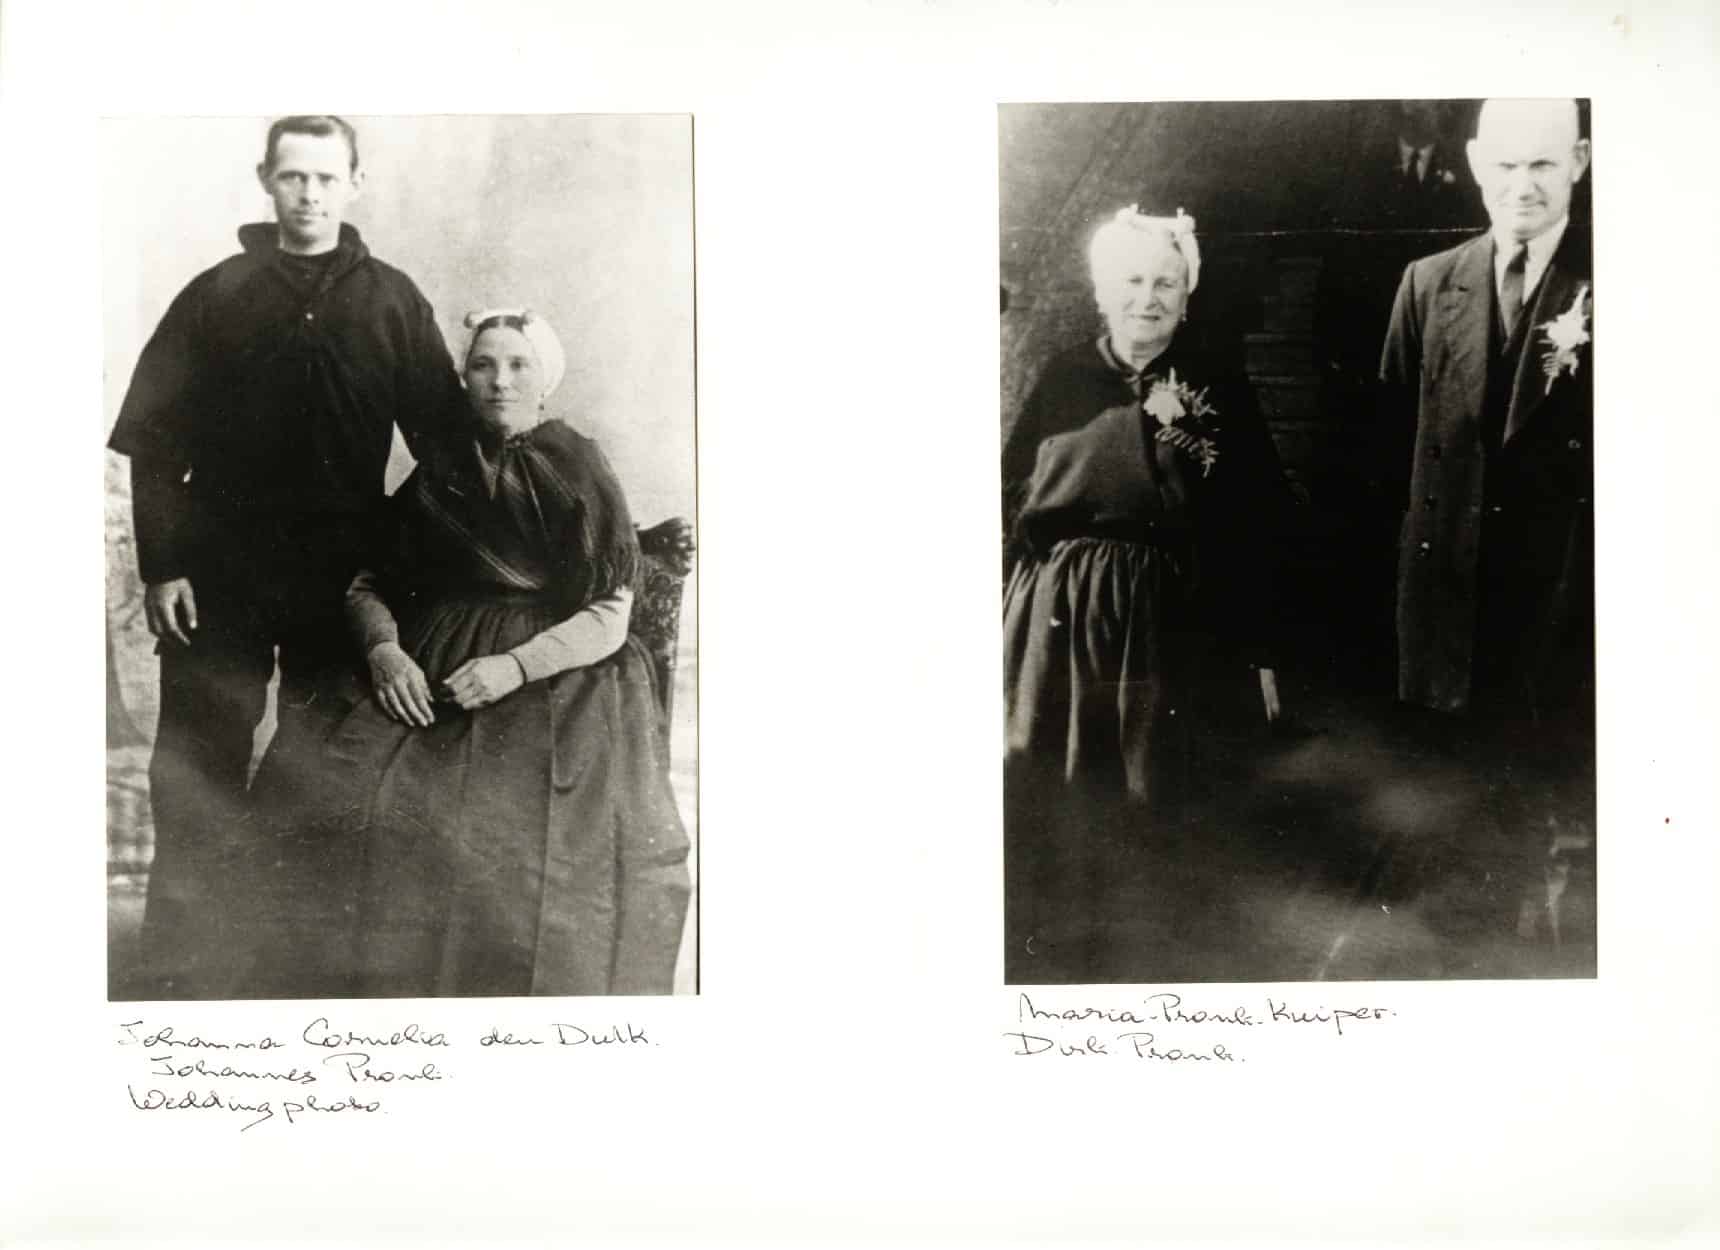
I was working on the computer this morning trying to finish doing the draft pattern for the final instalment of the Embroidery Sampler Book and I got distracted ….. After losing myself for a hour or more going through some forgotten photos on the computer. I went down a complete rabbit hole and the memories came flooding back …. Both happy and sad memories…. I felt it would be good to actually write a blog and share some of my family background with you all. I am sure you know that I am a kiwi (New Zealander) and have made my home here in Northern Ireland since 2005. But not many know that my family heritage is from Holland. My parents were Dutch and immigrated to New Zealand in the mid/late fifties. I say were …. as both my parents have since died. Dad died far too young from a lung tumour, he was 66 years and had only retired from his job as a Horticultural Scientist and was planning a new venture of being a Horticultural Consultant. He had been advising several countries on growing vegetables in the last few years of his life and made quite a few discoveries in developing better growing vegetables such as sweetcorn. My mother lost all heart after Dad died and she died a few years later, never truly recovering from Dad’s passing. I think it is even more special as Dad would have been 87 years old in a couple of days if he was still alive.
Wedding Day
Photo taken in 1980
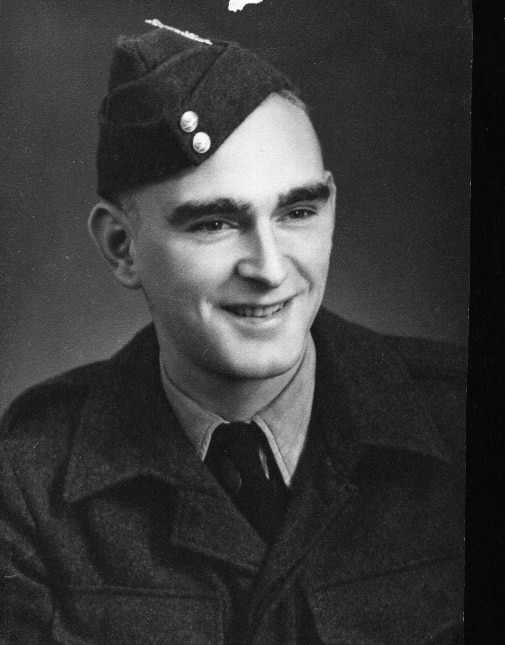
Dad in the Army 1950
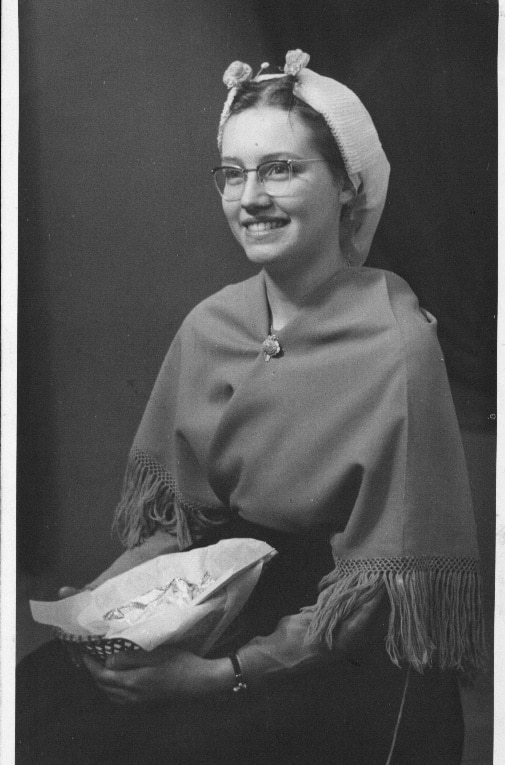
Mum (20) in family costume
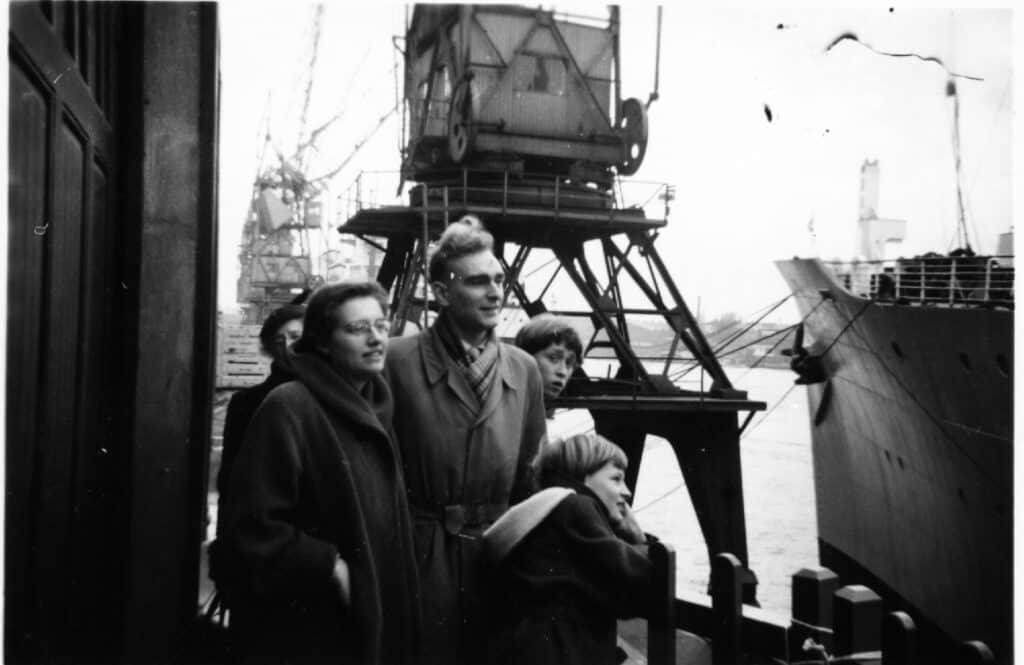
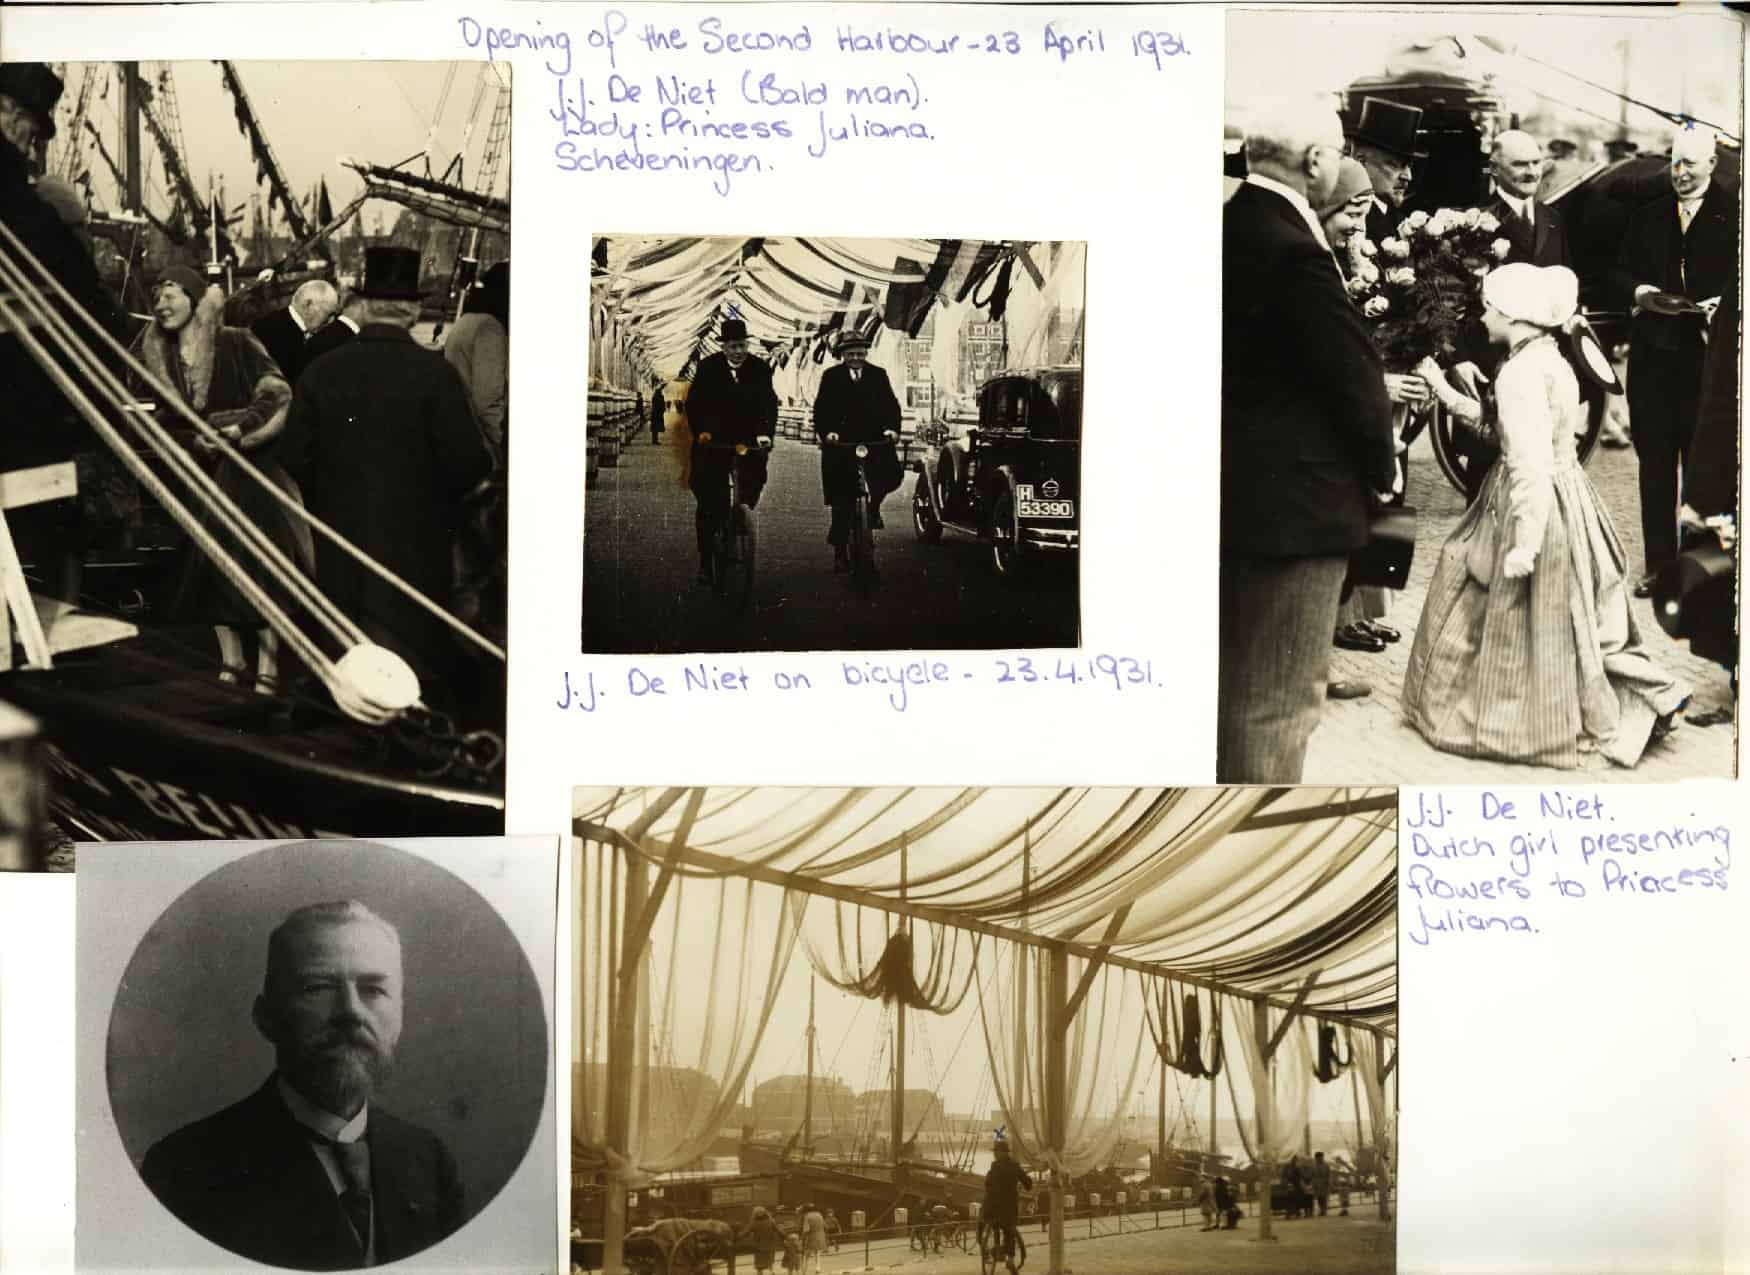
They left Holland to start a new life in New Zealand under the £5 scheme, encouraging people to come to a ‘new’ country leaving their home country which was devastated from the effects of WWII. I remember the stories Dad would tell me about being a young boy growing up in a war torn and occupied country. I am amazed that he survived with all the things he got up to. War had torn his family apart and the scars remained long after the war and occupation had finished.
Leaving Holland for New Zealand
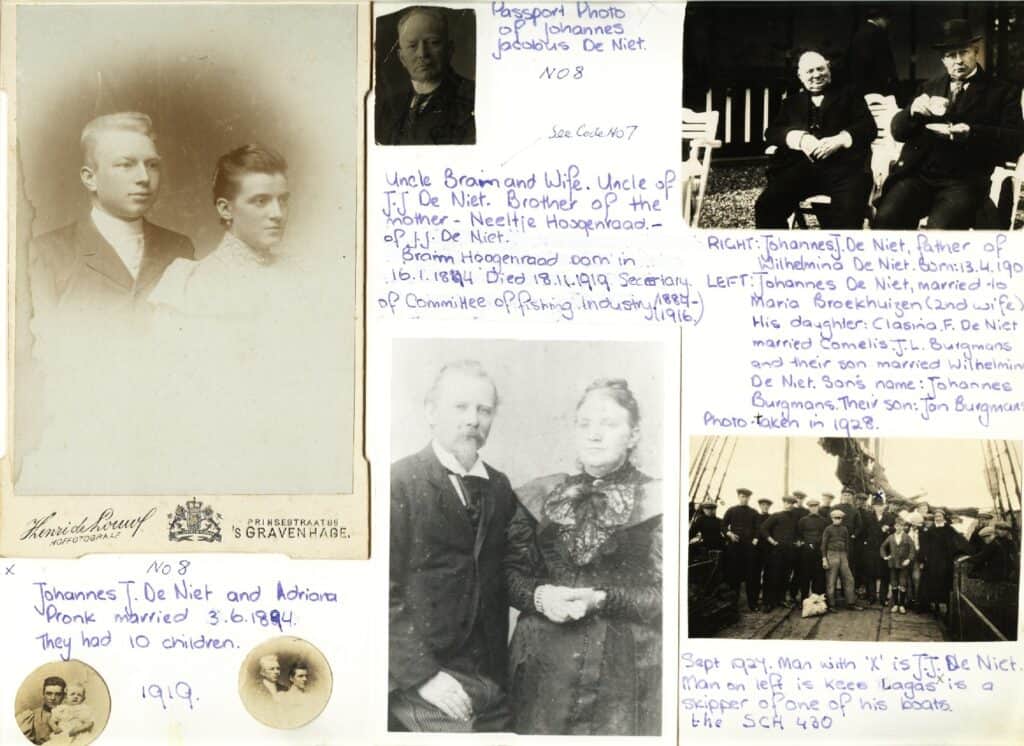
Looking back over the photos, brought back a rush of emotions and memories of growing up. The photos had been scanned onto a CD by my sister after Mum and Dad died, so we could all have copies of the family photos. There were scanned photo album pages of both sides of their families, photos dating back to the mid 1800’s. I then recognised my own handwriting as a 14 year old girl. The memories came rushing back of the evenings and days I had spent with Dad doing the family history and tracking down all of the family that came before us, those that have enabled us to be here today. He tracked our family tree right back to the mid 1500’s and we all come from proud fishing folk from a seaside town in Holland. I got to know my ancestors through these photos and got a glimpse into what their lives were like and who they were by the facts that Dad had discovered by searching through church and court records. Back then, there was no internet or google, everything was searched through newspaper cuttings, museum records and writing to the different sources. He sourced the original photos from family members and we compiled everything into a photo album.
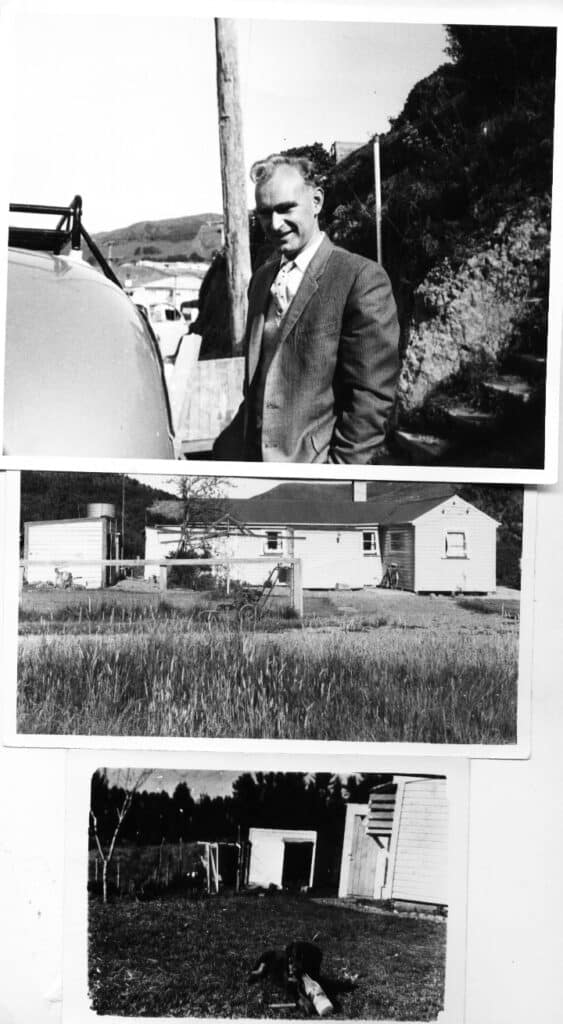
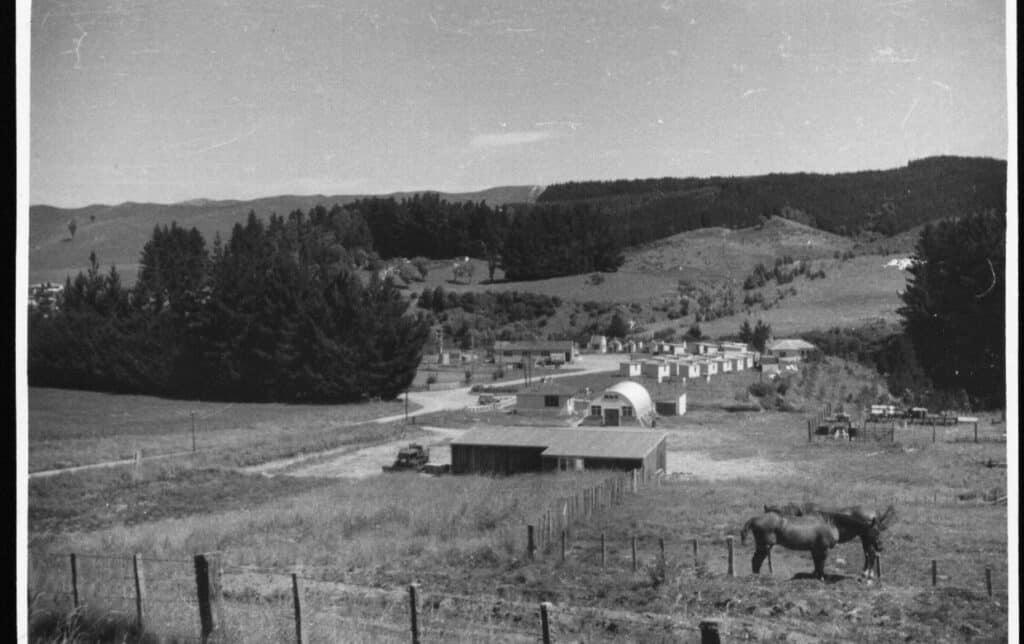
I then came across the photos of when they arrived in New Zealand, in their early twenties and having to adjust to a far different culture and a different language. Coming from Europe, even though it was damaged by the war, New Zealand was not as modern as Holland. I remember my mother saying that it was like going back in time. They moved from a fishing town that was just outside The Hague to a small rural settlement, where they had to live in two army huts joined together, in the middle of a huge pine forest, with the closest neighbours being 5 miles away and only being able to come into the village once a week. It was a time when females were not allowed to frequent pubs, there was no the entertainment/cafes that they had been used to in Holland post war. The condition of the cheap passage to New Zealand, was that Dad was employed by the New Zealand Government to work in the State Forests for a minimum of 2 years.
Army Huts
Forestry Head Quarters
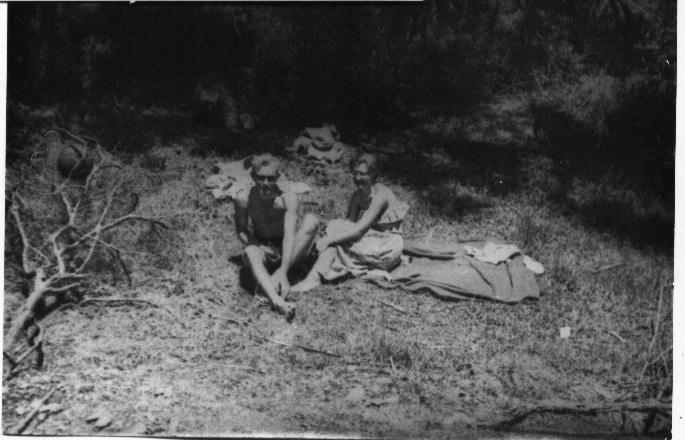
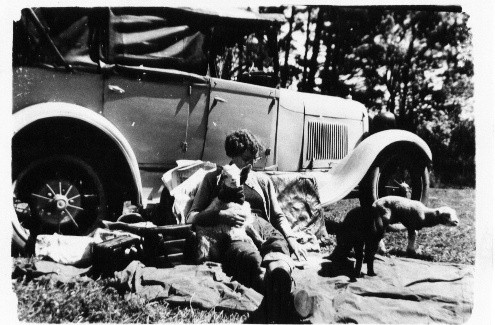
Mum and Dad in the forest
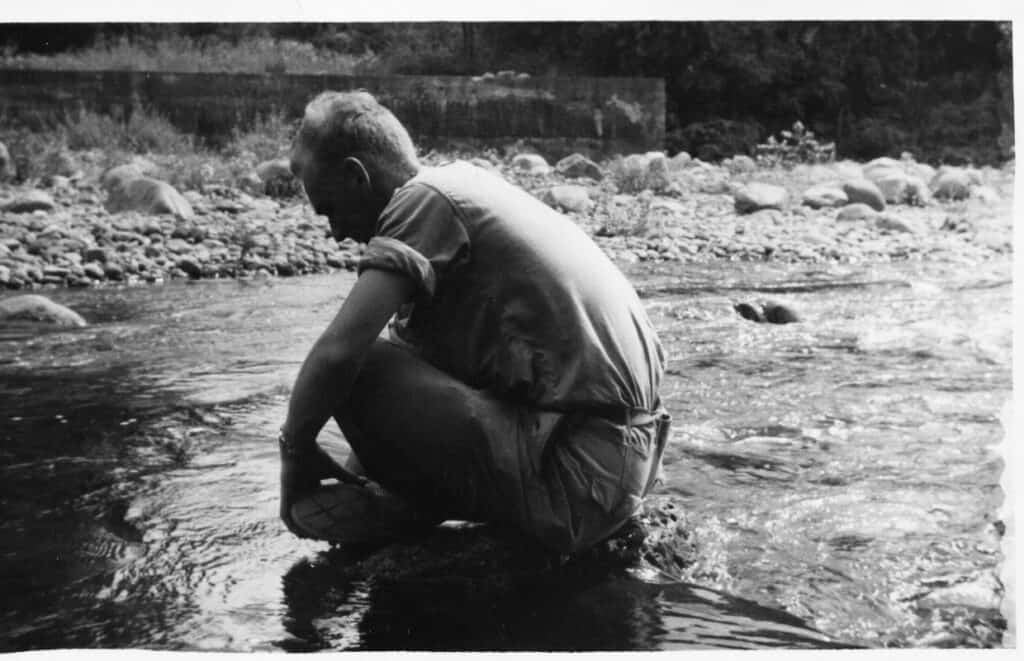
Dad reflecting in the creek
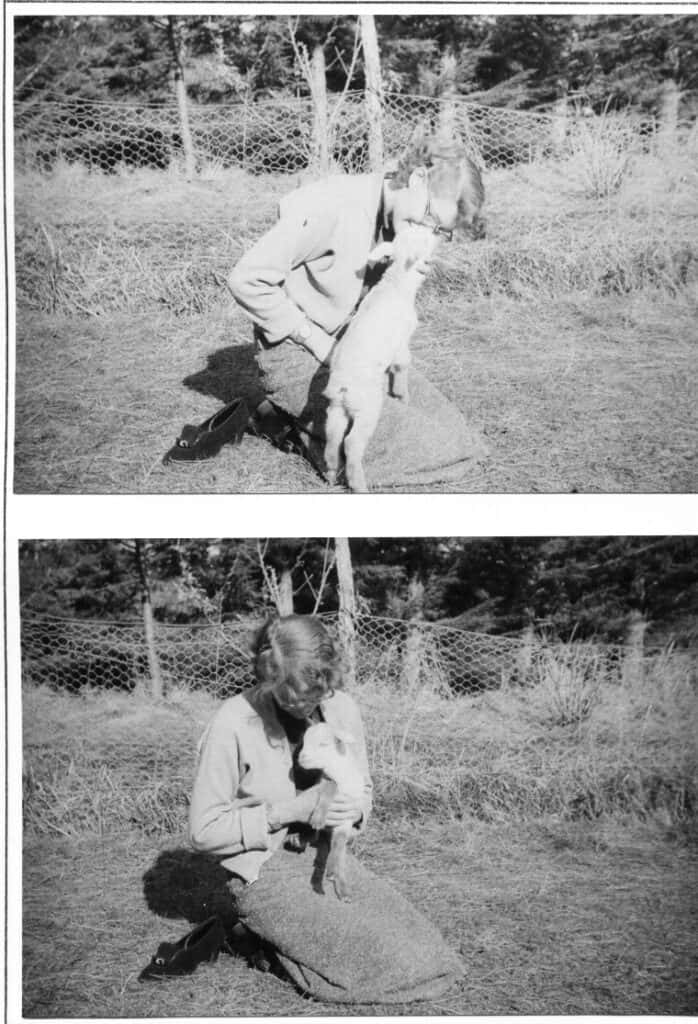
Mum with the pet goats
Pet goat
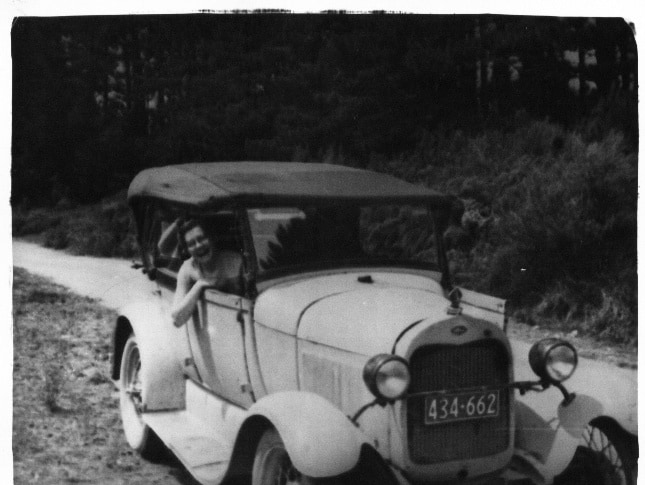
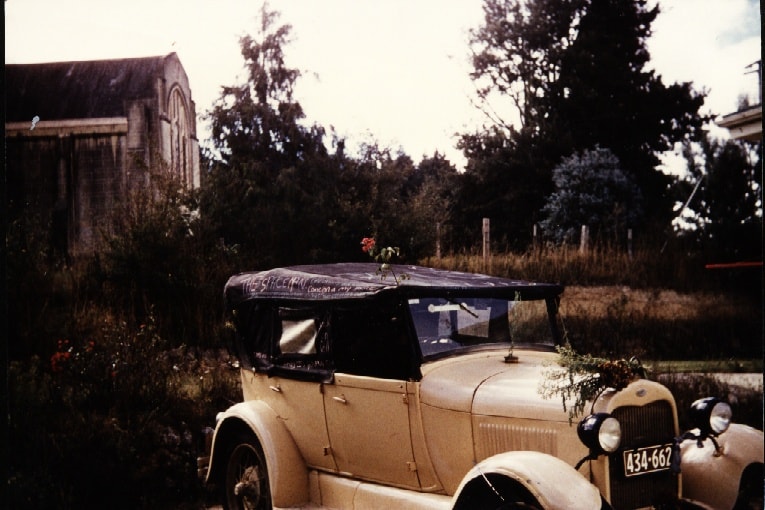
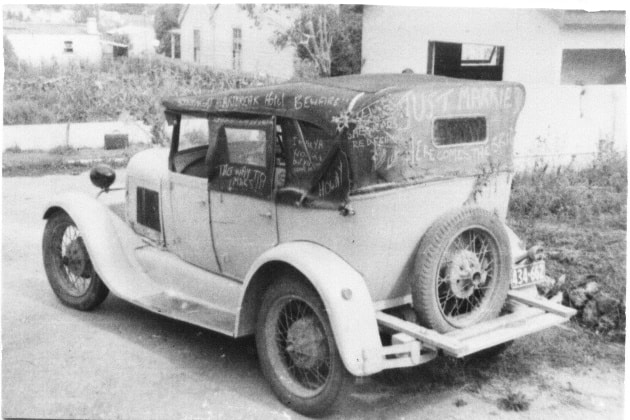
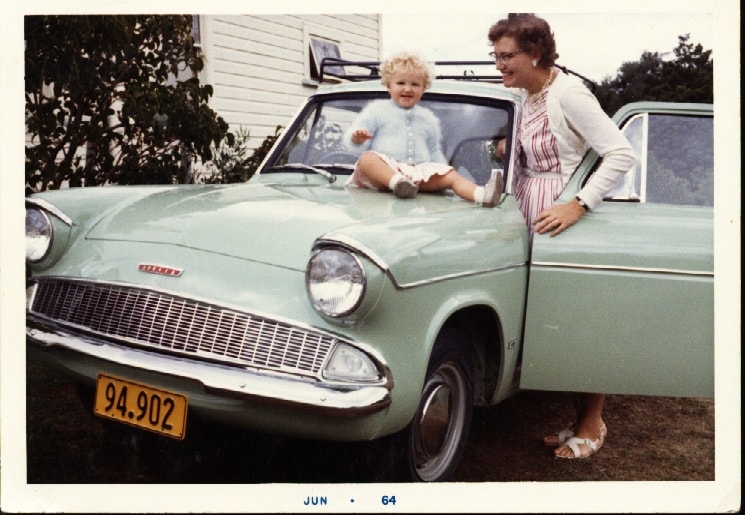
I remembered the stories that they would tell me about their life in New Zealand before I was born. When I was about 10 years old, we went on a drive to that forest to find their first home in a new country, but the army hut had long since been pulled down. They often talked about living in the small hut with no electricity or inside toilet. Far different from what they were used to in Holland. Their lighting was a tilly lamp and the heating from a wood stove, where they used to do all the cooking. Dad told us stories how they had a pet goat that used to love sitting on his lap by the wood stove. I guess many of us would not be prepared to live this way now, but they were young and it was an adventure. They even brought themselves a car after a few years. They no longer had to walk into the village or rely on others for transportation. Their pride and joy was a 1929 Ford Model T that they brought for £50. How I wish it was still around.
1929 Model T
1929 Model T
1929 Model T
So, when I should have been working on pattern writing, I got lost in looking at photos, long since forgotten and recalling times long since gone. I became saddened seeing my parents looking back at me from photos taken so long ago, smiling at the camera. It was if they were smiling at me, reminding me of the good times and when they were young. I feel so blessed that I have all these photos, though only copies on the computer, but still, they are treasured windows into the lives of family who lived a full life long before myself and my daughters. A treasure that will be cherished and passed down to the next generation of the family, so they have knowledge and a record of where we have come from and can add to the record of who we are.
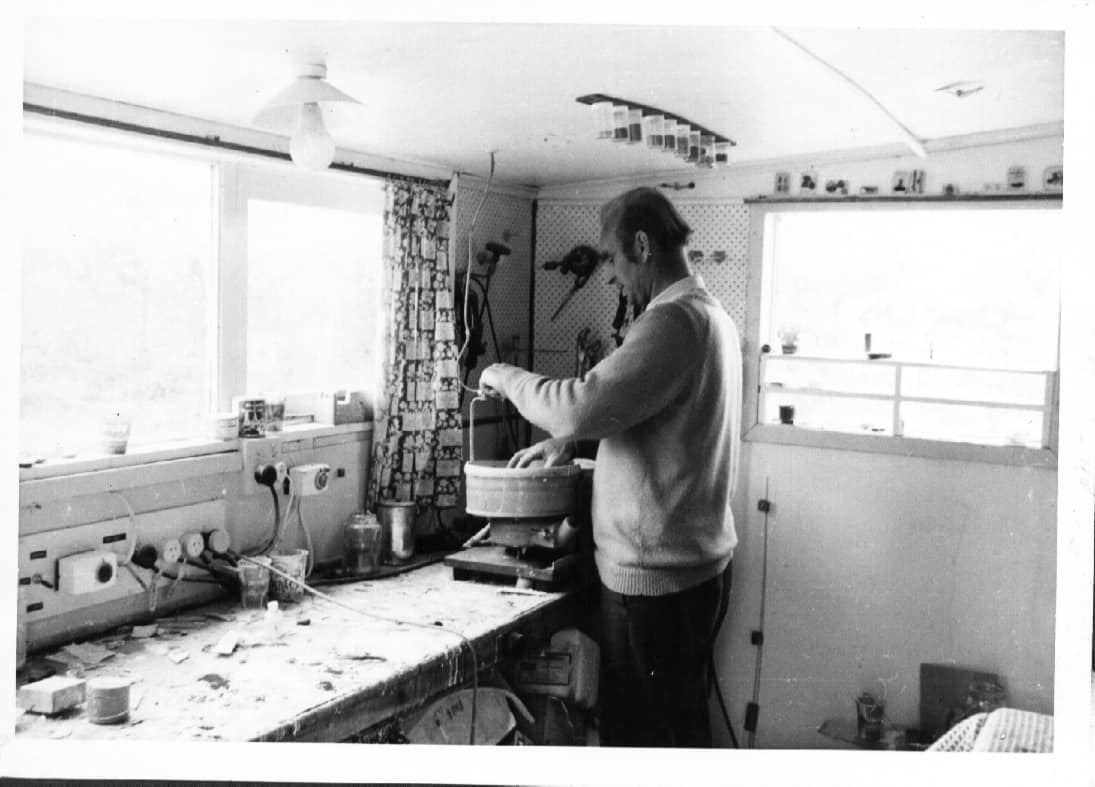
On searching further through the folders, I found more photos of when I was young (60’s) which brought back so many memories. I was the tomboy and spent most of my time with Dad in his workshop. He was experimenting with resin and putting objects into the resin, from insects, small animals, flowers, watches and other bits. It was still a new technique and not well known. But he did this in his spare time and was selling resin ‘fish tanks’ that were put into caravans. Some of the resins didnt work. I remember once he tried to put a dead mouse into resin but he hadn’t prepared the mouse correctly. After a while, the resin exploded and mouse ‘bits’ went everywhere! We had moved into a new house in a town as Dad had got a job working as a horticultural scientist for MAF (Ministry of Agriculture and Fisheries) where he worked with developing tomato varieties. There were so many photos of that house when I was so young and of my older sister. We then moved again in 1970 to another part of the country, where we remained.
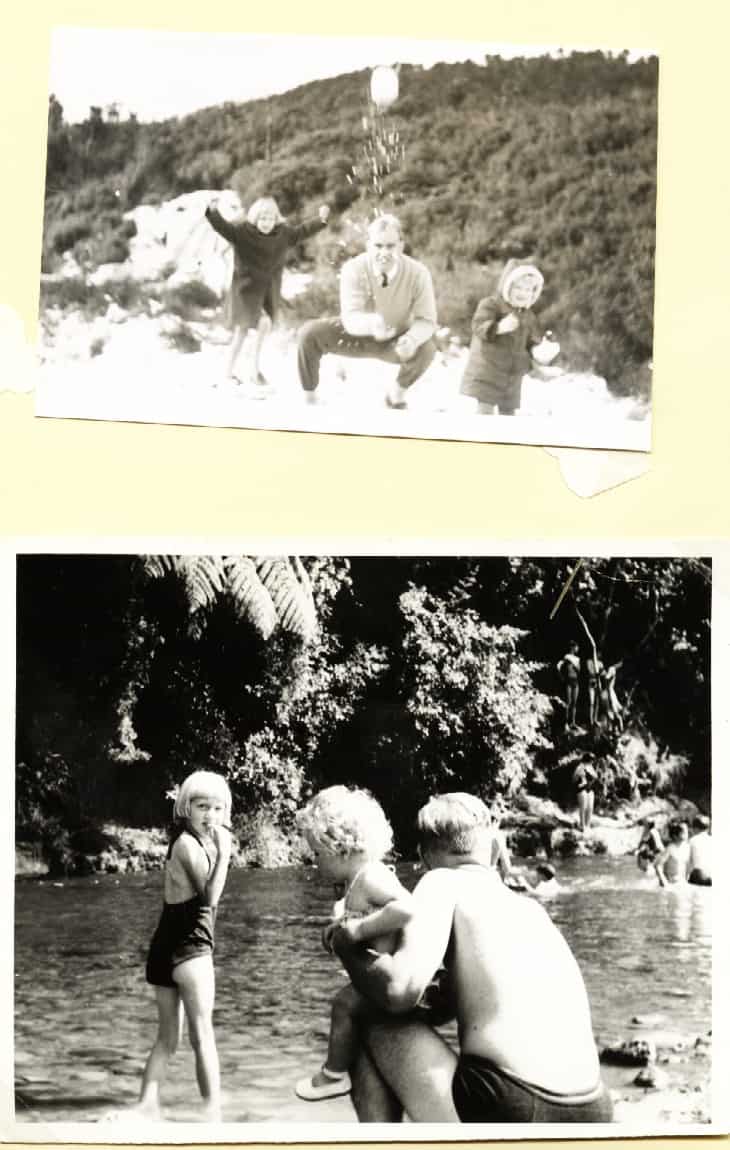
Me (curly haired toddler), my older sister and Dad
Dad in the workshop
Me and Dad
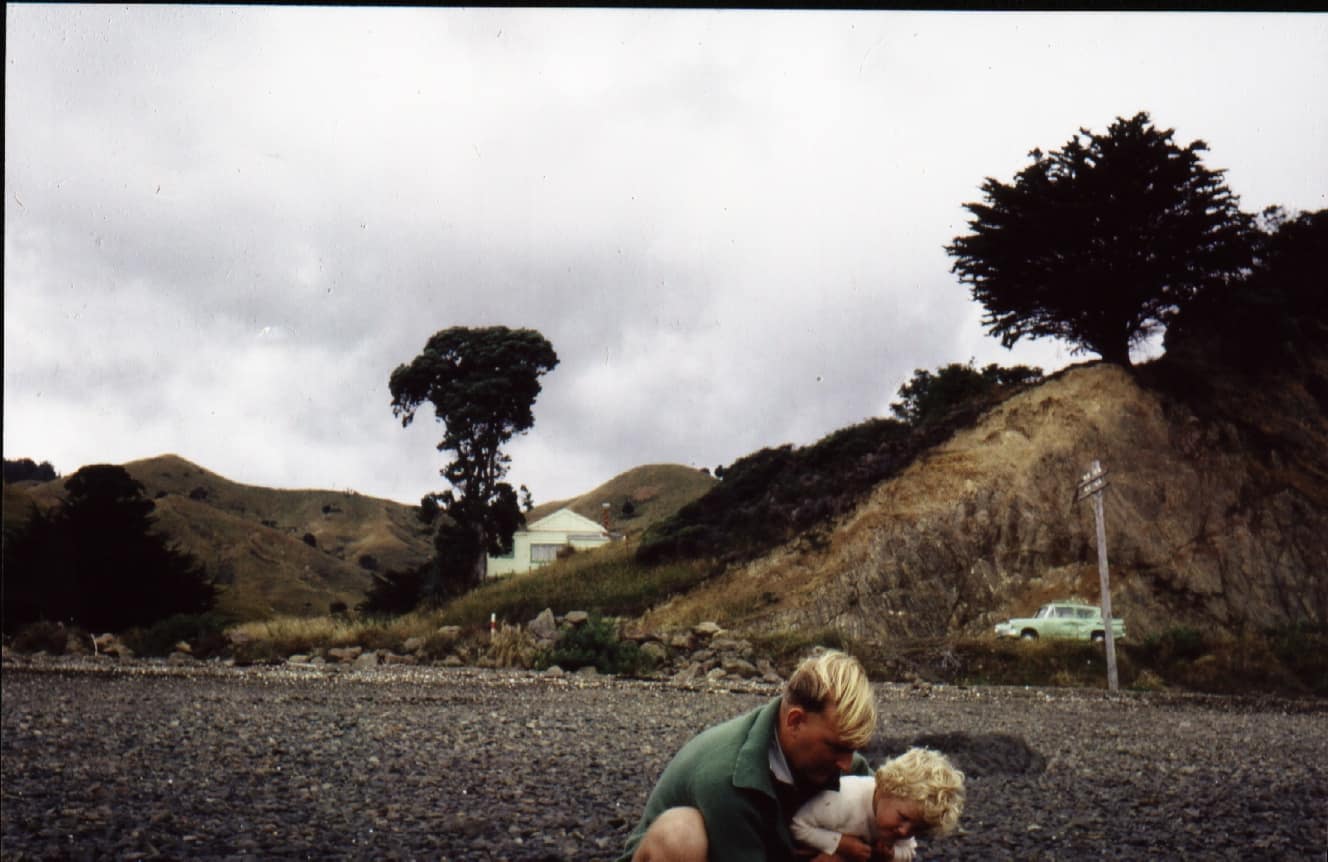
at the beach, digging for pipis (shellfish) at the beach 1960’s
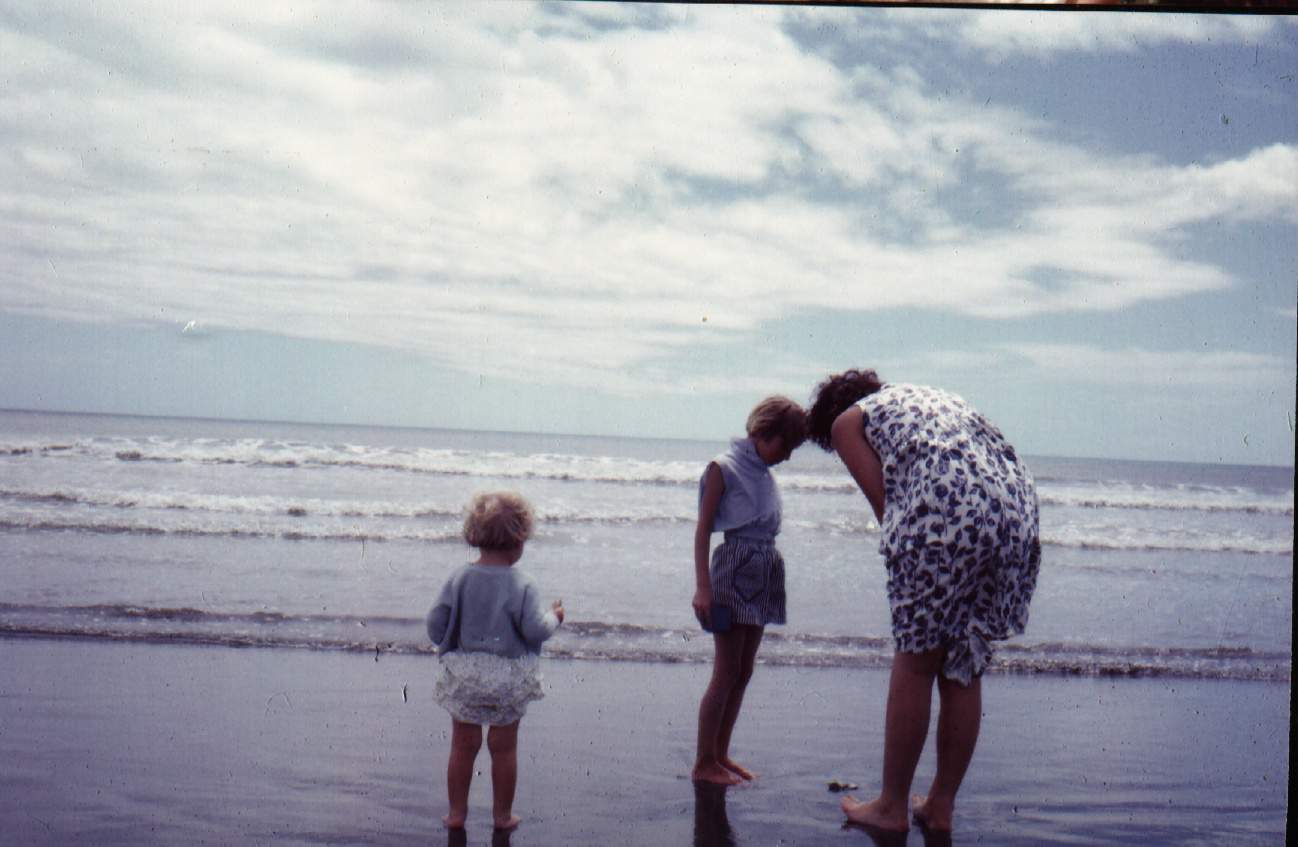
1960’s – me and Mum
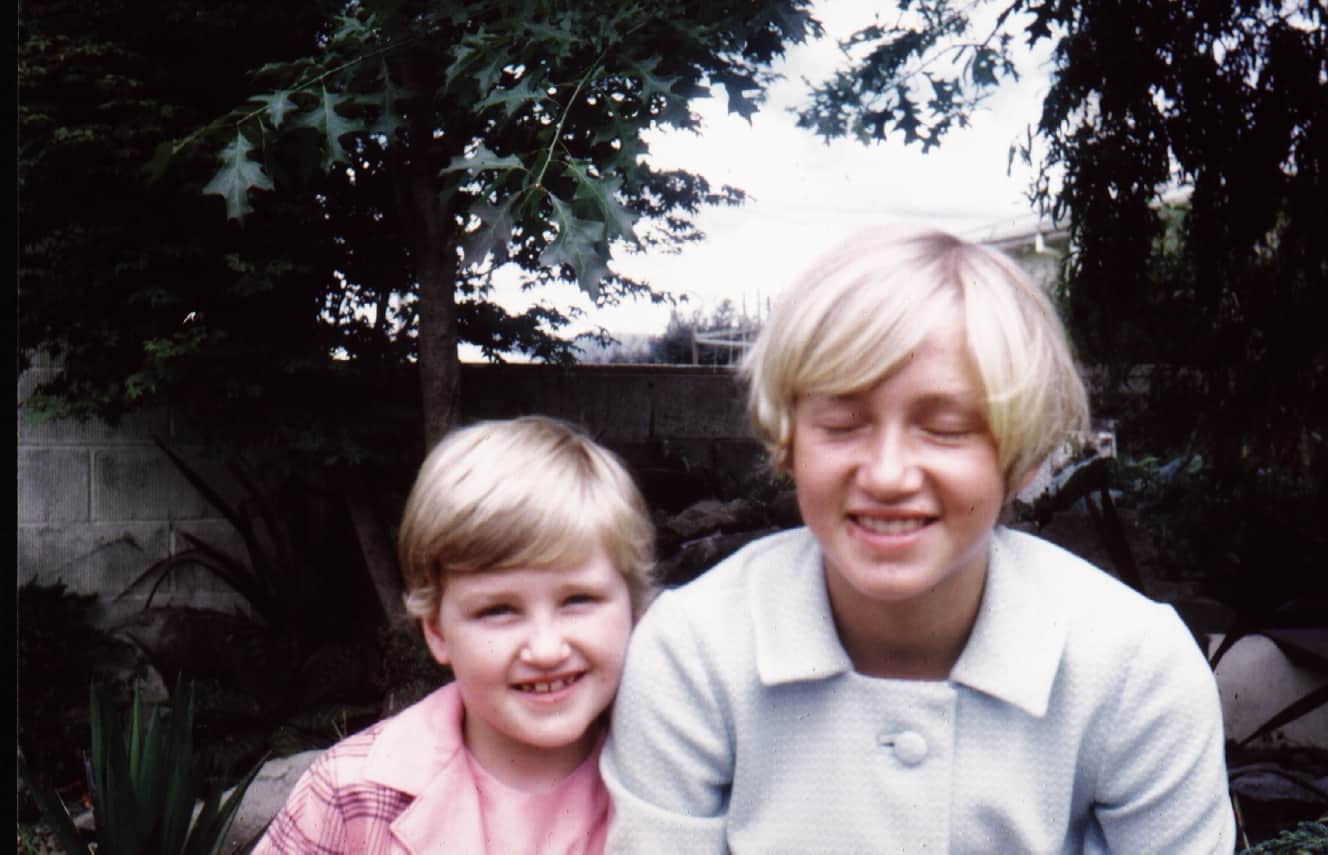
me and my older sister – 1970
So, even though I am a kiwi, born and bred in New Zealand, my roots stem far back in Holland where my father’s side of the family owned the fishing boats and my Mother’s side of the family worked on the fishing boats. The men worked on the boats as fishermen and the women worked on the beach sewing and repairing the nets. That was their way of life for many hundred years.
Costume for the area wore by all female family members
Side of the family that owned the fishing boats
Thank you for allowing me to share with you some insight into my family heritage and the ancestors that played a part in what I am today. I come from a family of strong women who lived a hard life, supporting their men to work on the fishing boats, family that lived through a war torn and occupied period. They were also women that crafted to support their families and I have been able to carry on that skill.
So I have spent time, going through photos of past family generations, recalled old stories of past generations and memories of spending time with my parents and understanding who they were. Having these photos and memories is truly a precious gift and something to share for the next generations…. So, now that I have reflected on the past by going through these photos , ….. I really should go and get some proper work done.
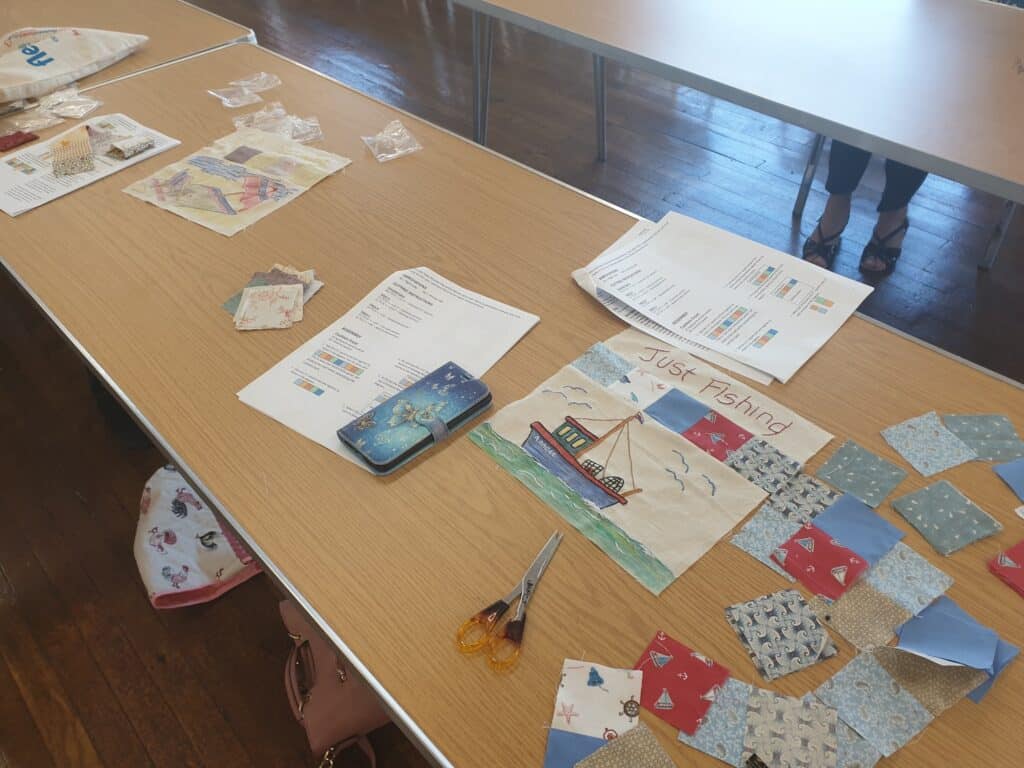
When getting my latest designs ready to be published and uploaded to the website today, I started thinking about the theme of the designs. These four designs were actually created over a year ago for a quilting group who were doing an Inktense/Redwork workshop. They wanted something related to summer…. So I came up with four designs, featuring something summer related. The designs went down a treat and the group thoroughly enjoyed that day. I love coming up with special designs for a particular group and workshop. It means that I have the excuse to create and draw. However, after the workshop I am usually left with a design that I now need to work out what to finish creating it into. That can be a challenge at times. Thankfully, the group knew what they wanted to make with the designs – a cushion.
Community Group – Inktense/Redwork class
It was a fun remit and I enjoyed being able to design a cushion which uses 2 ½” fabric squares to complete the front of the cushion design front. It was also a great way to stash bust and use up all the small scraps of fabric and cut them into 2 ½” squares! I remember how it took quite a while to create enough 2 ½” squares for each kit, each cushion required 70 squares! I needed about 20 kits and also wanted to be able to offer a choice in fabrics. Quick math calculations meant that it equalled a lot of 2 ½” squares! Too many for me to want to add those up! Thank heavens for my Accuquilt cutter. A pass through the machine cut 56 squares in less than a minute! It took more time to bag up 10 squares of the same fabric into the wee plastic bags!
So fast forward to 2021 and I realised that those four cushions that I designed and made for that community group 18 months ago …. Had never been finalised. The actual completed patterns had never been published. So, here we are in Spring …. The weather is definitely NOT spring like and summer is coming up quickly. It may not be a warm summer or one where we can go away on foreign holidays … but it is still summer … The months when the children are off school and hoping for nice weather so they can go away and do fun things…. So, I thought this was a great time to publish these designs so we can all dream of the best summer holidays ….
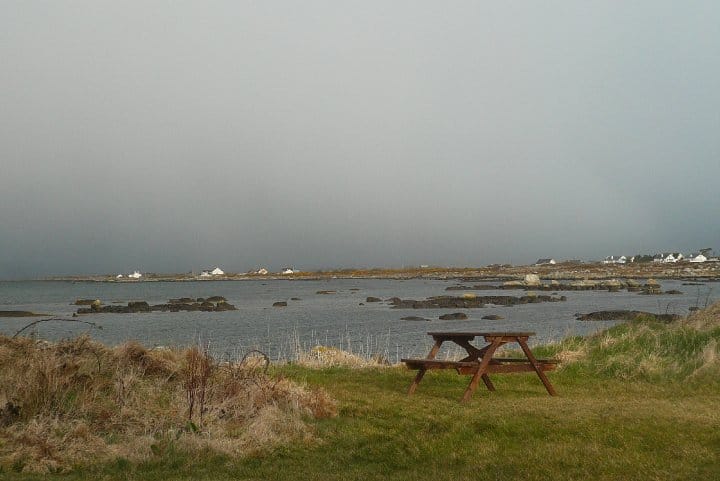
Summer Break in Connemara
I find that the hardest part of writing patterns (apart from actually coming up with the design) is writing something about the design …. Something to catch your imagination and relate back to the design …. When a design is left so long before the actual writing of the pattern, I seriously do wonder why I come up with words for the design. This is what I faced with these cushions …. The reasoning behind the wording on each cushion. Note to one self ….. write down reasons on why the design is done and how it relates… However, I seriously do wonder on my creativity at the time of coming up with the words for the designs!
So, while trying to come up with a suitable summary for the ‘Summer’ pairs – Summer Camping and Summer Huts; ‘Just’ pairs – Just Relaxing and Just Fishing, I really had to use the old brain matter and think of why I came up with the wording. The summer designs on my cushions represented a simple and relaxing summer, one where we can do nothing but relax and indulge in what we enjoy doing over the summer months. It is strange on how your brain goes when you think of something and then it gets side tracked. When you think of summer, I think most of us would immediately think of foreign summer breaks in the sun and exploring new countries. I have to admit that it is lovely going on holiday to another country to enjoy the warmer climates while exploring the culture and scenery. But is it really relaxing, doing nothing and recharging our batteries on these foreign breaks?
Summer holiday in Ibiza
But that was not what the cushion designs were about, so I thought back on my childhood summer holidays. Those memories really struck a chord. My childhood years were in the 70’s and in New Zealand. I think life back then was far different from what it is now and our expectations of summer holidays now, are not what they were back then.
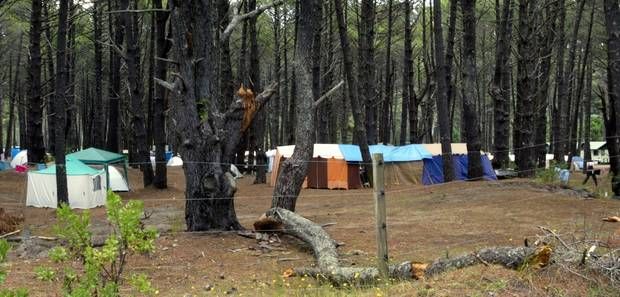
Every summer, my parents would take us away camping to a beach up the coast for a month. It was a 2-hour drive and the car was packed with our tents and everything we needed, along with the caravan being pulled behind. Our excitement grew as we got close to the beach and the camping group …. The excitement of meeting up with other families that went there every summer as well and renewing friendships…. The excitement of spending the days swimming in the sea, exploring the sand dunes, pine forests and sunbathing until the sun got too unbearable. We hung out in groups, spent the days doing what we wanted to do and only going back to the caravan when we needed food. We celebrated New Years Eve at the beach. The campsite was huge and quite magical as it was set under the branches of ancient and tall pine trees close to the beach …. It was literally a 5-minute walk from the shelter of the trees, over the sand dunes and onto the huge sandy expanse of beach, which was a sheltered and safe sea for swimming …. Except if there were shark warnings/sightings …. thankfully they didnt happen that often … but enough to make you weary of swimming out too far ….
camping under the shelter of the Pine trees
Those annual seaside holidays were the highlight and created such fond memories of long hot summer days spent at the beach. Summer camping and even though Beach Huts were not part of the Kiwi Beach scene, I still loved the thought of a beach hut and often thought that the beaches would be far better with them, to offer shelter from the fierce sun and blistering temperatures. As a wild child, I spent my summers going barefoot and I still remember the times that I would go down to the beach at 9am for the day and forgot my flip flops, and having to literally jump from blade of grass to another blade of grass through the sand dunes as the sand would burn your feet and then make a dash to the wet sand so you could cool your feet! There was a summer when I spent the day playing tennis on an asphalt court and by that evening the soles of my feet had huge burn blisters from the hot ground!
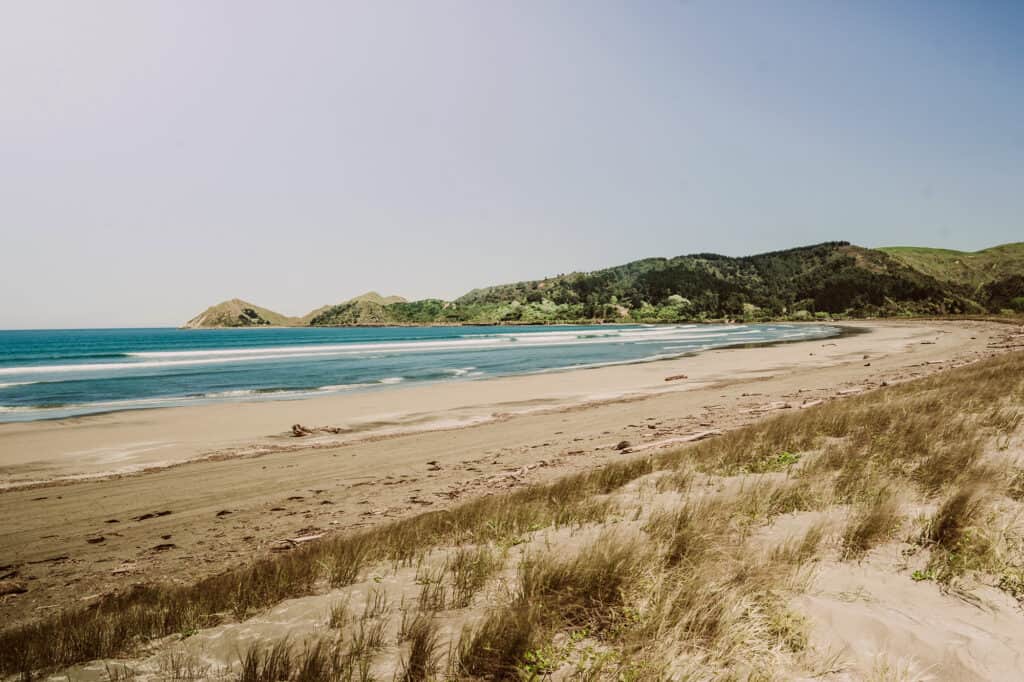
So back to the beach …. When I started to think on what to write for the patterns and the blog, the memory of those annual camping holidays got me wondering about the campsite and how magical it was. I couldn’t even remember the name of it but ‘Google was my friend’! Google search brought up the name and location – Blue Bay, Opoutama, Hawkes Bay, New Zealand.
Blue Bay, Opoutama, Hawkes Bay, New Zealand
In my search, I discovered that Blue Bay Motor Camp no longer existed! The pine forest was no more. The Motor Camp that had been in operation for over 60 years and was the foundation of many families’ annual summer holidays had been forced to close in the early 2000’s. It was sold to a Property Developer who came up with the vision of creating an exclusive residential resort, a mini private haven, complete with street lighting, paved avenues and decorative sculptures and hefty purchase prices for the sites. In effect, basically it made Blue Bay, a private beach, no longer accessible to the general public.
Exclusive Residential Resort, Blue Bay
The developer finished planning the site in 2004, but he faced financial difficulties and it was taken back by the mortgagee who then sold it in 2008 to another developer. However, the site has remained dormant since then! The campsite that was sheltered by the pine trees and backed onto a beautiful beach is no more. In reading about the campsite, I found out that it didn’t close quietly. There was a huge protest and even a documentary was made of the development due to the fact that it wasn’t the only ironic kiwi camping site to be closed. The great kiwi way of life was becoming extinct. The protesters were not able to stop the development and the pine forest being bulldozed, but the exclusive residential resort never rose from the ashes…. It is still a barren plot of land with streets laid down. Reading this, about the wonderful place we spent our summer holidays at was sad. It was like part of my childhood had disappeared. But I will continue to have those memories, the days spent swimming, sun bathing, making new friends, playing hide and seek in the sand dunes and pine forest, my first kiss …. So to me, these cushions represent those summer months camping, just relaxing on the beach for weeks on end, carefree summer months of a childhood that was free …. Even fishing on the beach or off the local wharf with our fishing lines and hook, attached to a long branch that we had found under the Pine trees ….
What childhood/fond summer holiday memories do these cushions bring to you ….. What colours would you do your summer collection cushions in ……
The Summer Collection comes in two patterns – Summer Holidays and Just Summer – with two designs in each pattern. Both patterns are in both PDF and printed form and available from our website.
Summer Collection – Summer Holidays and Just Summer
To provide the best experiences, we use technologies like cookies to store and/or access device information. Consenting to these technologies will allow us to process data such as browsing behaviour or unique IDs on this site. Not consenting or withdrawing consent, may adversely affect certain features and functions.
Functional
Always active
The technical storage or access is strictly necessary for the legitimate purpose of enabling the use of a specific service explicitly requested by the subscriber or user, or for the sole purpose of carrying out the transmission of a communication over an electronic communications network.
Preferences
The technical storage or access is necessary for the legitimate purpose of storing preferences that are not requested by the subscriber or user.
Statistics
The technical storage or access that is used exclusively for statistical purposes.The technical storage or access that is used exclusively for anonymous statistical purposes. Without a subpoena, voluntary compliance on the part of your Internet Service Provider, or additional records from a third party, information stored or retrieved for this purpose alone cannot usually be used to identify you.
Marketing
The technical storage or access is required to create user profiles to send advertising, or to track the user on a website or across several websites for similar marketing purposes.