Embroidery Sampler Book

Featured

Many years ago, a design concept formed in my head, one that I couldn’t let go, but was not sure of how to bring into realisation. Actually, I have to admit … that first seed was planted over two years ago.

Cross Stitch wallhanging

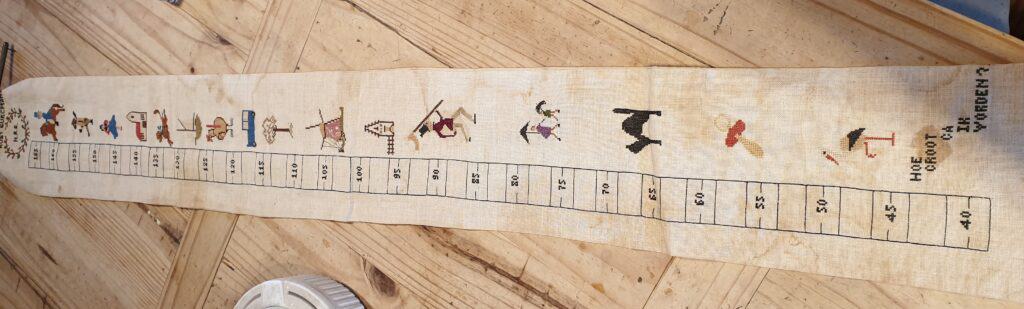
I remember in my childhood, my Oma (grandmother in Dutch) stitched a wonderful keepsake to celebrate the birth of my older sister and myself. Items that were made with her own hands and treasured. She stitched a growth height chart hanging for me, which always hung on my bedroom wall. I treasured it and was always intrigued how the writing on the chart was in Dutch – I couldn’t speak or read Dutch – but I learnt those words with pride – ‘Hoe groot ca ik vorden’ (How big can I get? I still have the chart, wrapped up and kept safe, as a reminder of my Oma who died over 30 years ago.

My older sister, received a stitched fabric book of nursery rhymes in Dutch. I am 5 years younger than her and I remember being little and wishing the book was mine as it was magical and could be touched and used, whereas my chart hung on the wall to look at, not to interact with. It is strange how we think when we are very young.

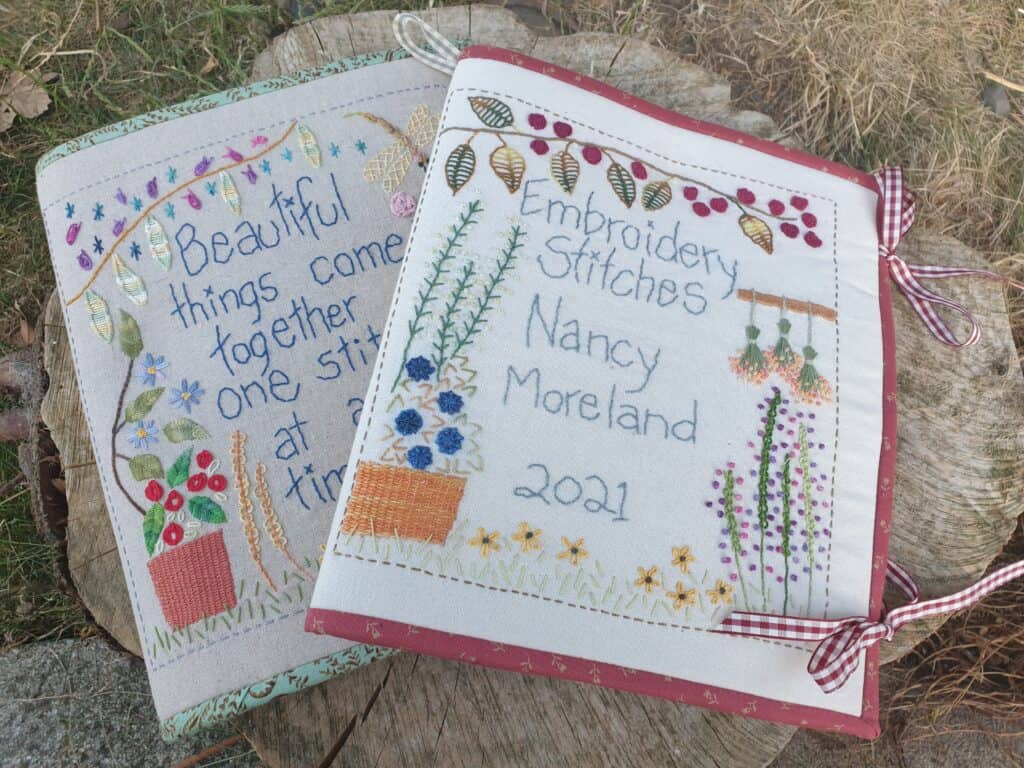
So, you are probably asking at this point, as to what these stitched keepsakes have in common with the embroidery sampler book? Well, even though I no longer want my sister’s fabric book, the concept of a fabric book stayed with me all these years. I always wanted to create a similar book (not necessarily in nursery rhymes) but a fabric book that would become a treasured piece of craft.

So moving many years forward, to about 3 years ago, the concept came to me again when I started to design embroidery designs and realising that it would be amazing to create a sampler book full of embroidery stitches. My head filled with ideas and issues of exactly how to put it into patterns so others could follow the tutorials and create their own embroidery sampler book.

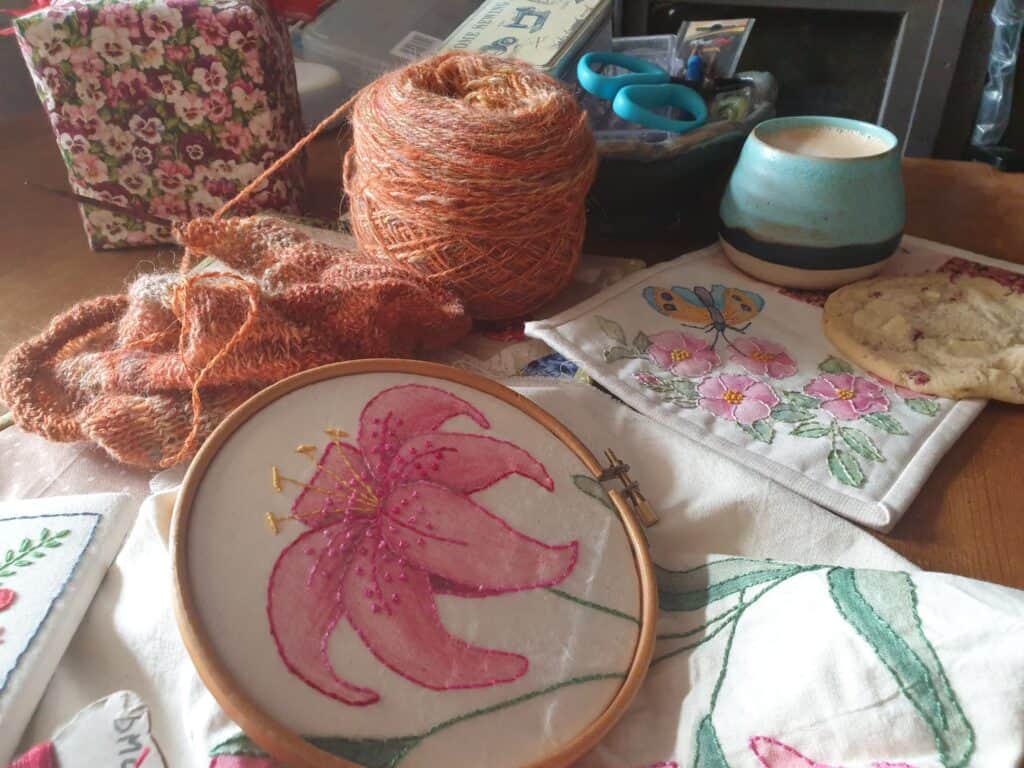
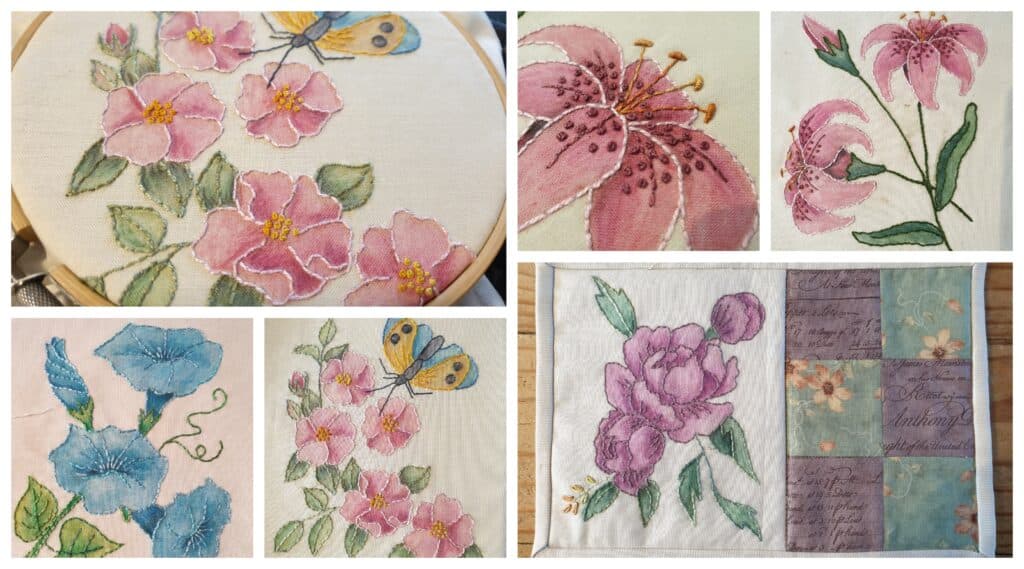
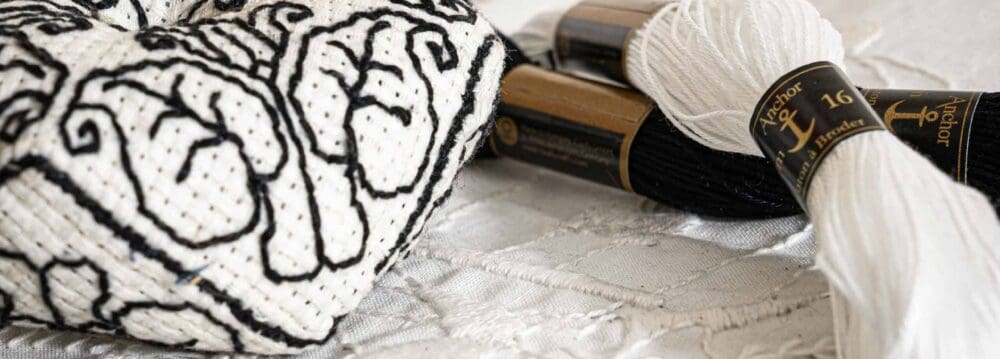
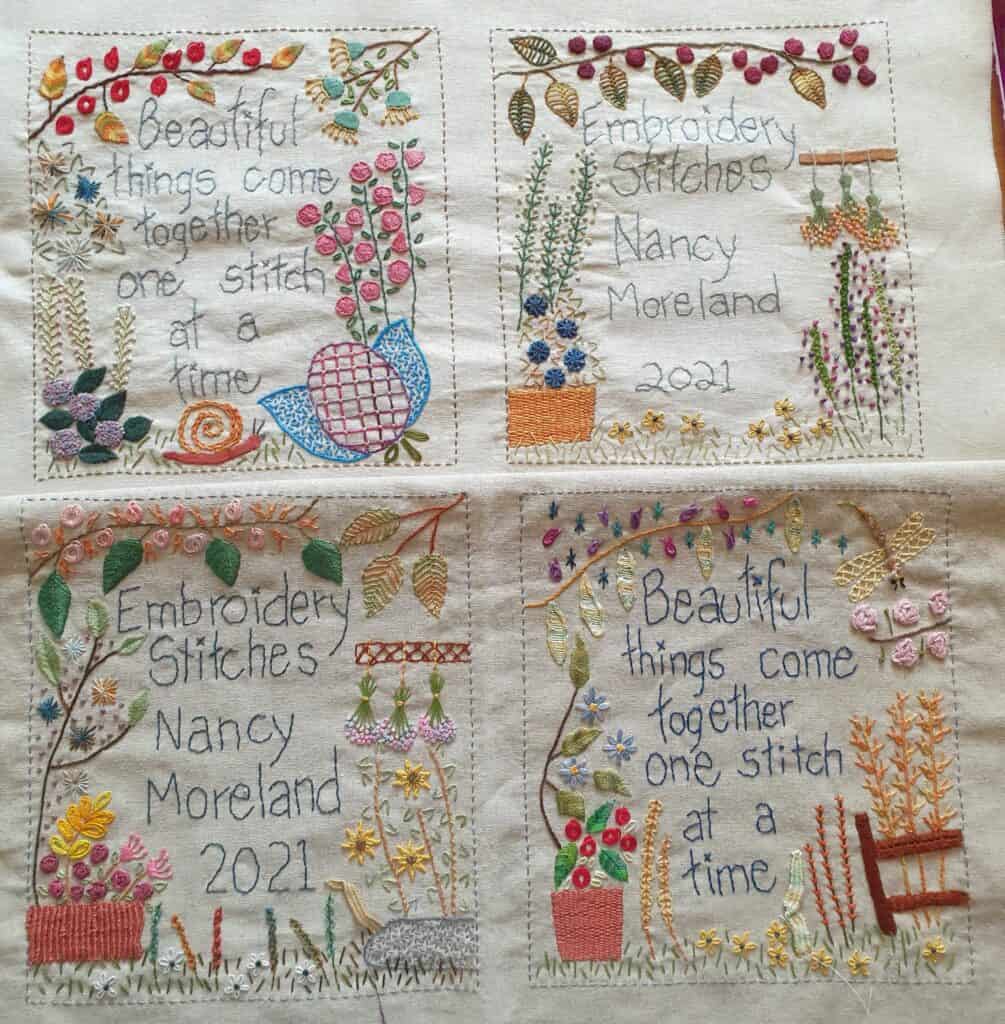
Just over two years ago, I started to put the ideas down on paper and start thinking on embroidery stitches to go into the book. That was the hardest decision, there are literally hundreds of different embroidery stitches! So hard in fact, that I decided to create two different books – a short one with 36 sts and a longer one with the same 36sts and 24 more stitches. I can never do simple!! The next choice was even harder! I didn’t just want any embroidery sampler design where you stitch a line of that particular stitch. To me, it didn’t really give me any insight in the stitch. Yes, it showed you how to work that stitch, but you were then left with the issue – just what do you use this stich for? What can be created with this stitch?

Draft Notes

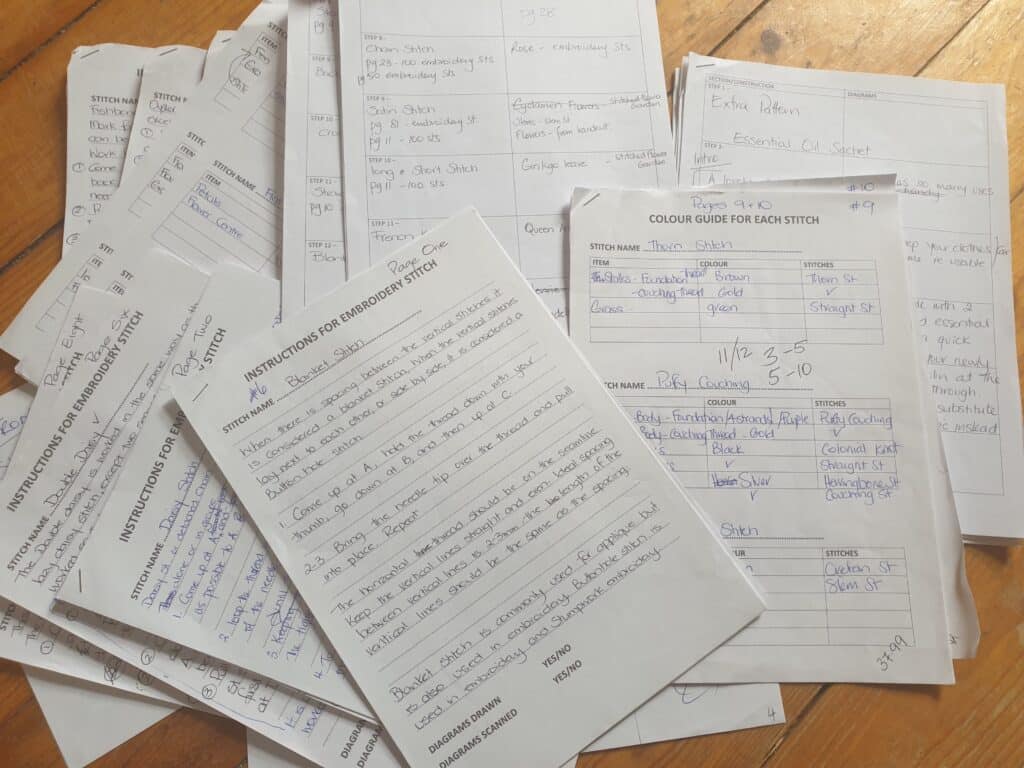
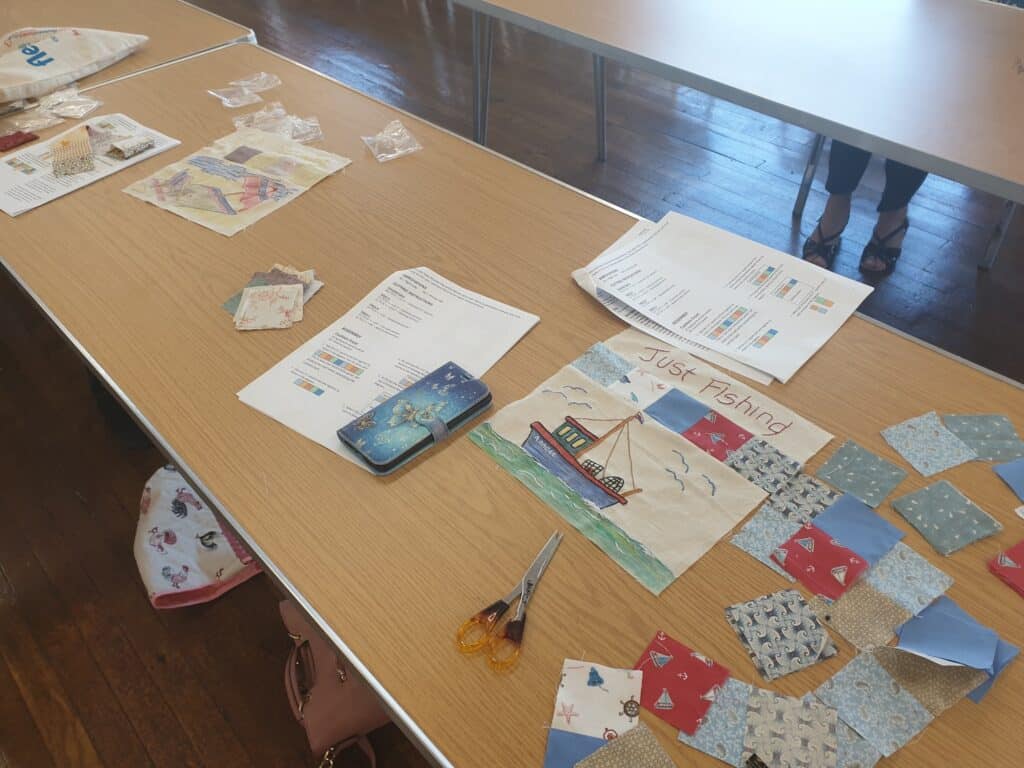
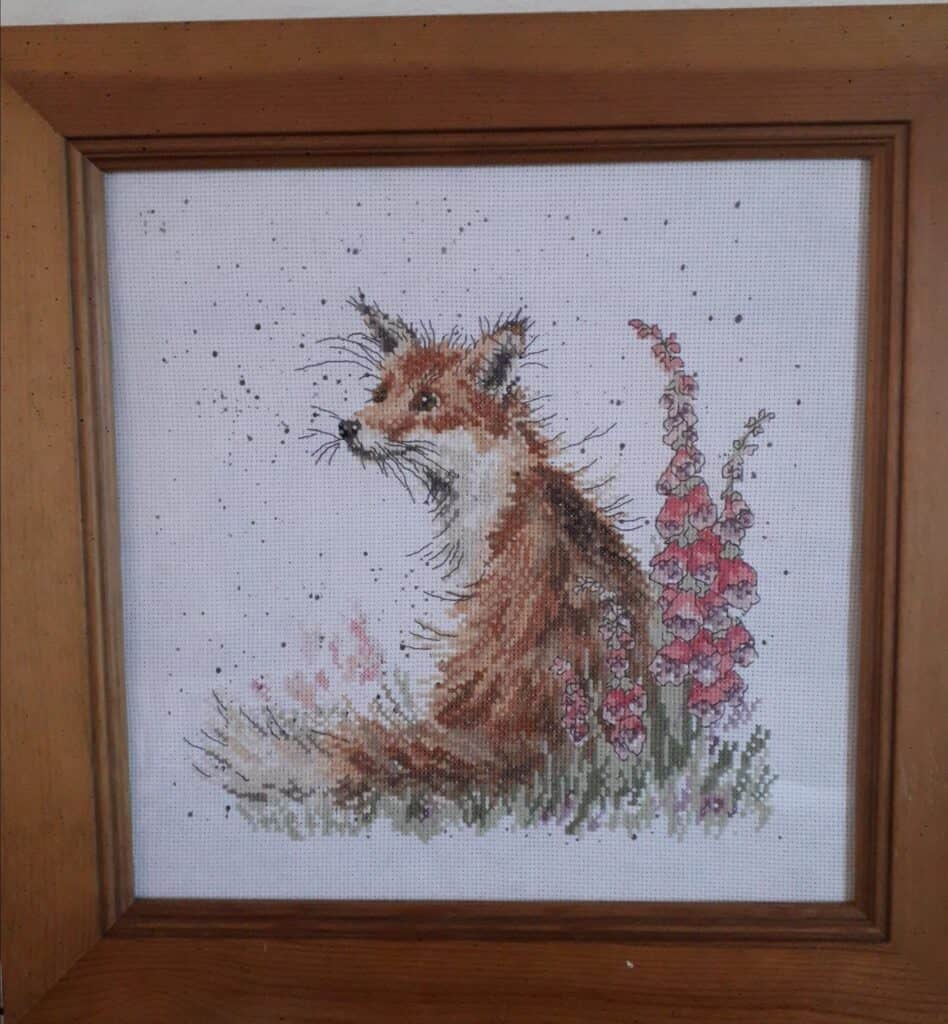
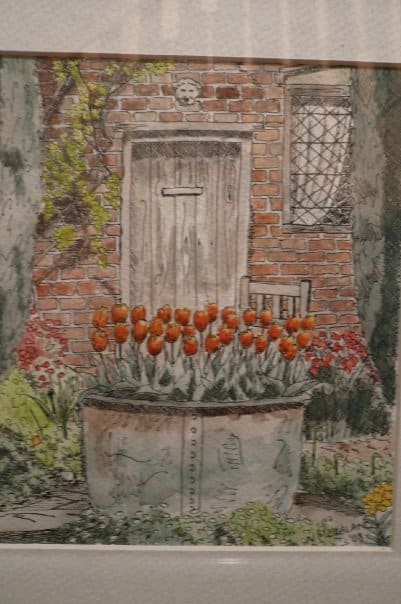
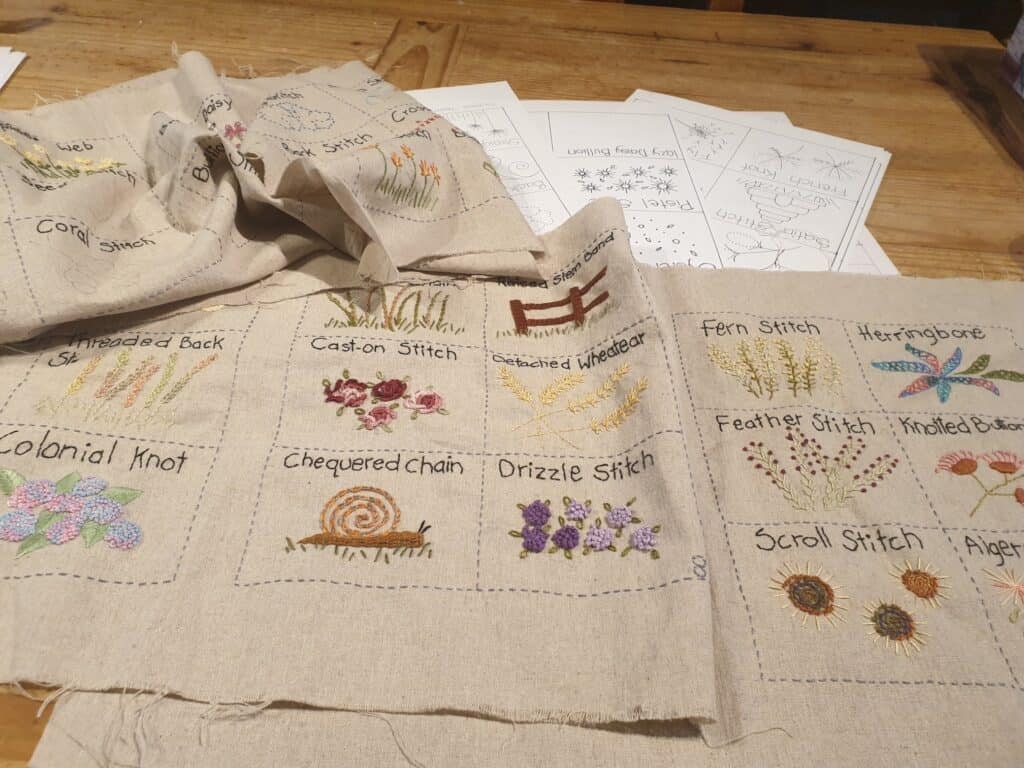
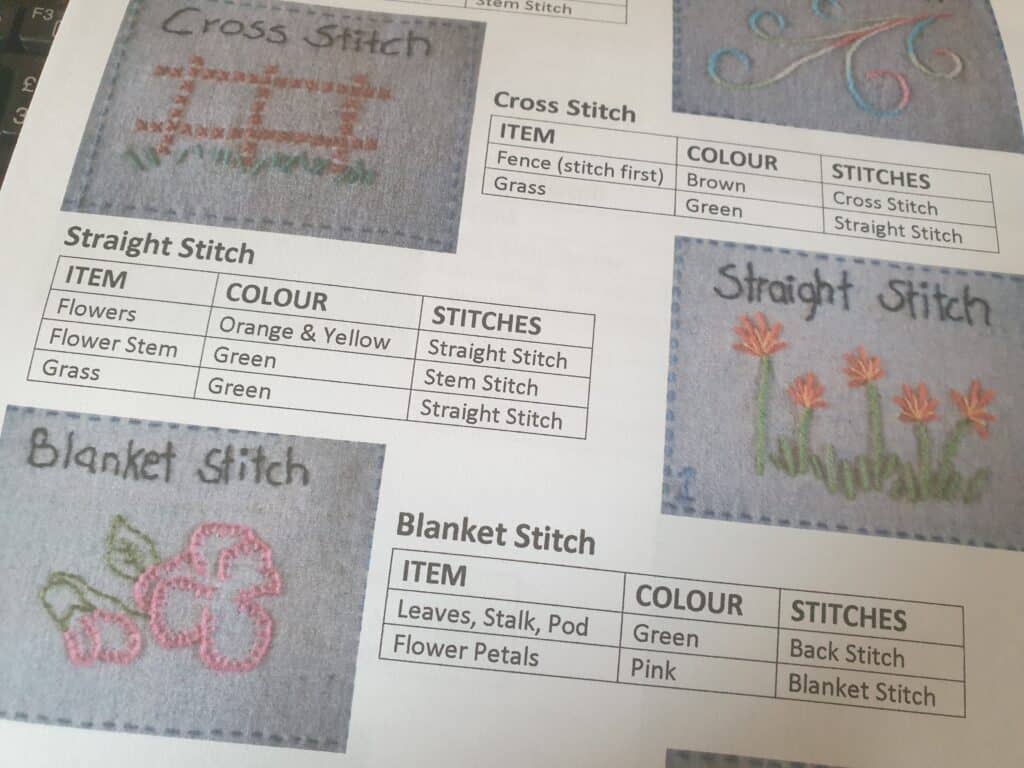
And so, the next issue came about. I had the list of the stitches I wanted to use in my two books. BUT, what and how do I design something simple with the particular stitch? My vision for the book was to have a theme. I then thought of what most embroidery designs feature ….. gardens. The stitches really did work well in creating floral designs. The birth of my embroidery sampler book concept came about. The books would focus on a garden theme and the stitches used would form some sort of garden/nature theme. It was challenging at times, to work the particular stitch into a design, but a lot of fun as well. With the theme decided upon, the next issue arose – what design would I use with each stitch? I am old school when it comes to coming up with designs – I prefer paper and pencil. I had already accumulated a good size paper trail with all my notes and design ideas. I had to have some way of keeping everything structured so I wouldn’t get too overwhelmed. At this stage, I was only concerned with what design each embroidery stitch would have. My notes got well used, and there was a lot of crossing out and redevising along the way. Once I was happy with the order of the stitches and the design sketches, though these got changed along the way, I created two paper books with the outline of the stitches and pages, just so I could see what the finished book would look like. I am a visual person and sometimes I need to have something physical in front of me.

Book Mock up

With the design notes and plans, I could now set about coming up with final design sketches and drawing these up into the final templates for each page. At this point, I still had not actually thought of how this would all go into a pattern, how do I write out the instructions for the book or the actual embroidery stitches? Those important factors, didn’t come into the equation at this time – I was focused on actually creating the book itself.

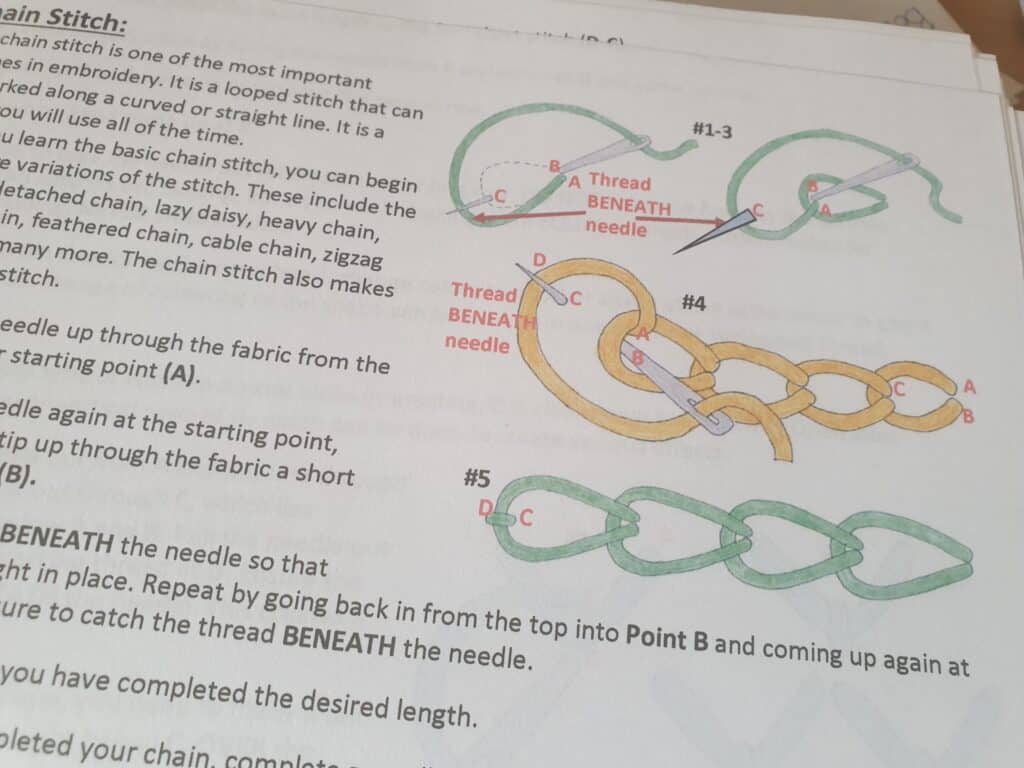
It is a difficult task when you set about writing and creating written pattern/instructions so someone can come along and follow the instructions to create their own sampler book from the written pattern. I really hadn’t thought that through. I started off with stitching the book, telling myself that the pattern content will come along. My initial thought was to create step by step photos of each stitch and that is how I started.

Two years ago, Alyssa and I went on holiday to Wales and I took my pages with me to work on during down time. It started off really great, but over time it has harder to remember to take step by step photos and ensure they were clear. I was still having issues with how the pattern should be written so it was not too lengthy but still clear enough for anyone to follow.

I came back from holiday, and continued to work on the pages. But it stopped shortly after as I really wasn’t happy with how it was progressing, I had a mental block on how to take the patterns forward. I put the pages in a tin and set them aside, with the intention, I would get back to it when I had a clear mind. Fast forward a year or so – I had pulled the pages out to show people every so often over the year and discuss what my ultimate goal was – and then promptly placed them back saying I will get back to them. I was still struggling with the pattern writing.

It even got to the point where I had ‘misplaced’ the fabric pages. They were not where I thought I had kept them safe. I tried not to panic over it, and soon ‘forgot’ about them.

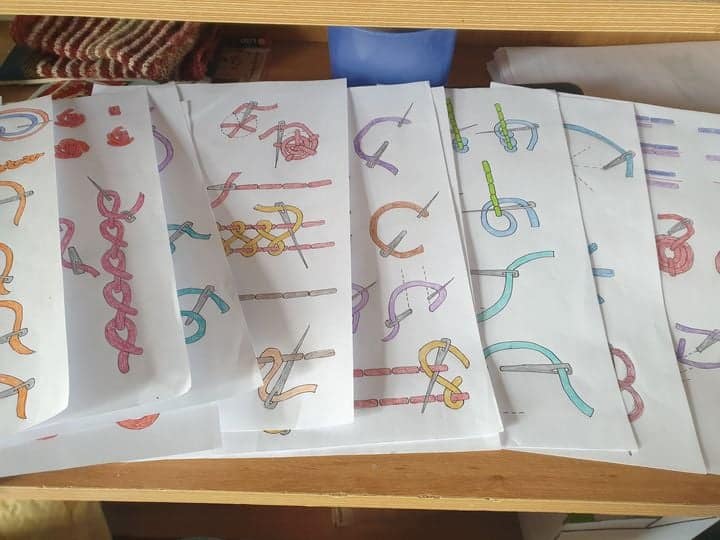
At the beginning of the journey, I had sent the first pattern to my testers who were wanting to do the project with me. They had their pages all prepared and ready to start stitching. I felt really bad, as I had put it all aside due to the mental blocks I was having with the patterns. Fast forward to the first lockdown – I devised a learn to crochet tutorial and I drew the diagrams and coloured them in. These instructions had great feedback and many found these diagrams easier to follow than photos. This got me thinking back to the embroidery sampler patterns and how it may be better to have coloured diagrams instead of photos which may or may not be in focus or the right lighting. With doing the crochet tutorial, I was able to move away from my mental block on the embroidery stitches.

Stitch diagrams

However, I still had the issue of locating my pages …. It didn’t help either when my testers asked if/when I was going to finish the sampler book….. so, with a confession and a promise to my testers …. And a frantic search around the house (several days in fact) looking to where my ‘safe’ spot was, I came up with nothing! Bring in Latisha, who offered to find them for me – and within 15 mins she had found them in the box of felt pieces! Heaven knows how or why they were in the bottom of that box! But, I was not going to get into solving that particular mystery, I was just so thankful that they had been found and I didn’t have to start making new pages …..

After not looking at the design notes and stitched pages for 2 years, it took a while for it to all come back …. I had noted on the paper books that the outside covers would have a saying on one side and name/year on the other. All of my notes on stitch designs, were all there and I had even written down all the stitch instructions, which I was so thankful for. I knew there was a reason why I put everything down on paper and keep it safe in a folder. Once I had gone over everything, I was able to look at the project with a fresh mind and the pattern instruction concept seemed to just flow and come together.

getting familiar with the notes and stitched pages

Maybe, I needed that time away to get it all right. I know that I felt better within myself this time round and the format of the pattern and instructions just seemed to come together. I even enjoyed drawing up the steps for the stitches and it seemed that with these diagrams, I was even able to rewrite the instructions so they followed the diagrams.

Stitch instructions and diagrams

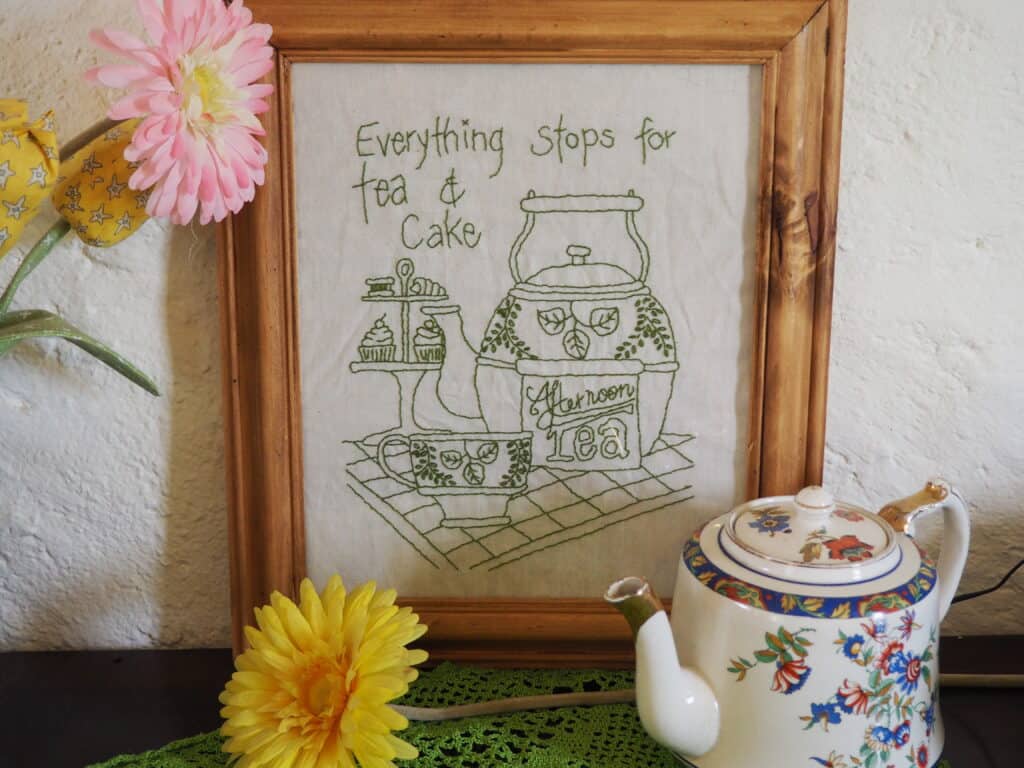
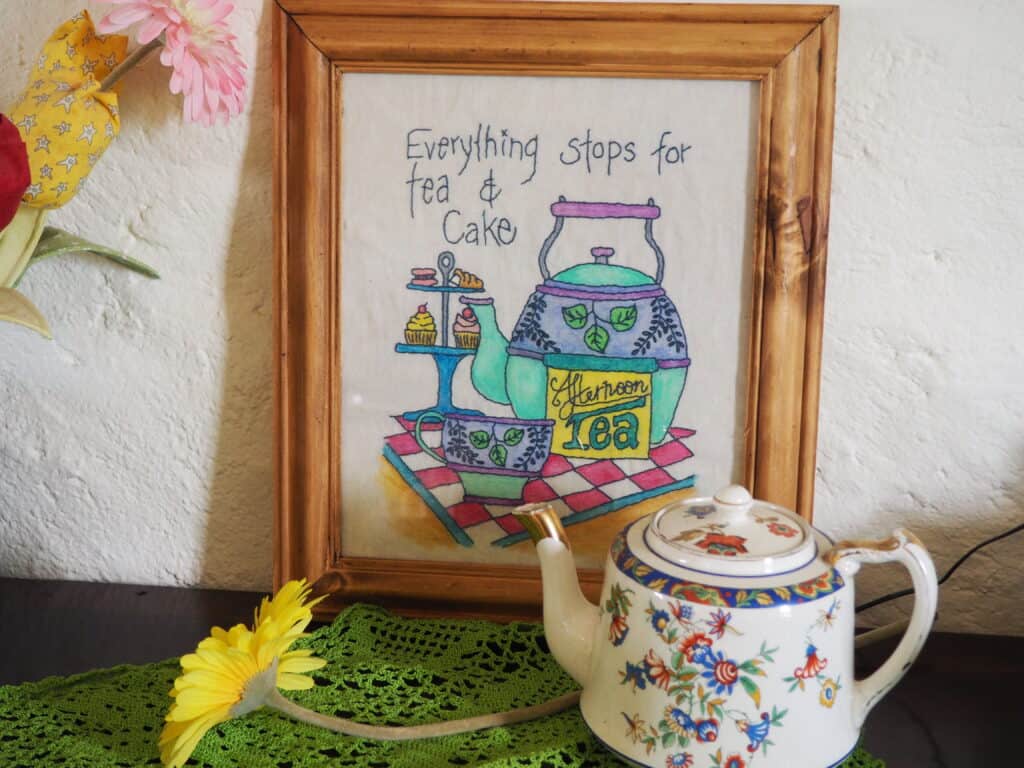
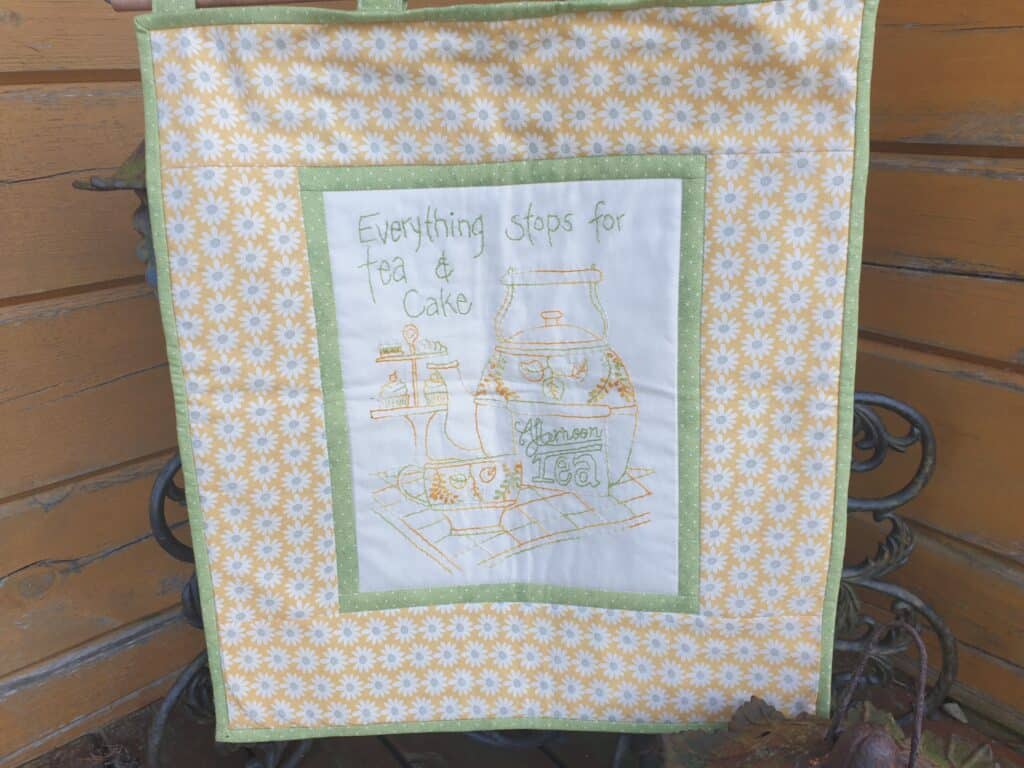
It was still a lot of work – finishing the stitches in both books and writing up each part of the stitch design, the colour I used and the stitch that was used. It was a section of the pattern that evolved as I went along, trying to find a simple and visual way to lay out how each embroidery stitch design was created. Hopefully, with the structure I have devised in the monthly patterns, it has made it that bit easier to follow.

Stitch design instructions

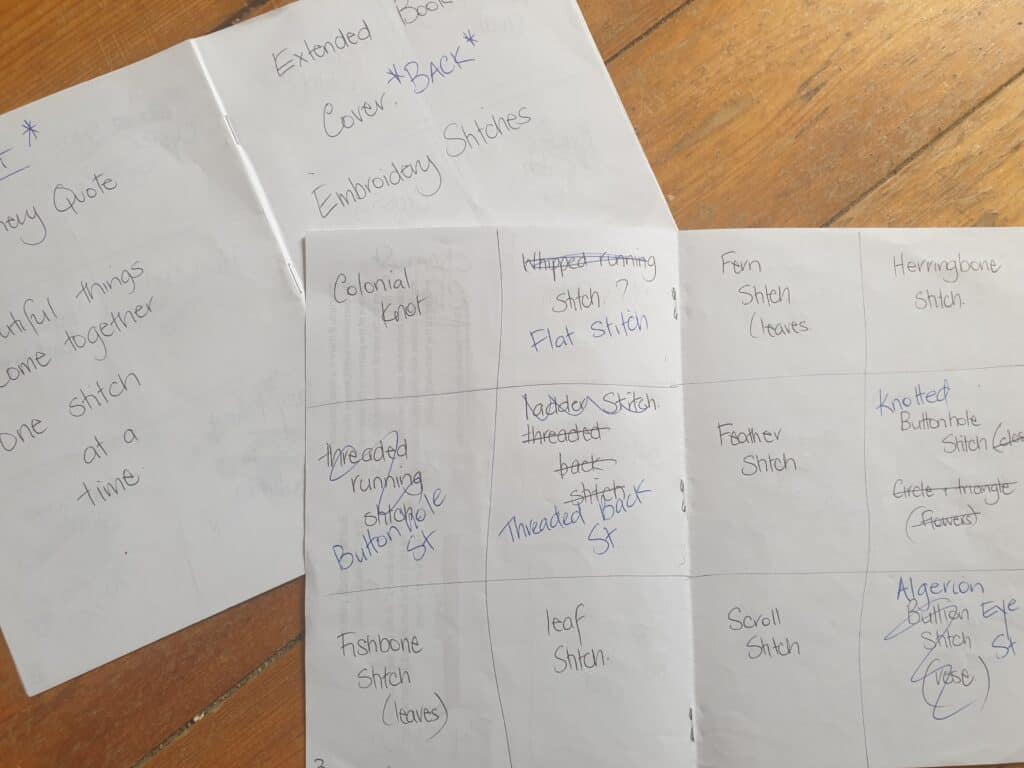
I still had to design the outer covers for both books and each one had to be different as both books used stitches that are learnt in that particular book. They were fun to come up with and the hardest decision was about which design should be on the front, and which on the back. That issue was never decided on, my testers all had different choices – so it was decided that the decision of what you would put on the front cover – The saying design or the title design – would be left up to you to decide! If everything in this sampler book was laid in stone for you to follow and create an exact replica of my book, there would be no fun or individuality on this embroidery journey.

outer cover designs

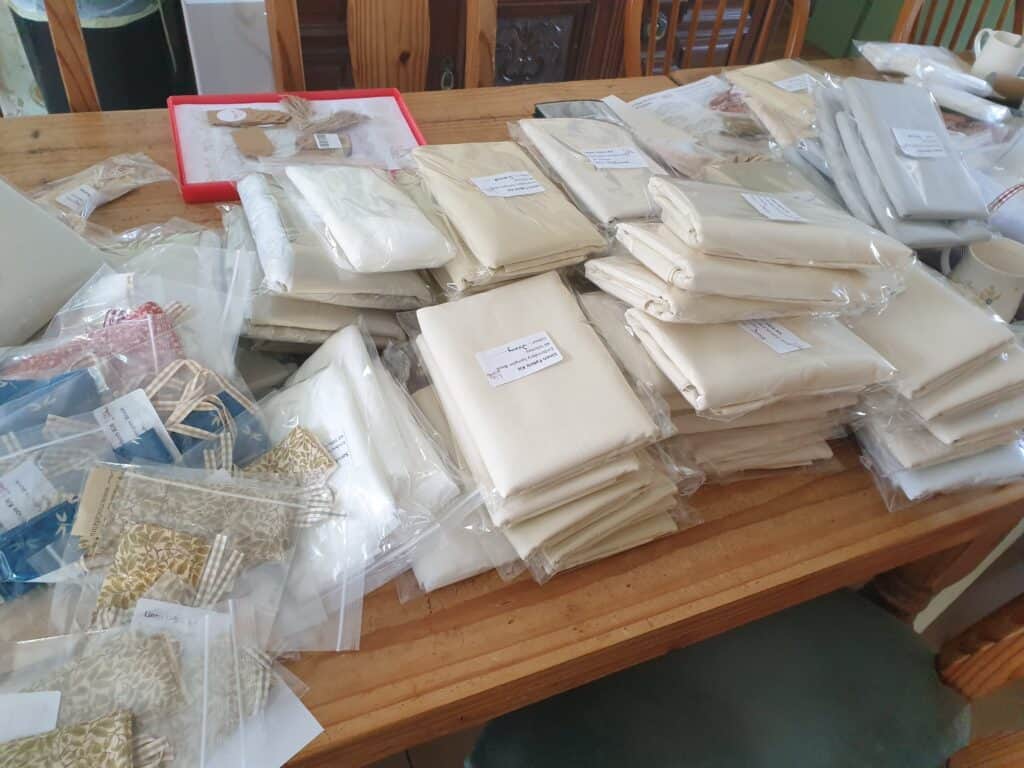
I have found that this embroidery sampler book journey has definitely evolved over the years. At the beginning, I have to admit I was really unsure on how to bring this project to fruition and make it perfect from the launch. Looking back, I am convinced that it needed that break in between …. I needed to grow as well. Sometimes we can have a seed of creation, but just don’t know how to execute it so it is exactly right. I needed the time to ponder over the pattern instructions so they were just right. The break also allowed for the concept to expand, at the start, I was just focusing on releasing the patterns … and had no thought or desire to have fabric kits, etc. So, the break allowed this to evolve and I was able to work on having kits available to purchase to support the sampler book. It has also allowed me to be able to offer the pattern for both left handers and right handers. I am so thankful for this, and fully believe that things happen for a reason and the two-year break was needed so I could bring this embroidery journey to fruition in the best possible way.

kit packing

So, how does this Embroidery Sampler Book monthly subscription work?

Each month a pattern will be released which will give you clear and simple instructions on how to create your chosen book. These can be saved in a folder for future reference. The first month will include cutting instructions for your ‘pages’ and how to ‘rule up’ each individual page to get the pages ready to start stitching the embroidery stitches in the following months.

Over the following months, you will receive 12 embroidery stitches to stitch into your book.

In the final month, you will receive the pattern, templates and instructions for the cover (front & back) of your book. These designs will incorporate all/most of the stitches you have stitches over the previous months. You will also receive detailed instructions on how to put your book together. The 36st sampler book is over 5 months and the 60st sampler book is over 7 months. There is NO pressure to complete each monthly pattern before the next pattern is released. This is your journey and you work along at your own pace. Alongside the patterns, I have started a Facebook group that is solely for the embroidery sampler book and it is a place where we can share our progress photos, ask for support and I can give extra advice for each monthly pattern and videos (if needed) on the embroidery stitch. https://www.facebook.com/groups/1981259928809348

This book will become a treasured heirloom, something to treasure for years to come. You will also learn some new and interesting embroidery stitches that you can incorporate in future projects.

So, are you wanting to join the embroidery journey? The first monthly pattern is available on our website, along with any kits that you may need/want to help with your journey in creating your very own Embroidery Sampler Book. I look forward to being part of your journey in learning new (& old) embroidery stitches

36 st and 60st Embroidery Sampler Book

Size of Backing Fabrics/wadding for the longarm

Featured

Are you ready for post one of our Quilting Finishing Techniques for both the longarm and domestic machine finishing?

Our first post is about the size of backing fabric and wadding that is needed if you are getting your quilt finished on a longarm.

Over the years, I have always quilted my quilts either by machine or by hand (when I had the time, which is usually never).

I seriously dread the layering of the three fabrics to create the ‘quilt sandwich’. I have to admit that larger quilt tops could hibernate in the ‘to be quilted’ box for a number of months …. or years! Not sure why, but I think it is more the dreaded thought that I could end up being short of either the wadding or backing fabric. I can honestly say that I ‘always’ ensure that my wadding and backing fabric is roughly 2-3” larger than the quilt top, around ALL 4 sides. However, I have had, on at least one occasion where I have miscalculated and have run short of either the wadding or the backing fabric and had to re-do the layering process. Tough lesson to have when it is a huge quilt.

Layering quilt on the table with only about a inch or so extra of the wadding and backing fabric – tight squeeze, but ok for quilting on domestic sewing machine

So, what if the quilt is being sent to be long armed quilted? Is the rule of 2-3” larger than the quilt top? I never thought it would be different and was surprised that it wasn’t the same. I am guessing that I wouldn’t be the only one who thought it would be the same principle if you were quilting it on your own machine. Reading that both the backing fabric and the wadding needed to be at least 8” larger than the quilt top (at least 4” larger on ALL four sides) really surprised me.

It got me doing some research to find out why. Strangely enough, I like to know the reasoning behind rules and techniques and why it is so. In finding the answers I thought it would be a great opportunity to explain the ‘why’ in a blog post so you can understand the reasoning why so much extra is needed on the long arm frame.

So, the 8” isn’t to allow for the longarm quilter to compensate for any layering errors she may have. The three layers are loaded onto the frame separately to ensure that each layer is wrinkle free and taut on the frame. The backing fabric and top have the centre top marked so that the centre point on both fabrics can be matched to the centre point on the take up rollers on the frame. This helps to ensure that the quilt top is placed centrally on the frame. The wadding is laid between the two with the wadding and backing fabric side edges matching. The quilt top lies on these two with 4-6” clearance all the way round.

clearance of wadding and backing fabric on a longarm frame ready for quilting

So why is size important?

The quilt back is loaded onto the quilting frame and two rollers – one at the top and the other at the bottom. This gives a flat surface, free of wrinkles with a tension that enables you to quilt.

quilt on the longarm frame

However, to be able to quilt well, you need good tension on both sides, not just at the top and bottom. The side tension is achieved with the side clamps that are attached to the frame. This now gives a 4-way tension on the quilt which prevents any puckers or tucks. This still doesn’t really explain why the extra fabric is needed on the backing fabric and wadding.

side clamp to ensure correct side tension

Well, if the quilt top was the same size as the wadding and backing fabric or if not much clearance has been allowed, then the clamp would be too close to the quilt top. This causes a big issue when the quilt is being quilted and the need to quilt (or baste) up to the side edges of the quilt top. The machine needs clearance to ensure the needle can go over the quilt edge. If the clamps are too close to the edge of the quilt top, the machine will bump against the clamp, causing the quilting stitches to be off.

side clearance of wadding and backing fabric – only about 1″ of wadding and 2″ for backing fabric. It meant that extra care needed to be taken to ensure the wadding and backing fabric cleared the top quilt and quilting had to be worked around the side clamp to prevent being knocked.

If rulers are being used for quilting, then it really is essential to have clearance as the ruler base extends on each side of the machine. If that base hits the side clamps, then it could mess up the ruler work.

Another important reason for having that extra clearance is that the tension needs to be checked with each new quilt loaded to ensure that both the top and bobbin thread are stitching correctly. This also needs to be done after each bobbin change. The tension test needs to be done using the backing fabric and wadding with a small piece of extra fabric (usually the backing fabric) as this is what is being quilted so will give the actual quilt stitching. If there is no extra allowance, then there is no room to test the tension.

suitable clearance from the quilt top to provide room for being able to do a tension test before commencing to quilt and enough clearance so the side clamps would not get in the way when quilting.

This would also apply if you were stitching free motion on your quilt with your domestic sewing machine.

So with explaining about the size of the backing fabric, it now leads into the question of – ‘what can I use for my backing fabric?’

Come back next week to find out about –

Backing fabric options – Extra wide fabric; Sheeting; Pieced backs

And the following posts –

  • “Squaring” off backing fabric and quilt tops
  • Binding          – How much binding; How to prepare binding; Attaching binding to quilt front; Finishing the binding
  • Quilt Labels – Why quilt labels?; What to put on a label; How to create a label; How to attach a label

Start of the Longarm Journey

Featured

With introducing Longarm Quilting Services to Nifty Needles, I thought it was a great opportunity to write a blog post on what is involved in getting your quilt quilted on the longarm.

I am so excited to be finally offering this service. For many (many) years it has been my dream to own a longarm quilting machine. It was something I thought I could only dream about. However, thanks to COVID, I needed to rethink Nifty Needles and the longarm was one of the long term goals (wishes) I set down for Nifty Needles and I can now proudly announce that this goal has been achieved!

the Moxie

I am loving being able to get creative with the machine and testing my creative skills. I can truthfully say that it no longer scares me senseless as it did when it first arrived or even when I thought of getting one. I still have lots to experiment with as there are some features on the machine that I haven’t tried out yet.

I purchased the Moxie Handi Quilter which is able to stitch pantographs, groovy boards and ruler work in addition to the hand guided free motion quilting. The Moxi sits on a 10foot frame which means that it can quilt up to a width of 105” with ease and any length.

When the machine arrived on a pallet with so many different boxes, it was mind blowing. Realisation sunk in about WHAT I had actually purchased! The mere thought that it was now up to us (Latisha and myself) to actually unpack the boxes and build the frame up from the ground, so to speak, was so scary! I think at one stage; I was secretly panicking that it may not fit into the log cabin. We did actually build the frame, the wrong way round and only for the fact that the cabin had a 10ft pitched roof, were we able to turn it round by standing it on its end in the middle. It definitely was not able to turn round!! If it wasn’t for the high peak, the frame would have had to be taken apart …. I definitely did not want to even think about that option. With the help of some little helpers we got the Moxi set up.

Building the frame with help

After I got the machine set up, I needed to write down all the information and services for the website which was more involved than I thought possible. I sourced some excellent reference books on longarm quilting machines, spent some lengthy evenings doing some ‘bedtime’ reading just to get myself familiar with the longarm, designs and what it is actually capable of. Reading and researching is a great help when trying to get used to a new piece of machinery. But, honestly, nothing beats diving right in and doing the practical stuff.

With the research and reading I also found that there was so much more to the longarm. I also have to confess that I have never had a quilt finished on a longarm. The few I had seen that had been quilted on a longarm were so densely quilted that they were stiff. To me, a quilt should be cosy and soft, not stiff. Since getting the longarm I have discovered that quilts are quilted in the way you prefer – gently quilted to retain the cosiness with an all-over simple design or custom quilted for a more unique quilt.

allover free motion quilting

I also found it was interesting to find out and understand what is exactly required when getting a quilt quilted on the longarm. When I am told that things need to be done a certain way, I like to understand why it is needed or done in that particular way. So with this in mind, it got me thinking that it would be a great opportunity to do a series of blog posts with supporting PDF tutorials to explain about preparing a quilt for a longarm or even when we are quilting and finishing it ourselves on our domestic machines at home.

So over the next month or so I will post supporting blog posts with the techniques and ‘whys’. The subjects will be as follows –

  1. Size of backing fabrics/waddings
  2. Backing fabric options – Extra wide fabric / Sheeting / Pieced backs
  3. “Squaring” off backing fabric and quilt tops
  4. Binding  – How much binding / How to prepare binding / Attaching binding to quilt front / Finishing the binding
  5. Quilt Labels – Why quilt labels? / What to put on a label / How to create a label / How to attach a label

To support the blogs, I will create a PDF of the technique so you can download the information for your own reference.

I know that when I was at the start of my quilting journey I truly wish I had such information to help me progress. My journey was marked with trial and error. But I have learnt by my mistakes. In fact, we all need to make mistakes. It is how we learn and develop our skills. But there are times when you wish that you had that extra bit of advice so you don’t feel as though you are foundering around.

I hope you will find the blog posts and PDF tutorials of some interest and support on your quilting journey. If there are any other techniques relating to quilting, let me know and I can look at doing up more tutorials relating to the technique.

But, tutorials aside, this blog started with the long arm and what role it will be doing within Nifty Needles. Have a read of the website pages on our longarm services. But more importantly, click on our Introductory offer voucher to download your voucher which will give you a discounted offer on our edge to edge quilting service for your first two quilts. You could save up from £30 to £70 depending on the size of your quilt. To prevail of the discount, you DO need to bring in the voucher, so click on the link to download and print off your voucher. We will also be permanently offering a customer loyalty scheme where you can get 15% discount on every 5th quilt you bring to be quilted. Your first two discounted quilts go towards the loyalty scheme as well.

If you would like more information or to book an initial consultation appointment for one of our longarm services, please contact us either by phone (078 6018 6261) or email (nancy@niftyneedles.com). Nifty Needles is NOT a shop and is open ONLY by appointment, so please do not just arrive on the off chance.

When you come for your pre-booked initial consultation, please bring your quilt top with you and we can have a cuppa while we discuss your requirements such as wadding, backing, quilting services, design options and thread colour choice. These will all be written down in detail on your order form.

We look forward to working with you in quilting or finishing your treasured quilts.

Don’t forget to come back next week when we start our series of Quilting Techniques. The first one being, all about the size of backing fabrics and waddings.

Happy quilting

Going Solo

Featured

So, today was the day that I decided that I was going solo on Moxie, my new toy.

I thought it was about time that I grabbed a quilt top that needed to be layered and quilted, and just see exactly how much I had remembered from the trial piece a week or so ago. Strange how subconsciously you seem to put things off, because you are scared that you have forgotten or just won’t be good enough. Well …. The thing with a long arm quilter …. Is …. That you just won’t improve your skills if you don’t get onto the machine and use it!!!

However, I was just slightly scared to jump right in with one of my large quilt tops …. I wasn’t that brave!! So armed with a (very large) table runner top, wadding and backing fabric and of course the essential cuppa, I headed up to the cabin. The sun was out and it was a nice morning. I opened the door of the cabin and let in the fresh air, turned on the lights and put on a CD to give me some great music to keep me company. Of course, I also had Holly and Nora come out to keep me company on the decking outside enjoying the sunshine …. You can’t be without animals.

Bracing myself to start loading onto the frame

So, after a few deep breaths and pulling up my ‘Big Girl panties’ I went to start loading the layers on to the frame. That certainly is a lesson in itself, but I am pleased to say that I had retained how to load on the layers and get them all centred and straight on the frame. Mind you, I do have to admit that it takes forever! Or maybe, I am just slow and nervous about getting it all on to the frame…. Maybe it had something to do with the fact that once the piece was loaded onto the frame, it meant that I would actually have to start up the machine and actually do some quilting.

Loading the backing fabric on
Loading the top

Once the layers were on the frame, it was now time to turn the machine on! That took me a few moments to brace myself up to that fact! But I did it, and was slightly amazed that it did turn on. I then had to mentally prepare myself to changing the thread colour on the machine and rethreading the whole thing! Thank heavens for the manual! It certainly is worthwhile to have the manual handy so you can check things when you are unsure – it is what I always told my students when they were learning to sew. Have your manual handy and read it! It definitely was a case of ‘DO what I say’. So after rethreading it, I was now ready to start basting the top to the wadding/backing. I even remembered to place the locking ring onto the machine wheels so it would stitch straight across, though, I think I didn’t place it on correctly, as the ring went flying off part way across and I stitched some rather wonky lines after that.

Preparing to baste the wadding to the backing fabric

I also found that it was not stitching correctly! It was that dreaded tension thing… the tension issue that I can never fully understand and hate! So out came the manual again and sitting down with a (now cold) cuppa to have a proper read of everything tension wise. AND, heedless to say – I forgot the most important issue in using a long arm – DO A tension check at every bobbin and thread change! Truly failed that lesson!! So did the bobbin test – YES – that needed slight adjustment …. Issue sorted. Then the top tension which was the issue, so I adjusted the top tension dial. And started to get sewing again. This time, the stitching was just right!

I was trying to decide what to stitch onto the runner. I wanted something just a bit more than wriggly lines, don’t get me wrong, wriggly lines are great when you find it hard to stitch in straight lines! But I wanted to add something else in it. I finally settled on doing some curls and stars with the wriggly lines and stitching a complete line of stitching across the length of the runner without breaking the stitching. That in itself is a mission. I had practised the stars on the practice piece as I thought they would be so easy as they were something that I would doodle on paper when bored (or for no reason at all). I could draw out those stars using a single pen line and not lifting off the paper in my sleep. But for some reason, when I practised on the first fabric, I could not seem to get those stars right! But I did a few practices on paper and found I could do them if I did not think about doing them.

So, those Big Girl panties were pulled higher and the music turned down so I could concentrate on the first pass of stitching. I started at the left hand side and wriggled, curled and managed stars all the way to the other end. I managed to do the first pass without too many errors – my stars even resembled stars (if we don’t look too closely). I was ready to come back, roll the runner up on the frame and start the second pass.

Managing to stitch stars, curls and wriggles

The start of the second pass wasn’t going to work! Moxie was being nice this morning to start with, she was being gentle with me. However, I spoke too soon!!! Moxie decided to play up and really give me a crash course in trouble shooting and how to get to know how to sort out all those minor issues! I have to be honest, it was hard for me to stay calm and not panic. I really wanted to walk away and cry. I then reminded myself that I had put on my ‘Big Gil panties’ and I needed to know how to deal and sort out minor issues. So it was like having my very own lesson and not knowing what I was meant to be learning.

The trusty manual, came into play again. But it really didn’t tell me why it was refusing to stitch. Thank goodness, for the internet and Facebook. I am part of a few long arm groups and specifically a Moxie group and I recalled someone saying that they had an issue with the machine not stitching even though everything was on. So, recalling the suggestions, I checked all plugs that connect to the machine as apparently they are sensitive and need to be pushed fully in. Found one was not in fully, so sorted that out. Got it stitching but it was now skipping stitches and not wanting to do curves, so again, it was reading the manual and they recommended changing the needle. My lesson also included How to change a needle! I got it working properly now and it was ready to start doing wriggles, curls and stars again.

This time, I put ABBA on, turned the volume up and I was ready to go. Good loud music that you can sing to is a great motivation to get struck in and just zone out. I completed the second pass without any issues. The test was if it would do the third without issue. And it did!

second pass complete

So going solo this morning was the best thing ever. I learnt all the troubleshooting issues and how to fix them …. Fingers crossed. The downside …. I finished quilting far too soon! I was really getting into it and thoroughly enjoying being creative with the machine and listening to ABBA up loud and the door open, letting in the sunshine and Holly lying outside the door on the decking. There really is nothing better than zoning out and being creative.

All over quilting, now binding …..

I am really looking forward to taking my next flight with Moxie and getting creative. Next time I will upgrade to a quilt! I look forward to sharing my journey with you and being allowed to get creative with your quilts …. If you trust me ……

The Tale (& fate) of Unfinished Projects

Featured

Who is honest enough to owe up to the fact that we have ‘Unfinished Projects’?

I really think there needs to be a support group for everyone that hoards all those unfinished projects …. I know that I definitely need to get my unfinished projects under control…. So this is a tale of one such unfinished project …. Just ONE …. And every good tale starts with ‘Once upon a time ….’ and ends with ‘Happily ever after’ …… so will this tale end on a happily ever after?

So get comfy with a cuppa (& piece of cake) and listen while I tell you the tale of the Unfinished Project and maybe you will be able to relate the tale to your own crafting habits.

Once upon a time …. There lived a crafter who loved making handmade gifts and gifting them to family and friends. All the best intentions to make gifts that are made & given with love to someone special who appreciates and loves receiving handmade gifts.

This crafter loved starting new projects and thrived on making them with a set deadline in mind. Deadlines help to keep the mind focused, knowing that something needs to be finished by a certain time, for a certain reason …. It is harder when you decide to make something just because you want to with NO set deadline or purpose …. Those are the projects that have more chance of finding themselves in the Unfinished Land. We all have those …. And we kind of want to ignore those ones …. If we do not acknowledge the pile of unfinished projects that we started just because we wanted to …. then maybe, just maybe, they do not exist. But that is not true, those unfinished projects come out and taunt us, try to make us feel guilty about how many we have started and just not finished for some reason or the other …. These are the ones that remind us that we should be finishing them, maybe fixing that small mishap that stopped us from completing the project ….

Well, this crafter decided to make a lovely crocheted blanket for her daughter’s birthday, a blanket that the daughter chose, so we know that the blanket would be cherished and welcomed with open arms. The promise was that it would be made for her birthday – June 5th. That was grand, there was plenty of time till the birthday deadline, there would be no pressure to get it finished. So the yarn pack was ordered online and it arrived quickly all packaged in lovely organza bags, along with the pattern. The crafter was motivated and eager to start the challenge of creating such a lovely blanket. There was time enough so there would not be any late nights.

The progress started well. The first part of the blanket was started and following the pattern was pretty straight forward. It was fun and complicated enough to keep the crafter interested and motivated to keep going so she could see the blanket progressing and coming together. There was still plenty of time to get it finished. So how did this lovely project turn into an unfinished project? Both the crafter and the receiver were looking forward to the finished project, there was a deadline. So what happened?

Maybe I should have started this tale with ‘Once upon a time many, many years ago …’ and there is the answer…. MANY, MANY YEARS AGO …. There was no reason or justification about the blanket morphing into an ‘Unfinished Project’ …. It was just one of those things…. The blanket kit was brought well in advance of the birthday deadline. It wasn’t 2021! But …. OVER four years ago.

So, come the birthday (long ago), the crafter had to find another birthday present and apologise that the blanket didn’t get finished, BUT it would be ready for Christmas! Another deadline! But which Christmas?

So, with most things in life, life got in the road. Things came up, things that needed to be done, things that were more important than this lovely blanket. Many would say, what would be more important than finishing a birthday blanket? Truly?! The crafter had no answers.

The half completed blanket, along with the wool was placed lovingly into a plastic container where it would be kept safe and be finished when the crafter could make time. The blanket lay safe in the container, in the craft room so it was in plain sight, ready to be picked up and finished. The very so patient blanket.

The years quickly past without the blanket being lifted out of its plastic prison. There were times over the years where it was moved as things had to be sorted and organised. I guess, it was acknowledged and the crafter spoke (ever so slightly guilty) to the blanket and vowed that it would be finished soon and sent to its new home. But it seemed that it was just words that were spoken when the container was noticed. But as soon as the container was left in its new spot, it was quickly forgotten, amongst a mess of stored boxes and containers in an unused log.

Years later, the time came when the crafter had to clear out the log cabin to make room for a new addition. It was then that the crafter noticed the container and actually made an important step and moved it back into the house vowing that the blanket should really get finished as it was just a waste. So another move again and the blanket found itself placed on the floor of yet another room…. But something was different this time round. The container was in main sight and was noticed every time the crafter went into the room. What was different? Maybe this time the crafter really felt guilty and realised the words/thoughts ‘I really should get that blanket finished and give it as a birthday present’ really were important. Why now?

The crafter realised at the same moment of uttering those thoughts, that today was the start of June! The birthday was on the 5th! If the utterance was genuine, then there was five days to make that promise come true and also make an unfinished project, finished. It could be done. But was the crafter true to her word?

Armed with a cuppa and clear head, she picked up the plastic container and took it to a comfy chair where she took the lid off, dismissed the smell of something that has been stored for years and carefully (& somewhat lovingly) took the blanket out, feeling overwhelmed. She had no idea where she had stopped part way through the pattern! There were part balls of wool not able to give any clue on what was last worked on. Thankfully the pattern, ever so worn but still readable, was able to give some clues. The crafter quietly praised herself for having the foresight of marking off the rows as she had completed them so she could remember what part of the blanket she was at.

She then made a vow to the blanket that it would no longer spend its life shut away forgotten in a container feeling unloved. She made a promise that by the end of the week, it would be finished and given a bath to freshen it up so it could begin the next journey in its life – to be lovingly used and enjoyed. I also have to make it known that the completion of the blanket did not go without any sighs or other such unspeakable expressions. It was not a creation done with total devotion, BUT, it was a great sense of achievement when the last stitch was finished! The crafter felt great pride in a sense of achievement THAT she had finished something that had spent many, many years as an unfinished project and she had saved it from a life of laying forgotten in a container. The crafter thought of the many other items that were lying about as unfinished projects, forgotten and hidden away in cupboards, shelves and containers …. Maybe this blanket could be the start of a new set of goals …

By now, you are probably thinking (if you have made it this far) if the tale of the poor forgotten blanket has a happy ever after …. Shall we continue?

Once finished, the crafter weaved in all ends and tidied the blanket up. She then gave it a lovely wash with comfort, laid it out to dry and feel fresh. She then lovingly folded the blanket up and placed it inside the washed organza bag that the yarn had arrived in, all those years ago.

Then on the daughter’s birthday, the crafter handed the organza bag to her and they both laughed and remembered the beginning of the blanket and the promise that it would be for her birthday. Well … the blanket was gifted on her birthday … just NOT the birthday it was originally for all those MANY years ago.

The blanket was off to start a new journey filled with lots of use, and not to be left forgotten.

So, I guess that you have now come to realise that the crafter I am writing about is myself …. and that this is just not a fairy-tale with the ‘once upon a time’ and the ‘happy every after’ ending. You would be correct, this tale is about myself, but rest assured, if we are honest, it could be anyone of us, those that have the pile of unfinished projects lurking around in the dark corners, forgotten cupboards and drawers …. I have heard that there is a rare breed of crafter that does not know what an unfinished project is! And never starts a new project until they have finished the current one. I have yet to meet that crafter but have been told they exist.

Well, this is the tale of ONE of my unfinished projects and it is a great sense of achievement to actually finish an item that spent so many years forgotten in a container. I have so many unfinished projects and maybe, just maybe I can set myself some goals of getting them finished …. Or even a couple!

So, I now ask of you …. Do you have such a tale to tell? Do we need to form ‘An unfinished Projects’ Support Group? Maybe we could help support each other to give those forgotten unfinished projects new life …..

Family History

Featured

I was working on the computer this morning trying to finish doing the draft pattern for the final instalment of the Embroidery Sampler Book and I got distracted ….. After losing myself for a hour or more going through some forgotten photos on the computer. I went down a complete rabbit hole and the memories came flooding back …. Both happy and sad memories…. I felt it would be good to actually write a blog and share some of my family background with you all. I am sure you know that I am a kiwi (New Zealander) and have made my home here in Northern Ireland since 2005. But not many know that my family heritage is from Holland. My parents were Dutch and immigrated to New Zealand in the mid/late fifties. I say were …. as both my parents have since died. Dad died far too young from a lung tumour, he was 66 years and had only retired from his job as a Horticultural Scientist and was planning a new venture of being a Horticultural Consultant. He had been advising several countries on growing vegetables in the last few years of his life and made quite a few discoveries in developing better growing vegetables such as sweetcorn. My mother lost all heart after Dad died and she died a few years later, never truly recovering from Dad’s passing. I think it is even more special as Dad would have been 87 years old in a couple of days if he was still alive.

They left Holland to start a new life in New Zealand under the £5 scheme, encouraging people to come to a ‘new’ country leaving their home country which was devastated from the effects of WWII. I remember the stories Dad would tell me about being a young boy growing up in a war torn and occupied country. I am amazed that he survived with all the things he got up to. War had torn his family apart and the scars remained long after the war and occupation had finished.

Looking back over the photos, brought back a rush of emotions and memories of growing up. The photos had been scanned onto a CD by my sister after Mum and Dad died, so we could all have copies of the family photos. There were scanned photo album pages of both sides of their families, photos dating back to the mid 1800’s. I then recognised my own handwriting as a 14 year old girl. The memories came rushing back of the evenings and days I had spent with Dad doing the family history and tracking down all of the family that came before us, those that have enabled us to be here today. He tracked our family tree right back to the mid 1500’s and we all come from proud fishing folk from a seaside town in Holland. I got to know my ancestors through these photos and got a glimpse into what their lives were like and who they were by the facts that Dad had discovered by searching through church and court records. Back then, there was no internet or google, everything was searched through newspaper cuttings, museum records and writing to the different sources. He sourced the original photos from family members and we compiled everything into a photo album.

I then came across the photos of when they arrived in New Zealand, in their early twenties and having to adjust to a far different culture and a different language. Coming from Europe, even though it was damaged by the war, New Zealand was not as modern as Holland. I remember my mother saying that it was like going back in time. They moved from a fishing town that was just outside The Hague to a small rural settlement, where they had to live in two army huts joined together, in the middle of a huge pine forest, with the closest neighbours being 5 miles away and only being able to come into the village once a week. It was a time when females were not allowed to frequent pubs, there was no the entertainment/cafes that they had been used to in Holland post war. The condition of the cheap passage to New Zealand, was that Dad was employed by the New Zealand Government to work in the State Forests for a minimum of 2 years.

I remembered the stories that they would tell me about their life in New Zealand before I was born. When I was about 10 years old, we went on a drive to that forest to find their first home in a new country, but the army hut had long since been pulled down. They often talked about living in the small hut with no electricity or inside toilet. Far different from what they were used to in Holland. Their lighting was a tilly lamp and the heating from a wood stove, where they used to do all the cooking. Dad told us stories how they had a pet goat that used to love sitting on his lap by the wood stove. I guess many of us would not be prepared to live this way now, but they were young and it was an adventure. They even brought themselves a car after a few years. They no longer had to walk into the village or rely on others for transportation. Their pride and joy was a 1929 Ford Model T that they brought for £50. How I wish it was still around.

So, when I should have been working on pattern writing, I got lost in looking at photos, long since forgotten and recalling times long since gone. I became saddened seeing my parents looking back at me from photos taken so long ago, smiling at the camera. It was if they were smiling at me, reminding me of the good times and when they were young. I feel so blessed that I have all these photos, though only copies on the computer, but still, they are treasured windows into the lives of family who lived a full life long before myself and my daughters. A treasure that will be cherished and passed down to the next generation of the family, so they have knowledge and a record of where we have come from and can add to the record of who we are.

On searching further through the folders, I found more photos of when I was young (60’s) which brought back so many memories. I was the tomboy and spent most of my time with Dad in his workshop. He was experimenting with resin and putting objects into the resin, from insects, small animals, flowers, watches and other bits. It was still a new technique and not well known. But he did this in his spare time and was selling resin ‘fish tanks’ that were put into caravans. Some of the resins didnt work. I remember once he tried to put a dead mouse into resin but he hadn’t prepared the mouse correctly. After a while, the resin exploded and mouse ‘bits’ went everywhere! We had moved into a new house in a town as Dad had got a job working as a horticultural scientist for MAF (Ministry of Agriculture and Fisheries) where he worked with developing tomato varieties. There were so many photos of that house when I was so young and of my older sister. We then moved again in 1970 to another part of the country, where we remained.

So, even though I am a kiwi, born and bred in New Zealand, my roots stem far back in Holland where my father’s side of the family owned the fishing boats and my Mother’s side of the family worked on the fishing boats. The men worked on the boats as fishermen and the women worked on the beach sewing and repairing the nets. That was their way of life for many hundred years.

Thank you for allowing me to share with you some insight into my family heritage and the ancestors that played a part in what I am today. I come from a family of strong women who lived a hard life, supporting their men to work on the fishing boats, family that lived through a war torn and occupied period. They were also women that crafted to support their families and I have been able to carry on that skill.

So I have spent time, going through photos of past family generations, recalled old stories of past generations and memories of spending time with my parents and understanding who they were. Having these photos and memories is truly a precious gift and something to share for the next generations…. So, now that I have reflected on the past by going through these photos , ….. I really should go and get some proper work done.

Summer Collection

Featured

When getting my latest designs ready to be published and uploaded to the website today, I started thinking about the theme of the designs. These four designs were actually created over a year ago for a quilting group who were doing an Inktense/Redwork workshop. They wanted something related to summer…. So I came up with four designs, featuring something summer related. The designs went down a treat and the group thoroughly enjoyed that day. I love coming up with special designs for a particular group and workshop. It means that I have the excuse to create and draw. However, after the workshop I am usually left with a design that I now need to work out what to finish creating it into. That can be a challenge at times. Thankfully, the group knew what they wanted to make with the designs – a cushion.

Community Group – Inktense/Redwork class

It was a fun remit and I enjoyed being able to design a cushion which uses 2 ½” fabric squares to complete the front of the cushion design front. It was also a great way to stash bust and use up all the small scraps of fabric and cut them into 2 ½” squares! I remember how it took quite a while to create enough 2 ½” squares for each kit, each cushion required 70 squares! I needed about 20 kits and also wanted to be able to offer a choice in fabrics. Quick math calculations meant that it equalled a lot of 2 ½” squares! Too many for me to want to add those up! Thank heavens for my Accuquilt cutter. A pass through the machine cut 56 squares in less than a minute! It took more time to bag up 10 squares of the same fabric into the wee plastic bags!

So fast forward to 2021 and I realised that those four cushions that I designed and made for that community group 18 months ago …. Had never been finalised. The actual completed patterns had never been published. So, here we are in Spring …. The weather is definitely NOT spring like and summer is coming up quickly. It may not be a warm summer or one where we can go away on foreign holidays … but it is still summer … The months when the children are off school and hoping for nice weather so they can go away and do fun things…. So, I thought this was a great time to publish these designs so we can all dream of the best summer holidays ….

Summer Break in Connemara

I find that the hardest part of writing patterns (apart from actually coming up with the design) is writing something about the design …. Something to catch your imagination and relate back to the design …. When a design is left so long before the actual writing of the pattern, I seriously do wonder why I come up with words for the design. This is what I faced with these cushions …. The reasoning behind the wording on each cushion. Note to one self ….. write down reasons on why the design is done and how it relates… However, I seriously do wonder on my creativity at the time of coming up with the words for the designs!

So, while trying to come up with a suitable summary for the ‘Summer’ pairs – Summer Camping and Summer Huts; ‘Just’ pairs – Just Relaxing and Just Fishing, I really had to use the old brain matter and think of why I came up with the wording. The summer designs on my cushions represented a simple and relaxing summer, one where we can do nothing but relax and indulge in what we enjoy doing over the summer months. It is strange on how your brain goes when you think of something and then it gets side tracked. When you think of summer, I think most of us would immediately think of foreign summer breaks in the sun and exploring new countries. I have to admit that it is lovely going on holiday to another country to enjoy the warmer climates while exploring the culture and scenery. But is it really relaxing, doing nothing and recharging our batteries on these foreign breaks?

Summer holiday in Ibiza

But that was not what the cushion designs were about, so I thought back on my childhood summer holidays. Those memories really struck a chord. My childhood years were in the 70’s and in New Zealand. I think life back then was far different from what it is now and our expectations of summer holidays now, are not what they were back then.

Every summer, my parents would take us away camping to a beach up the coast for a month. It was a 2-hour drive and the car was packed with our tents and everything we needed, along with the caravan being pulled behind. Our excitement grew as we got close to the beach and the camping group …. The excitement of meeting up with other families that went there every summer as well and renewing friendships…. The excitement of spending the days swimming in the sea, exploring the sand dunes, pine forests and sunbathing until the sun got too unbearable. We hung out in groups, spent the days doing what we wanted to do and only going back to the caravan when we needed food. We celebrated New Years Eve at the beach. The campsite was huge and quite magical as it was set under the branches of ancient and tall pine trees close to the beach …. It was literally a 5-minute walk from the shelter of the trees, over the sand dunes and onto the huge sandy expanse of beach, which was a sheltered and safe sea for swimming …. Except if there were shark warnings/sightings …. thankfully they didnt happen that often … but enough to make you weary of swimming out too far ….

camping under the shelter of the Pine trees

Those annual seaside holidays were the highlight and created such fond memories of long hot summer days spent at the beach. Summer camping and even though Beach Huts were not part of the Kiwi Beach scene, I still loved the thought of a beach hut and often thought that the beaches would be far better with them, to offer shelter from the fierce sun and blistering temperatures. As a wild child, I spent my summers going barefoot and I still remember the times that I would go down to the beach at 9am for the day and forgot my flip flops, and having to literally jump from blade of grass to another blade of grass through the sand dunes as the sand would burn your feet and then make a dash to the wet sand so you could cool your feet! There was a summer when I spent the day playing tennis on an asphalt court and by that evening the soles of my feet had huge burn blisters from the hot ground!

So back to the beach …. When I started to think on what to write for the patterns and the blog, the memory of those annual camping holidays got me wondering about the campsite and how magical it was. I couldn’t even remember the name of it but ‘Google was my friend’! Google search brought up the name and location – Blue Bay, Opoutama, Hawkes Bay, New Zealand.

In my search, I discovered that Blue Bay Motor Camp no longer existed! The pine forest was no more. The Motor Camp that had been in operation for over 60 years and was the foundation of many families’ annual summer holidays had been forced to close in the early 2000’s. It was sold to a Property Developer who came up with the vision of creating an exclusive residential resort, a mini private haven, complete with street lighting, paved avenues and decorative sculptures and hefty purchase prices for the sites. In effect, basically it made Blue Bay, a private beach, no longer accessible to the general public.

Exclusive Residential Resort, Blue Bay

The developer finished planning the site in 2004, but he faced financial difficulties and it was taken back by the mortgagee who then sold it in 2008 to another developer. However, the site has remained dormant since then! The campsite that was sheltered by the pine trees and backed onto a beautiful beach is no more. In reading about the campsite, I found out that it didn’t close quietly. There was a huge protest and even a documentary was made of the development due to the fact that it wasn’t the only ironic kiwi camping site to be closed. The great kiwi way of life was becoming extinct. The protesters were not able to stop the development and the pine forest being bulldozed, but the exclusive residential resort never rose from the ashes…. It is still a barren plot of land with streets laid down. Reading this, about the wonderful place we spent our summer holidays at was sad. It was like part of my childhood had disappeared. But I will continue to have those memories, the days spent swimming, sun bathing, making new friends, playing hide and seek in the sand dunes and pine forest, my first kiss …. So to me, these cushions represent those summer months camping, just relaxing on the beach for weeks on end, carefree summer months of a childhood that was free ….  Even fishing on the beach or off the local wharf with our fishing lines and hook, attached to a long branch that we had found under the Pine trees ….

What childhood/fond summer holiday memories do these cushions bring to you ….. What colours would you do your summer collection cushions in ……

The Summer Collection comes in two patterns – Summer Holidays and Just Summer – with two designs in each pattern. Both patterns are in both PDF and printed form and available from our website.

National Tea Day

Featured

So, do you put the milk in the cup first? Or after you have poured the tea in?  

It is strange how such simple questions can cause such a strong debate on the correct way to drink our national brew.  

Today is the day when all the British and Irish tea lovers celebrate drinking tea. Although tea originated in China, tea is associated with the United Kingdom. This is because the British made tea a popular drink back in the 17th century. However, since tea was more than double the price of coffee, it was a drink strictly for the wealthy.  

National Tea Day came about in 2016 to celebrate Queen Elizabeth the Second’s actual birthday and has since become an annual celebration for drinking tea, with Day events organised by tea companies, cafes, restaurants, tea rooms, in other words, by businesses that are engaged in making, producing or selling tea. It is the event where tea lovers can sample and buy new teas and learn the art behind brewing the best tea. 

It is not only the British that enjoy their ‘cup of tea’, the Irish love the drink even more than the British. “Taking tea” has become an Irish custom that has been enjoyed for many centuries and today, the Irish are the heaviest tea drinkers in the world, beating the British by averaging 4-6 cups per day. 

It wasn’t until the mid 20th century when an Irish businessman decided to import tea directly to Ireland and drop the middleman, England, that the tea consumption really made it big. Before then, tea drinking was expensive and only available to the rich due to having to buy the tea from the British. Drinking tea became a status symbol and hosting a tea drinking party at home really placed you on the ladder to social success.  

So why is Irish tea so strong and drunk with plenty of milk? Well, back when the Irish had to buy the tea from the British, they received the cheaper quality tea, so milk needed to be added to cover up the taste. This meant that the Irish tea had to be brewed stronger than the English tea and this custom still exists today. 

There is a definite ritual to the Irish tea making. Ideally the tea is brewed in a teapot, which had to be scalded beforehand by swirling boiling water around in it and emptied. Then one tea bag per person and ‘one for the pot’ (that is important!) is added to the tea pot, or if you are lucky enough to have loose tea, it is one teaspoon of loose tea per person and one for the pot. Let the tea steep 3-4 minutes, but no more than 5 mins! Pour suitable amount of milk into each tea cup and then pour the strong hot tea. And there is your perfect cup of Irish tea.  

Irish Tea Ritual

I guess when you are fortunate enough to live in a damp and cold country like Ireland, a hot cup of tea is just the thing to warm the body and soul, making everything right with the world. Many a problem or crisis is fixed over many a ‘cuppa tays’.  

I remember, when visiting households (and many for the first time) the first thing you would be offered, is a ‘cuppa tay’. Even though, I am not really a tea drinker, I felt that I couldn’t refuse and somehow had to suffer through the typical Irish tea, hoping I could refuse a second or third cup of tea. Drinking tea was the way that walls could be taken down, friendships formed and a mutual ground established – all over sharing a ‘cuppa tay’. Any time during the day was the perfect time to stop and have a cup of tea, and we cannot forget the biscuits and cake that went with the tea.  

So, to celebrate National Tea day, I felt that launching my latest Redwork design was the perfect time. This design truly represents the social meaning behind drinking tea – ‘Everything’ does stop for Tea and Cake. We can’t forget the cake! The pattern (printed and PDF) is available on our website and we also have kits available. The kits come in a variety of different colour thread choices as well as the option of a pre coloured design. 

This design would grace any kitchen/dining room wall all year round and remind us just important Irish tea is to our culture and customs. It is more than a cup of tea! It is the bringing together of strangers, forging families and friendships, solving problems and warming the body and soul. 

So, do you pour the milk in first or after the tea is poured into the cup?  

Stress Awareness Month

Featured

April is Stress Awareness Month and was founded in the 1990s to help raise awareness of stress in the workplace and just how debilitating it can be. It is a well-documented fact that stress can cause or aggravate health problems. Stress is a part of our life, and nobody is immune to it, so it is vital that we know how to deal with stress when it occurs. Often, it is hard to realise that we are stressed (or that it is building up) until something snaps. It is important to learn some strategies for coping with stress when it rears its ugly head. April is all about learning more about stress and how we can deal with it.

With the current Worldwide situation in the past year, it is more important than ever to know how to deal with stress. According to the Mental Health Foundation, 74% of UK adults have felt so stressed at some point in the past year to the point where they have felt overwhelmed or unable to cope. I think it is also true to say, that this is not just limited to adult, many children and young adults have suffered from stress due to the restrictions, lockdowns and COVID.

Stress is often overlooked and not taken as seriously as physical health concerns. Stress plays a huge part in mental health problems like anxiety and depression. It is also linked to physical health issues like heart disease, digestive problems and even insomnia. Stress is generally brought on by a stressful situation, like going through a relationship breakup, financial and work related problems, placing ourselves in unknown or uncertain situations. The list is endless and what may be stressful for one person, may not be stressful to the next. We are all different and handle stressful situations in different ways.

I can honestly hold my hand up and say that over the years I have been stressed, over very difficult personal and family related situations, work related, of small issues … In some ways I have to admit that I can get stressed and the outcomes to that stress can differ. While trying to write this blog, I am thinking of situations and the times I suffered from stress.

I can think back to a few family and relationship situations that caused extreme stress. I suffered physical conditions like severe stress headaches and needed to go onto medication to manage those headaches, but it isn’t always beneficial to keep taking meds to stop the headaches. I have suffered with severe eczema, not being able to sleep or eat. To combat the stress, it helps to weed out the root of what is causing the stress. That is easier said than done.

I found it helps to find some activity that helps ‘clear the mind’, to help relief the stress. I know that crafting has helped me in so many ways, something that I have to focus on, or something that doesn’t take much thinking on I started to do counted cross stitch when I was very young and it is something that I continue to do, when I can find the time. I found that cross stitch helped me to clear my mind, I had to focus on the chart, count the squares and colours and stitch the corresponding stitch onto the blank fabric. It helped to clear my mind, I would settle myself in a cosy chair (preferably in the warm sunshine), have a cuppa and a snack and start stitching in complete silence or a good audio book to listen to while stitching. It seemed to ground me, enabled me to lose myself in the craft and usually I was able to distress myself.

Fox Cross Stitch

There would be times when I was too stressed to focus on the cross-stitching, and I would find something else that suited the way I was feeling. I found that reading books was another way for me to de-stress. I could lose myself in the story of the book, snuggled under a quilt with a good supply of drink and treats. I remember once, (many, many years ago) I needed to distress and I started reading a book, lying in a quiet peaceful place with a hot drink (or 2/3) and some freshly baked peanut brownies. Well, after spending the afternoon reading, I was totally relaxed, had finished the book. And also the entire tin of peanut brownies!!!

The past year has been no different. I found that the current situation has been extremely trying and stressful. There were so many factors to take on board and try to cope with. I have read SO MANY books!!! I have lost count, some good reads and others, just your basic trashy quick reads. Thank heavens for a kindle….

Reading Nook

With everything that happened last year, and now this year, I have found on many occasions I had to put in force some effective coping tools to help us combat the stress levels. It is all about the unknown factor and outcome of the current situation. The current lockdown has been the worse for me. There seems to be no end to this all …. It gets stressful thinking about everything, the financial issues, the future of everything ….. The way I have tried to limit my stress is to take everything day by day and not to focus too much on the unknown, to find my ‘happy place’…

My ‘Happy Place’ can change day by day, depending on the way I feel. I tend to be ‘good to myself’ – not push myself to the limits. However, what I have found from past stressful situations, I always tend to go to my crafting. Crafting has been a lifeline to me for many situations. Sitting down, and quietly creating something beautiful, seeing it emerge by your hands, something that can be treasured and remembered in the future on how it came about. Finding the time to relax and do something that we enjoy doing to help is important. It is so important to look after ourselves – we are in charge of our well-being and self-care.

During this last lockdown, I have found spinning to be my current ‘happy place’. I find it so relaxing and therapeutic to be at the wheel, listening to the whirl of the wheel as it goes around with my treadling and spinning the fibre into yarn. It is so satisfying to start with sheep fleece and spin it into yarn that can then be knitted/crocheted with. I have created something practical. There is a great sense of satisfaction to have started with a sheep fleece and creating it into a wearable item. To me, it is using my ‘downtime/de-stress time’ to do something worthwhile and practical. It may seem unpractical to some. why spin your own yarn when you can buy it? But it is my way of relaxing, grounding my inner self and de-stressing myself when I find stressed or overwhelmed … ‘my happy place’.

Spinning

Alyssa has also found the current situation stressful and I am so thankful that she enjoys crafting as well. Her crafting interests are different from mine. Her ‘happy place’ during this lockdown has been drawing, she draws portraits of the old silence movie/black & white actresses (ones I have never heard of and I have no idea how she finds them all) as well as well-known singers of the past. She is self-taught and spends hours drawing these portraits in either pencil or watercolour. Her skill in drawing and painting has improved over time as she fine tunes her already amazing drawing talent. Her needle felting has also played an important part in helping her to relax and unwind.

Alyssa’s Drawing

It is not just crafting that helps when we may feel stressed. Exercise or walking is another great way to combat stress. I have often experienced that if I am feeling stressed, a good walk really helps. Even on a chilly, windy day, it helps to blow the cobwebs away, the chill seems to clear the head and freshen up your mind. Maybe not as much if it is raining …. Yet, I have walked in the rain when feeling stressed and found that it seemed to have the effect of washing away the feelings. When I lived in New Zealand, we lived by the seaside. There were many a time that I would go and sit on the beach and listen to the waves crashing on the rocks and the sound of the gulls. There is nothing quite like walking on a deserted beach in bad weather to really cleanse and clear the mind and soul. Living in the country here has been a great stress relief. I feel so thankful to be able to walk up the lane, which is narrow and very deserted, surrounded by large open fields where Holly can explore and hunt out all the rabbit holes. It gladdens the heart and soul being surrounded by the glories of mother nature and watching how the seasons change the surrounding countryside. Nature seems to have a calming effect.

Walk in the Countryside

I have found that if I am really stressed, then I lose my appetite and just can’t eat anything. Yet, for others, stress causing the opposite effect. The common ‘go to’ food seems to be everything that is unhealthy for us, indulging in a box of chocolates, a tub of ice cream or everything ‘forbidden’ food there is. Whatever way stress affects our eating habits, we need to remember that sometimes we do need to treat ourselves, to be good to ourselves (we deserve it) but to find that ideal balance to eat sensibly.

Comfort Food

I think one of the most important things to remember when we (or others) are feeling stressed, is to feel comfortable enough to talk openly about feeling or being stressed. Stress is not to be buried in the closet like a shameful issue. We all get stressed. It is good to share our coping mechanisms. If something works for you, then it may help someone else who is feeling stressed.

Crafts can be a great tool in helping us when we feel stressed, especially when we can gather together in a safe place and share our feelings. When I started doing classes here at home, I never thought they would mean so much, far more than just a group of ladies gathering together to share a love of crafting. Those sessions became therapy, a safe place where we would gather together and find time for ourselves. The kettle was put on, baking brought out and the crafting put aside. There was many a time when there was no crafting done. The look on a person’s face when they turned up for the class, was enough to know that what they needed more than crafting was being able to feel safe, talk and express themselves and allow others to help, offer advice or a listening ear, just simple support and understanding is all that is needed at times. I have lost count at how many times the classes have been therapy sessions, with the ‘thank you’ afterwards, on how much they needed that and it helped to relief the stress they were experiencing.

Class Table

If we have somewhere to go, where we feel safe and able to take time out for ourselves, then we need to ensure that we do this when we need to find ‘our happy place’. It is hard at the moment; as social gatherings are not allowed. This makes it truly difficult, as I think that with all that is going on at the moment in the world, having social gatherings are doubly important, for our mental and physical wellbeing. Many of us live alone and have been isolating for nearly a year and have not ventured out as much as we were used to.

I know that as a person, I love my own company and even as a child, I loved nothing more than playing by myself. My mother told me (when I was an adult) that I used to get very stressed as a child, to the point where she had to give me a day off school once in a while, in order for me to de stress and just recharge myself. I have fond memories of playing for hours behind the sofa in the lounge, building cities and farms with my Lego, toy cars and animals (I was not a girly girl). I didn’t really know the reason why as I was so young, but those memories stay with me as it was ‘my happy place’. As I got older, I got interested in crafting, learning to sew on the machine when I was 7yrs and then learning to knit, crochet and do cross stitch.

When the first lockdown came, I thought that it was a dream come true – being on our own, spending the days without people and doing what we wanted. It didn’t last for long. Even if we prefer to be on our own, we still need contact with others. No amount of crafting on our own can replace human contact.

So, how does this blog connect stress awareness and Nifty Needles? I feel that a great way to become more aware of stress and how to combat it, would be by hosting some free zoom sessions, where we can ‘come together’, virtually and make time for ourselves to relax and reconnect. I will have more details on those sessions on my Facebook page and will have the link for booking onto them on the website.

Social Crafting

I also want to ‘stress’ the role that crafting can play in helping us to relax and recharge our batteries when we are feeling stressed. There are some great craft kits available on the website that is a brilliant way to help us relax and find time for ourselves. Even learning a new skill or craft is a great way help combat stress. At the beginning of 2020, Alyssa and I enrolled in a ceramics course at the tech. I wanted to find something that we could do to ensure that we took time out for ourselves. There were times when, the last thing I wanted to do, after teaching long workshops all week, was to go out in the evening (my only free evening in the week) to do a course. But, I am so glad that we made the effort and went there, even if we would rather be at home in front of the television. Once we got there and started creating, the stress just seemed to fall off. After 2.5 hours of playing with the clay we felt so much better. I also think it was also a bonus when we saw the finished product that we had. We got out, learnt new skills, and were able to ‘lose ourselves’ and relax.

Ceramics Course

How do you respond to stress? What are the ways that you have found that help you to relax and combat skill? It is a good opportunity to share your stress relief solutions to others. 

So why not, make April the month where you ensure you take time out for yourself, do some crafting and just relax and be good to yourself. Learn to notice the warning signs that you are stressed and take yourself out of the equation, even if it is only for a walk, curling up with a book or doing some crafting. Check out our website and the craft kits we have available and learn a new skill – https://niftyneedles.com/shop/

National Floral Design Day

Featured

Take out the flowers. Today is Floral Design Day. This is a day where we appreciate flowers as a unique and creative art form. It started in 1995 and was created to mark the birthday of Carl Rittner, the founder of the Rittner School of Floral Design in Boston.

I had never heard of Carl Rittner, nor his Floral School. I guess it is more because, although I love flowers and flower gardens, I have never had the creative ability to arrange flowers into a stunning creative display. I love Cottage gardens with wild masses of colour and disorder, where the flowers and plants take care of themselves. I had a lovely cottage garden in New Zealand and I still miss it. It was a riot of colour which created a sense of peace and tranquillity to spend time in. The old cottage was built on the side of a hill in the middle of the city. Living there, you were able to forget that you lived in a city. Access was a huge problem, as there were sixty steps to get to the house through a small forest and if you wanted to continue down the hill, there were another sixty steps to the road below. It was a hassle when you brought the groceries home in the rain or dark. The garden was over four different levels of terracing which were not developed. It created a challenge but one I loved. I created mini garden rooms on each terrace area, with stone paths throughout where the flowers and plants overhang and opened to small ‘hidden’ areas where there was a garden seat or a fish pond. Each area had its own charm and design. The New Zealand weather made it easy to create such a garden.

New Zealand Cottage Garden

Living here in Northern Ireland has meant that I can no longer grow or have the garden that I had in New Zealand due to the difference in climate, but there is still the ability to create a beautiful garden in Northern Ireland. There are just different plants. What I love most about being here is the ability to visit and experience magnificent Stately homes and their equally magnificent gardens. There is nothing better than spending a warm (dry) summer’s day enjoying the beauty and peacefulness of beautiful large garden of a stately home. The gardeners from past centuries were true artists and designers, creating amazing masterpieces filled with sculpture and beauty, that have lasted throughout time so it can be enjoyed today, and for many more years.

Grand Estate Garden

So, I may not be a floral designer and have no intention of showing off my very poor ability to arrange an amazing floral design, but there are other ways we can show our appreciation today and that is by drawing a lovely floral design or even just basically picking a bunch of lovely wildflowers and putting them into an old china jug. I knew a lovely lady who had this amazing skill of flower arranging. She went to a floral class every week for many years. I admired her ability of taking some flowers and ‘weeds’ and put them together to create a masterpiece. Her work was inspiring and I was most honoured and humbled when she presented us with a festive arrangement every Christmas to grace the table over the Christmas period.

Christmas Decoration

Though my talent does not venture as far as floral design, I do have the ability to paint. For many years I loved using water colours and black ink to create some floral drawings, which now hang on my walls. It was a craft that I found relaxing and took me to many a peaceful place where I could spend hours being creative with paper and paint.

Water Colour and Ink

However, as the years passed, life got busy and business affairs took over. I found I was being creative in other ways and I just didn’t find the time to be creative with my painting. I missed it. But I still found a way to bring in floral designs into my sewing and embroidery creativity. I took it a step further and brought in colour and painting into my needlework designs which would back the passion of those watercolour floral paintings from years previous.

I get such a joy and pleasure from being creative with drawing up designs, colouring and embroidering them and incorporating them into my designs for sewing and quilting. It really enables you to bring in your own creativity and personality into these designs. For me it is the way I can be creative with flowers. Last year I designed a number of floral designs, some for planned workshops with community groups and some just ‘for no reason at all’. When planning my yearly structure this year I thought that releasing my Inktense/Redwork floral designs today, would be a great way to celebrate National Floral Design Day. We may not be floral designers, gardeners or painters, but I know that we all can colour in and sew. So why, not celebrate today and the start of Spring with these lovely cushions and set of floral mug rugs.

Cushions DUO

I chose Daisies and Blossoms for the cushion covers, because they are such cute and simple looking flowers and loved by (nearly) everyone. Daisies symbolise innocence, new beginnings and purity. Most of us have fond memories of when we were young (and maybe not so young) spending relaxing days in a field of daisies, where we created daisy chains to wear in our hair, seeing who could create the longest chain by threading a string of daisies threaded together by their stems or even pulling the petals off, one by one, to see if ‘he loves me, he loves me not’. I love a daisy chain, it brings forth so many memories of being young and innocent.

Daisy Chain

Blossoms bring to mind the start of spring as the bare branches of the hedgerows on country lanes start to bloom. The brief blossoming of Rowan, Wild Cherry and Hawthorn is a magical sight, thinly wrapped in ancient folklore. The sights of the emerging foliage, the scent of the blossoms reminds us that we have emerged safely from another long winter with the promise that the world is alive with new possibilities.

They are a great way to use up your scrapes of fabric. The front of the cushions has two Redwork panels which are joined together with 2 ½” squares. You can get totally scrappy and use up all those fabrics, or you can do what I have done, and cut squares from 7 different fabrics in a colour range. There is no need to use Inktense colouring if you have no pencils or just want to do it in Redwork.

The pattern does have instructions on how to do the Inktense colouring and is also fully supported with full colour diagrams and easy to follow instructions.

With the coming of Spring, there is nothing better than being able to relax in a peaceful and colourful garden, under the shade of a flowering Blossom tree, comfy in a chair surrounded with lovely handmade cushions reading a good book (or maybe doing some stitching) and a cool drink. To complete the scene, a set of handstitched mug rugs to grace the outdoor table is exactly what we need.

I have designed four floral designs full of colour for the mug rugs. I have to admit that these would be my favourite flowers and I loved drawing these up. Being able to colour and stitch them is the best part of the design as you can really bring to life these flowers. These are a quick design to make up and if you are not into Inktense colouring than these designs would look equally as stunning in Redwork, either in one colour or multicoloured. Why not make up a few sets, one to keep and a few to gift?                                                 

So, to celebrate National Floral Design Day, we don’t need to be a master Floral Designer. All we need to do is create some stunning floral creations in our own way – by sewing and stitching.